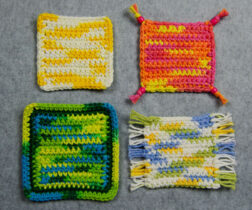
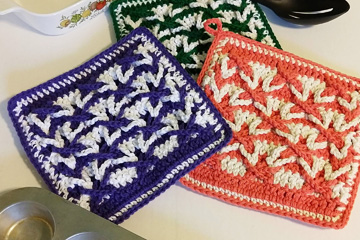
If you’re a beginner crocheter (or just like to crochet quick, easy projects), I have a FREE beginner coaster pattern, along with 2 YouTube videos for you. This coaster is an easy, beginner pattern that anyone can successfully make. In the 2 videos, I teach you how to do the center of the coaster in rows of single crochet. I also teach you to add any of the 4 edging options to your coasters: 1 round of sc, 3 rounds of sc, corner beads and tassels or side fringe. Here’s a look at the coasters in the video:
As you can see, you can make your coasters in any colors you like. I’ve chosen different colors for the coasters in this FREE pattern to make each of these 4 different coaster finishes distinct! However, I made a set of coasters for our home in colors that coordinate with our living room.
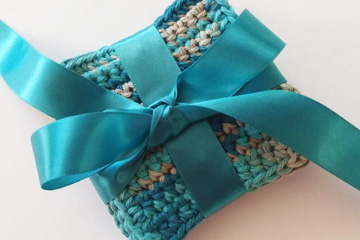
These coasters make great gifts and are very economical to make. One skein of yarn, that costs around $2 – $3, is all you need to make a set of 4 coasters.
I hope you’ll give these easy, beginner coasters a try. Please let me know if you like this coaster pattern and if you have any questions about the pattern, please don’t hesitate to ask. I’d love to see photos of your finished projects!
I’ve been keeping very busy with various projects during the first 3 months of COVID-19. If you’re anything like me, you’ve completed lots of crochet projects, too! But that’s not all I’ve been doing.
Since my husband retired last year and has more time on his hands in retirement, we figured it was time that I got started on one of my business goals/dreams! So without further ado, here’s my big announcement!
I’ve started a YouTube crochet channel!!!
I’ve wanted to do this for many years, but I’m not very “tech savvy”! However, my husband is! He’s got so much more knowledge and patience than me with anything electronic! I have plenty of patience with other things, like crochet and teaching, but NOT with electronics and tech things!
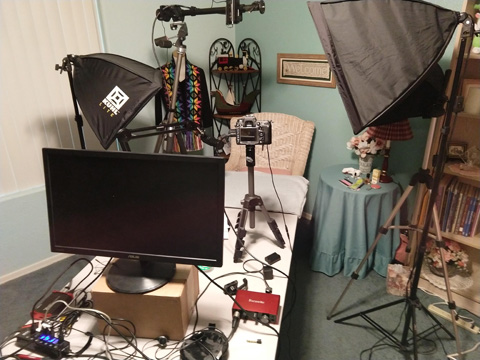
Starting my YouTube channel has not been without it’s challenges! We’ve had all kinds of issues with the audio and have put in countless hours to try to correct it. It’s sometimes still an issue, but we’re improving all the time. The lighting hasn’t been as much of a challenge because we already had the lighting for photographing my crochet patterns.
Three months ago, we took apart our guest bedroom and converted it into our video studio. Here’s a look at our new studio:
I’ve got a handful of videos published on my YouTube channel right now and dozens/hundreds of ideas for lots more videos to help YOU be successful with your crochet projects! Right now, I have videos for absolute beginners, from how to hold the hook and yarn to how to make the basic stitches and your first crochet project. I’ll be doing videos on lots of crochet techniques and stitches, as well as videos to support my self-published crochet patterns. I love lots of fabulous crochet techniques, but trying to explain how to do them in a written pattern can be challenging. Having videos to accompany my written patterns will be very helpful to explain and demonstrate the more complex parts of the patterns.
I’ve been teaching crochet for 15 years now and I learn a lot from my students, which helps me be a better teacher. I learn how things can be interpreted differently by others and how I can explain things better to my students.
If you’d like to check out my YouTube crochet videos and subscribe to my channel, that would be wonderful! Please let me know what type of crochet videos you’d like to watch to help you learn the stitches and techniques that interest you. My goal is to help you in your crochet journey so that you enjoy crochet more every day!
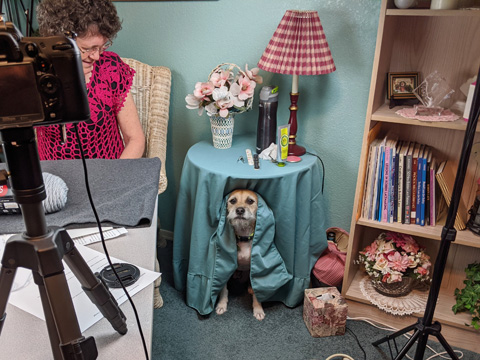
Every good venture needs a mascot, right? Well, here’s our mascot, Maggie, who usually lays down either under the side table covering or behind my chair while we’re working on videos. She just loves being with us and is so quiet in the video room! She’s come a long way since we brought her home almost 5 years ago! She used to chew a lot of things and very rarely does she chew anything of ours now.
I hope you’ve enjoyed this look at my new YouTube channel and will take a look at my videos to help you be successful and increase your crochet knowledge and skills.
I hope this finds you and your loved ones doing well, both mentally and physically during the COVID-19 pandemic of 2020, no matter where you are in the world. I hope you’ve found some projects to crochet, knit, sew, etc to keep you busy, safe and mentally healthy during this trying time in all of our lives. Since my husband retired a year ago this month, our daily routine hasn’t changed that much. However, I know there are so many others whose lives have been turned upside down by this virus, the social distancing and the loss of their jobs (or the need to stay home from their usual work environment). The stress that can come during these times, even when we think we’re taking good care of ourselves, can be overwhelming at times. As for myself, I sometimes have waves of “fear of the unknown”, even without this current pandemic! When this happens, I often need to talk to someone (usually my husband) and pray that God will ease the fear in my heart and body. I pray that you’re taking good mental and physical care of yourselves and your loved ones during this challenging time in all of our lives.
Now for some crochet “eye-candy”!
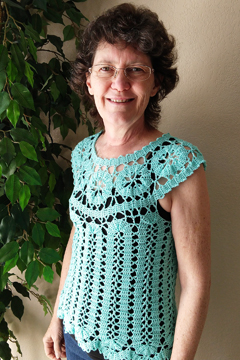
I’ve been staying busy with various crochet projects during the past 3-4 weeks of the COVID-19 social distancing. I’d like to share photos of 3 projects that I’ve crocheted during these 3-4 weeks. Since I’ll be teaching the techniques of Irish Crochet and Bruges Lace Crochet at the IOLI Convention in Mesa, AZ in July (as long as it doesn’t have to be cancelled due to the virus), I decided to crochet a Bruges Lace top. Here’s a photo of me wearing that top:
Bruges Lace Shell
As you can see, it fits me pretty well. Bruges Lace Crochet is a wonderful technique, made with narrow rows of crochet stitches (usually dc), called “tapes”. You can curve the tape around into various shapes, such as the circles in the yoke of this top and the long, narrow ovals in the body of the top. This pattern didn’t come with the lowest edge that you can see in this photo. When I was done with the pattern, I decided to add that round to lengthen the top slightly.
For this top, I used some yarn that was in my stash. I purchased this 100% acrylic yarn (it looks and feels more like cotton) at the 2015 CGOA Conference in San Diego, CA from the show floor vendor, Newton’s Yarn Country, located in Anaheim, CA. The pattern, called “Bruges Lace Shell”, can be found in the book, “Lacework for Adventurous Crocheters”, by Margaret Hubert. Amazon has the Kindle edition of this book for $11.99 here. This design is by Tatyana Mirer, who is a fabulous Bruges Lace Crochet designer! I won’t be teaching anyone to crochet a Bruges Lace garment in my IOLI class, but I’ll teach my students everything they need to know in the Bruges Lace Crochet technique to be able to crochet a Bruges Lace garment, if they so wish!
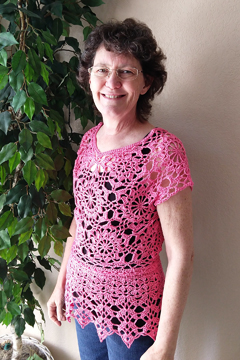
Here’s the 2nd garment I crocheted:
Andromeda Peplum Vest
This is a wonderful design! It’s called “Andromeda Peplum Vest”, and is designed by the very talented Doris Chan. You can find this pattern, along with many more, in her book, “Convertible Crochet”. Amazon has a Kindle edition of this book for only $7.99 here. I’ve had this book for 5 or more years and always meant to crochet this top, but never took the time to get started on it. Once I did, I found it a fun top to crochet! I used 9.2 oz/260 grams/6 balls of Patons Grace yarn, which is 100% cotton, for this garment. I had 9-10 skeins of this yarn leftover from editing crochet patterns for Rita Weiss and Jean Leinhauser many years ago and I’ve been wanting to make something with it for years! I’m very happy with how this top turned out!
Since I have a little “challenge” with gauge, I had to crochet the top part of this garment twice, once with the smaller G (4.0mm) hook and again with the larger #7 (4.5mm) hook. I tried the bodice on after crocheting all the motifs and it was somewhat snug, especially in the armholes. I knew I needed to make it larger or I wouldn’t be happy with it and possibly wouldn’t wear it, which would be a huge shame! I decided to rip out all the motifs and remake them (I was able to reuse most of the yarn because I could crochet the 5-sided motifs with the yarn from the 6-sided motifs without having to add more yarn, which would mean more ends to weave in!).
I learned something new with this pattern (besides getting and keeping gauge): what a “peplum” is! This top has 3 pieces: the top V-neck vest, the bottom “peplum” and the draw string that connects the two halves. I have a friend in CGOA who has made quite a few of these tops. Each one looks fabulous on her!
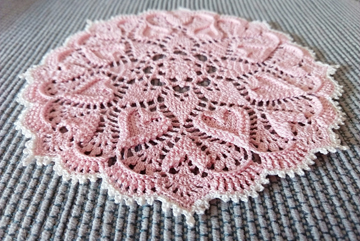
Here’s the 3rd project I made:
Sweetheart Soiree Doily
This is the “Sweetheart Soiree” doily, designed by Julia Hart of www.draiguna.com. This is a fabulous doily design with lots of texture, due to the use of post stitches. Julia doesn’t just use FPdc and BPdc in this doily. She uses 2-FPdc decreases, 3-FPdc decreases, 4-FPdc decreases, special FPdc decreases, 2-FPdc clusters, as well as 3-dc clusters and 4-dc clusters! With all of these special stitches, the doily has lots of visual interest and lots of beautiful texture! Don’t you agree?
I didn’t find enough light pink cotton crochet thread in size 10 in my stash for this doily, so I chose some size 20 pink thread instead: DMC Cebelia in #818 Baby Pink and what I think is Ecru (I don’t have the color number with this ball, so I’m just guessing at the color for it). I used a #10 (1.3mm) steel hook, also. I blocked the doily afterward to give it a nice, crisp look!
If you’d like to make one of these doilies for yourself or a loved one, you can find a pdf of the pattern for $1.00 on Ravelry here. Or you can find the pattern for free on Julia’s website here.
I enjoy designing my own patterns, but I also enjoy crocheting/knitting other designers’ patterns! I learn so much from making others’ designs, which helps me be a better designer, too!
As you can see, I’ve been keeping myself busy this past month during the COVID-19 pandemic. What have you been doing to keep yourself busy while staying at home?
I hope everyone is enjoying National Crochet Month, which takes place every year in March. What will you do to celebrate your love of crochet this month? Will you learn a new crochet technique or find a crochet designer who is new to you? Will you start or finish a crochet project? How about trying a new yarn that you’ve never used before?
If you’d like to learn Irish Crochet or Bruges Lace Crochet in person, please consider signing up for one of my classes at the IOLI Convention in Mesa, AZ. This convention takes place the week of July 20-26 at the Hilton Phoenix/Mesa. I’m really looking forward to teaching these classes and meeting new people there! To find out more about this convention, check out the IOLI website. There are lots of other lace classes being taught at the convention, as well!
March is also a month to be grateful, especially for the knowledge and ability to crochet. There is so much for each of us to be grateful for in our lives. I’m grateful for my family, friends, a place to live, good health, and so much more! Crochet is another blessing to me and I’m very grateful for the ability to do what I love! I’ve met so many wonderful people throughout my crochet adventures and made many friends, near and far, because of crochet!
To celebrate National Crochet Month, I’d like to share a small blessing with you this month. You can enjoy a 25% discount off every one of my crochet and knitting patterns right here on my website throughout the whole month of March. To take advantage of this discount, use the code “NatCroMo2020” when you checkout.
I hope you enjoy National Crochet Month by trying some new patterns and/or expanding your crochet skills and knowledge, either face-to-face with someone, through in-person classes or online classes. If you’d like to try a few of my free crochet patterns, check out my “Free Patterns” page!
Do you love crocheted afghans and/or rugs, but you don’t have the time or expertise to crochet them yourself? This is your lucky day! I have a sale going on that you don’t want to miss!
If you’ve been eyeing one of my finished crocheted afghans or rugs in my Etsy shop, now is the time to make your purchase! I’ve discounted the finished afghans and rugs in my Etsy shop by 10% until the end of day on March 4, 2020. So get them while they’re on sale, before they’re gone (or their listings expire)!
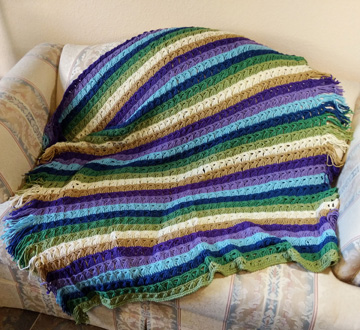
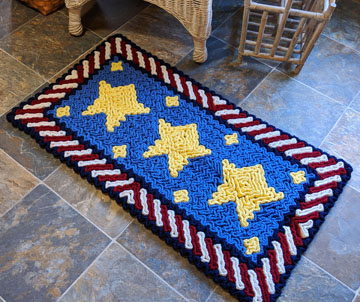
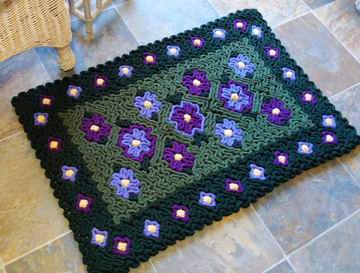
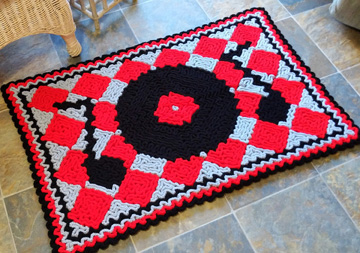
Here are the 3 crocheted afghans and 4 crocheted rugs that are on sale in my Etsy shop:
Reversible Popcorn Ripple Afghan
Filet Bouquet Afghan
Broomstick Lace Afghan
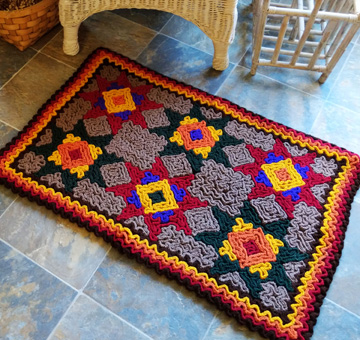
Star Spangled Rug
Flowers Rug
1950s Music Rug
Quilt Rug
The afghans are made in various crochet techniques, while the rugs are all made in the wiggly crochet technique.
I hope you’re inspired to decorate your home with one of these beauties (or snatch up one for a loved one)! Here’s the link to these afghans and rugs in my Etsy shop.
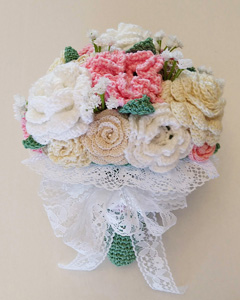
Do you love fresh flowers at weddings, but don’t like it when they wither afterwards? Can you imagine a bridal bouquet and boutonniere that don’t wither? These beautiful crocheted floral pieces are such keepsakes and can be friendly on the wedding budget, as well!
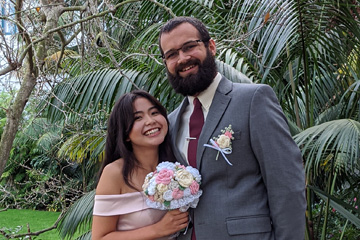
In November of 2019, I was inspired to create this bouquet and boutonniere for my youngest son’s wedding in December (it only took me 3-4 weeks to complete both pieces!). They didn’t want to spend a lot of money on a wedding, so they got married at the local courthouse. It was a beautiful day spent with our children and grandchildren celebrating our son’s marriage and our new family member (yay for adding another daughter-in-law to the family)!
My youngest son & his beautiful new bride!
So what’s a crochet designer supposed to do when she gets the urge to create something new? I did what I almost always do: get inspiration on the internet and in published crochet patterns to see how others are making their crochet designs (and I looked at photos of real floral bouquets, as well)! I saw lots of ideas and gleaned a lot from those patterns. I’m pleased with my finished bridal bouquet & boutonniere and I’m very excited to share this pattern with you on my crochet pattern page here!
To celebrate the launch of this new pattern, I’m offering $1.00 off the price of my Bridal Bouquet & Boutonniere pattern with coupon code “BBB1off” from today through next Monday, January 27, 2020.
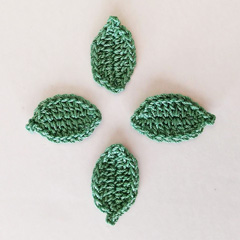
Leaves for bouquet
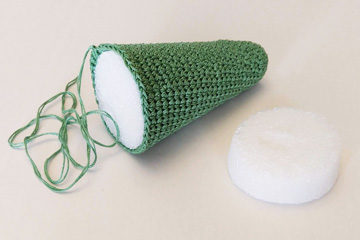
Covered Styrofoam cone for bouquet
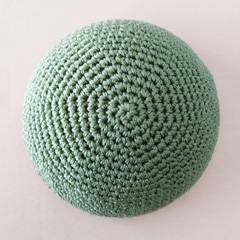
Covered Styrofoam half ball for bouquet
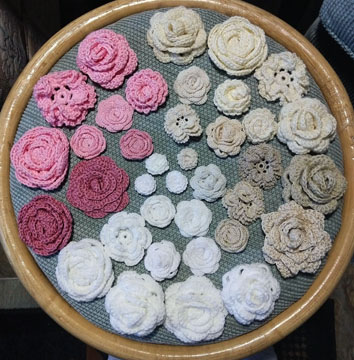
This pattern includes a list of all the materials I used to make both pieces. I used yarns and crochet threads for the flowers, leaves, fern and Styrofoam coverings. The pattern also includes specific instructions to crochet the leaves and the coverings for the 2 Styrofoam shapes: the half ball and the cone. Step-by-step assembly instructions and photos are included for the bouquet and boutonniere.
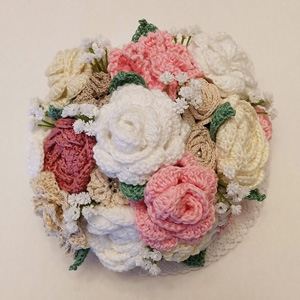
Crochet flowers for bouquet
PLEASE NOTE: The pattern does NOT include specific instructions for crocheting the flowers on both pieces and the fern on the boutonniere. I used some free patterns for some of the flowers as well as some paid/copyrighted patterns for both the bouquet and boutonniere. In the pattern, I have included photos of the flowers, information about the name and designer of each flower/fern pattern and links to where you can find or purchase the flower/fern patterns that I used. Because of US copyright laws, I did NOT include the specific instructions to make these pieces. I did, however, include information about the changes I made to the flower and fern patterns, which can be used in conjunction with the free and paid patterns themselves.
You should use any crochet flower patterns, as well as colors of yarn and/or thread you choose to make your bridal bouquet and boutonniere. If desired, you could use an artificial fern piece for the boutonniere instead of crocheting a fern (and stiffening it with wire). You could also use artificial leaves instead of crocheting the leaves.
Let your imagination run wild to create a one-of-a-kind bridal bouquet and boutonniere for a friend or family member! You’ll be glad you did!
I’d love to see your finished bridal bouquets and boutonnieres! Please tag me (or send me an email) so I can share your bouquet and boutonniere success with you!
Happy New Year to all of you! I hope you had a wonderful 2019 and are looking forward to a great 2020!
What kind of New Year’s resolutions do you have for this year? I’m resolving to self-publish more patterns this year than I did last year. Last year I self-published 4 designs: Scarfie, Cowlie & Hattie; Sassy Stripes Baby Blanket (knit); Polish Stars Potholder; It Takes All Colors Snowflakes Afghan. But that’s more than the previous year when I didn’t self-publish ANY designs! However, I was working hard on my 2 Annie’s videos in 2018 (Crochet ER: Fixing Damage & Mistakes and Learn Filet Crochet), so self-publishing took a back seat that year! If you’d like to take a look at my new Annie’s videos, you can find the Crochet ER video here and the Filet Crochet video here.
I have a stockpile of crochet and knit designs that I’ve designed over the past 5 years and they’re beginning to get out of hand! So my biggest New Year’s resolution is to self-publish a good amount of those patterns this year (and over the next few years, as well!). I like to make sure my patterns are as clear as they can be before publishing them, so I don’t like to rush things! And I also get distracted with other things along the way (are any of you like that or is it just me?)!
A year or two ago, I came up with a new twist on a crochet technique and I’m eager to release a few patterns using that new technique twist to the public so you can enjoy this new twist, too!
Did you learn any crochet techniques last year? Are there any crochet techniques that you’d like to learn this year? I love learning new techniques/skills and passing along what I’ve learned along the way to the students in my classes, whether that’s in person or through videos!
I’m very excited to announce that I’ll be teaching 2 crochet techniques at the annual IOLI Convention (International Organization of Lace, Inc) in Mesa, AZ in July of this year! I’ll be teaching a 12-hour class on Irish Crochet and another 12-hour class on Bruges Lace Crochet! I’ll also be teaching two 6-hour classes on Irish Crochet. This all takes place the week of July 19 – 25, 2020. For more information about this convention, check out the IOLI website here. There are lots of teachers and lace techniques being taught. It’s going to be a fantastic convention!
Here are photos of the projects in my 12-hour Irish Crochet and Bruges Lace Crochet classes at the IOLI Convention:
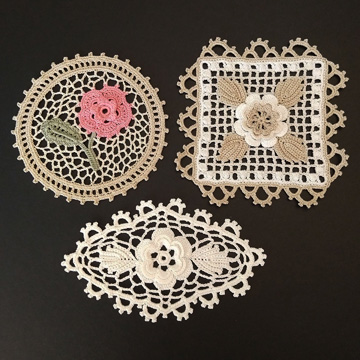
Irish Crochet class projects
Bruges Lace Crochet class projects
Here is a direct link to my 12-hour Irish Crochet class. And here is a direct link to my 12-hour Bruges Lace Crochet class.
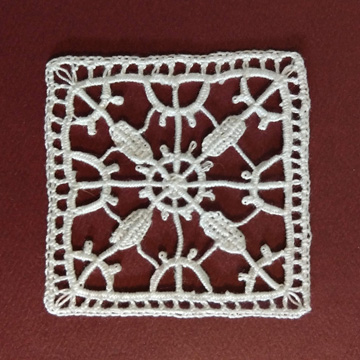
Since I learned to do bobbin lace 2 years ago this month, I’ve been even more fascinated with all kinds of lace techniques: crochet, knit, bobbin lace and more! I’ve gone to a couple of Lace Days that the IOLI Lacey Ladies Guild puts on in Phoenix, AZ and I’ve just begun to learn a needle lace technique called Aemilia Ars. This is my first attempt at making that lace:
My first Aemilia Ars needle lace piece
It’s by no means perfect, but it’s a start! I have a long way to go in improving my needle lace skills, but at least I’ve made the initial jump into learning how to do this gorgeous lace technique! It’s challenging to learn a new skill or technique, but it’s a great way to keep our brains active!
I hope you all have a great year learning new things and improving your skills. I look forward to meeting some of you at the IOLI Convention in July!
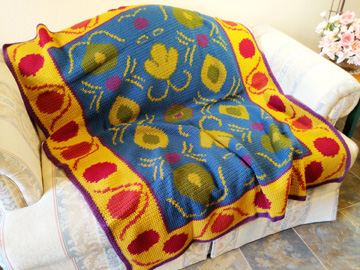
I’m pleased to announce that I’ve just self-published my “It Takes All Colors Snowflakes Afghan” pattern! This pattern was previously published on the Mainly Crochet magazine website, but that website is shutting down by the end of this year. So I thought it was high time that I made this pattern available as a single PDF download, not as part of a subscription.
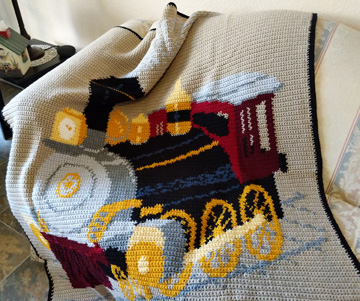
So without further ado, here’s a picture of this colorful afghan:
It Takes All Colors Snowflakes Afghan
I LOVE the colors in this afghan and the design (I’m partial to snowflakes and snowmen)! I designed this afghan after a knit sweater that I had in my wardrobe with these colorful snowflakes on it.
This afghan is made with rows of single crochet, mostly in the back loop. There are color changes in most of the rows to form the snowflakes. Since all of the rows are worked on the right side and there are so many ends because of this, I decided that it would be best to turn the ends into fringe instead of weaving them in, which would distort the edges (there are 2 ends/tails at the beginning and 2 ends/tails at the end of each row).
This pattern is both written and charted. I have included some step-by-step photos of several aspects of the pattern, which you can read about on the pattern page.
If you’d like to check out this pattern, here’s the link to the pattern page. This pattern is available for $5.95 and would make a great addition to any holiday celebration (or just to use to help you stay warm)!
To celebrate the release of this pattern, I’m offering a 25% discount on this pattern from Nov. 14 – midnight, Nov. 16, 2019 with the code “snowflakes”. The code is only valid here on my website. Since I live in Arizona, it’s for Arizona time, which is 2 hours behind New York and 1 hour ahead of California (at this time of year).
If you like the looks of this snowflake afghan, but don’t want to commit to a large project like this, my Stained Glass Snowflake Scarf is made in the same technique and takes a fraction of the time to make!
My husband and I have finally come to the point in our lives when it’s time to de-clutter our home (he’s retired now and I’m thinking about retiring)! So our loss is your gain!
For many years now, I’ve been storing a lot of crochet projects that I designed and made for publication in various books and magazines. I’ve finally decided that these lovingly-made items need to go to homes where they’ll be used and enjoyed (we can only use so many afghans and such at our home)! So I’ve decided to list them online for sale through my Etsy shop.
If you’re looking for a one-of-a-kind gift for the upcoming holiday season, check out my Etsy shop and see if there’s something that would be just right for someone on your shopping list (or for yourself).
Here’s a look at the current items I have for sale in my shop (5 crochet afghans and 4 wiggly crochet rugs):
I’ve been meaning to publish this pot holder pattern for several years, but everyday life has been getting in the way! That’s not a great excuse, but I’m going to run with it!
I first learned to do the Polish Stars crochet technique many years ago. I can’t remember if I took a class or learned it through a pattern. The original way to work the Polish Stars technique was a little jumbled (in my opinion), so I made a little adjustment to the technique, making it easier to do!
I’ve seen a few videos on this technique. In one of them, the stars are woven incorrectly, making the end result look pretty bad! So I decided I’d better add more information and a weaving diagram to the instructions in this pattern to make it easier to learn the technique and execute it correctly. I plan to make crochet videos in the near future (God willing) to help others with their crochet skills and knowledge. This is one of the techniques I’ll cover in those videos.
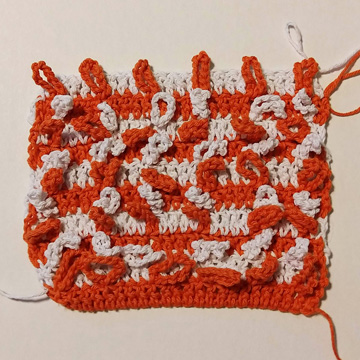
If you’ve never done the Polish Stars technique, let me tell you a little about it. Basically, you crochet rows of stitches with 2 solid contrasting colors, alternating the color on every row (I’ve used extended double crochets in this pot holder, which I explain how to make in the pattern: they’re between the height of a dc and a tr). Within those rows of stitches, you work chain loops per the instructions. When the instructions say to weave the loops, you do that, then you crochet the last row of the pattern, which secures the chain loops in place.
Pot Holder front before weaving chain loops
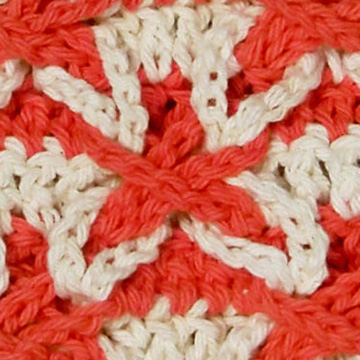
Polish Stars close up
Like I said, I’ve included a weaving diagram in this pattern, which shows how each chain loop is woven into the appropriate adjacent chain loop. There are also detailed written instructions for weaving the chain loops.
Since I LOVE symbol crochet charts, I included one of those for the front of the pot holder, for those who also enjoy working from a symbol crochet chart.
Polish Stars Pot Holder front
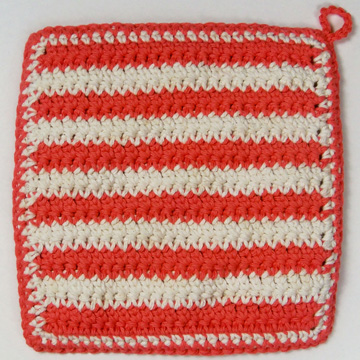
I included 2 layers in this pot holder design. The front has the stars and the back has stripes to mimic the colors of the rows worked on the front. However, there are no chain loops on the back. The purpose for the back piece is to make the pot holder thicker and eliminate holes that fingers can go through. With 2 layers of cotton yarn, the pot holder is safe to use in the oven (no fingers will go through to touch hot casserole dishes, cookie trays, etc).
Polish Stars Pot Holder back
I hope you’ve enjoyed this look at my Polish Stars Pot Holder pattern and that you feel more confident to give this crochet technique a try very soon! If you’d like to give this a try and make a unique pot holder, check out the pattern here.