I have a guest blogger again this week. It’s Jenny King, who I met at a CGOA Conference sometime in the past 12 years (I can’t remember exactly which year it was)! Jenny has a fantastic crochet class on Annie’s and I’ll let her tell you all about it! Be sure to read all the way to the bottom to enter to win a free Annie’s class!
Jenny King in her Bavarian Crochet class
G’day my name is Jenny King and I am an Australian crochet addict!
Let me come visit and sit down with you and show you just how to do Bavarian crochet. Yes, at your place. In this Annies online class you will feel like I am there. I will do what the Mother and daughter from Bavaria had endeavoured to do in Australia and that is how to create the beauty of Bavarian crochet without need for translation. You will love it and you will become addicted.
I walk you through the process slowly and repeat myself so much that you may nearly get sick of hearing my Aussie accent telling you to pull through 2 and pull through 2. I am grinning ear to ear as I say this to you.
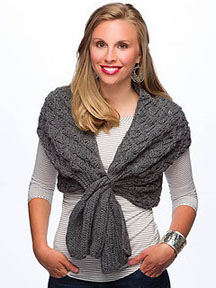
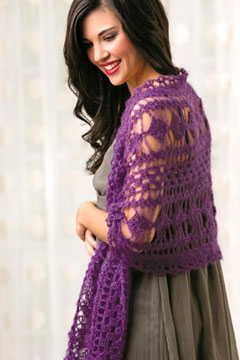
Bavarian Wrap
We start with a headband working in a simple strip to demystify the stitch and its 2 row repeat. Although this class is taught in USA crochet terms I couldn’t help but tell you how to do it in the terms used by the rest of the English speaking world so no-one gets left out. So if you live in the United Kingdom, South Africa, New Zealand or Australia you will be able work along with me as well.
I originally wanted to call it this the Mystery history stitch as the origins of this amazing stitch eluded me for over 15 years of thorough searching. I even took samples to USA to consult with the experts. Funnily enough all searches led me back to my own state of Queensland, Australia. You can hear all the history as I explain the stitches.
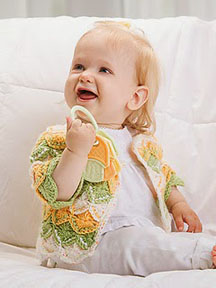
Baby Crop Cardigan
I have simplified this original Mother and Daughter design and instead of only working it in a square I have experimented to make all manner of shapes . Let me show you how to do this stitch in a long strip as a scarf, as a decorative edging on slippers, and finally extend your skills to create a top-down seamless baby jacket, and nearly everything else in between.
I should warn you though that Bavarian crochet is just delightful and you may become addicted. It can be worked in any color combination of your choice or you can experiment with the wonderful textured stitch if it is done in just one color as in the wrap vest in charcoal. That is just Yummy.
See you soon at your place. I can’t wait.
Jenny
So now you know something about Jenny’s Bavarian Crochet class. To learn more about Jenny’s class, just visit the Annie’s website here. To learn more about Jenny King, visit her website here.
Now, as promised, here is the information about my giveaway of a free class from Annie’s! To enter, just leave a comment on this blog post. I’ll pick the winner at random at the end of this month and will announce it right here (and I’ll send the winner an e-mail, too). There are so many great classes at Annie’s! To see all of the classes offered, check them out on the Annie’s website.
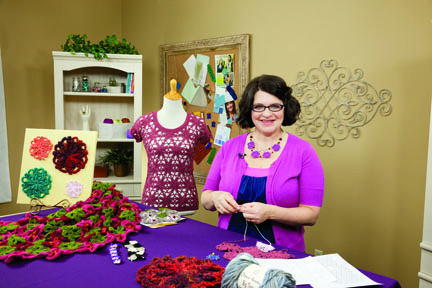
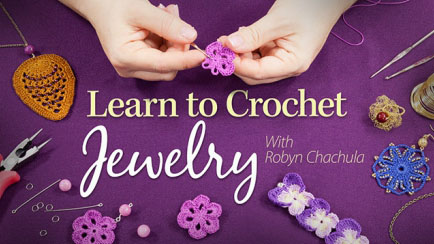
Today I’m featuring a guest blogger who has been in the crochet business for many years. Please welcome Robyn Chachula, who will be talking about one of my favorite things to crochet with thread: JEWELRY!
Robyn’s Jewelry class
I love jewelry. I love big bold funky statements to delicate classic beauties. I never feel truly dressed until I am wearing a matching necklace. My kids have other ideas. In steps crochet to my rescue. Instead of worrying about yet another “mysteriously” missing necklace my daughter borrowed or another being used as a teething ring by my son; I know I can fix all. With a few quick techniques, I know I can whip up overnight any ring, bracelet, or necklace for any outfit. So no more stress about ruined favorites, instead my little pumpkins are just giving me more opportunities to crochet!
Flower Motif Necklace
Before I started crocheting jewelry, I thought I would need a ton of equipment and tools to get a true professional look. Boy, I was mistaken. In class, I walk you through exactly what you need to make your perfect accessory. And most of them are probably sitting in your yarn bag or toolbox right now. We will talk about a few tools that you might want to get after you get completely hooked, but for the most part your main tool will just be your hook.
Learn to Crochet Jewelry class at Annie’s
The most important tool I try to stress is understanding crochet patterns. Whether you are looking at a modern stitch dictionary with all the directions completely listed or an antique crochet leaflet with just some diagrams; I want to make sure you are totally in control. In class we will de-mystify crochet diagrams and sharpen our skills at reading patterns. We go through learning patterns and diagrams so you can grab any stitch dictionary and be able to turn an edging you love into a bracelet or a motif into a ring.
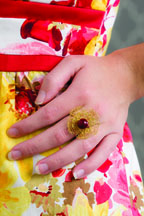
Golden Petals Ring
What do I want you to make jewelry out of? Anything. In class, we talk about all materials from basic crochet thread, to thin gauge wire, to leather and hemp; and even end with yarn. The materials do not make the jewelry, you do. So we talk about how to dress up or down the material you are working with. One basic way is using metal chains, jump rings, and beads to connect your crochet together. In just a few steps, I show you all you need to know to attach your beautiful crochet together into fantastic jewelry. One word of warning, is the jewelry techniques I show you in class are so simple it is very easy to slip into another hobby and love every minute of it.
The best part of creating and making jewelry is it always cheers up my day. Any day I get to crochet for a few minutes is great. To be able to then wear something I made the next day, even better. Hope you will join me in Learn to Crochet Creative Jewelry class. I truly can’t wait to see what you can create!
To find out more about Robyn’s “Learn to Crochet Jewelry” class, see all of the projects in the class and watch the introduction video, visit Annie’s website here.
To learn more about Robyn Chachula, visit her website here or her blog here. I think Robyn will be holding a contest to win her class this month, so visit her blog and enter to win! Her class looks absolutely fabulous to me!
I hope you’ve enjoyed my guest blogger, Robyn Chachula, today. I’ll have a guest blogger during each of the next 2 weeks, so check back to read what my other 2 guest bloggers have to say about crochet!
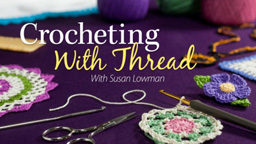
Leave a comment on this blog post to be entered to win my Annie’s class, “Crocheting With Thread” (or another Annie’s class of your choosing). During the next 2 weeks, you’ll have 2 more chances to enter to win the class (one chance per week). I’ll pick the lucky winner at the end of this month. So if you’d like to learn to crochet with thread, this is the class for you!
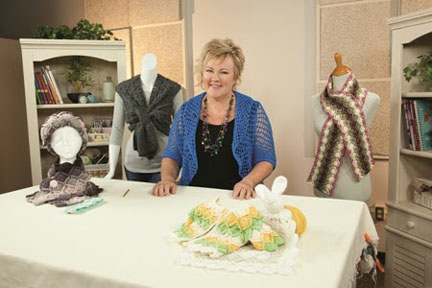
During the month of June, I’ll be participating in a “Round Robin” with 3 other crochet teachers from Annie’s online video classes. During the next 3 weeks, I’ll have a special “guest” blogger (once a week)! The teachers who are participating in this guest blogging tour, as well as their class/classes are:
Ellen Gormley: “Learn to Crochet”, “Crocheting With Beads” and her new class coming very soon, “Learn to Crochet Lace”
Jenny King: “Learn to Bavarian Crochet”
Robyn Chachula: “Learn to Crochet Jewelry”
Susan Lowman: “Crocheting With Thread” and “Beginner’s First Doily”
I’ve met these wonderful crochet designers/teachers (Ellen, Jenny and Robyn) at CGOA Conferences over the past 12 years. They’re very friendly and talented ladies! We all enjoy sharing our crochet knowledge with others through our crochet classes and patterns!
We’ll each be sharing some information about our classes, crochet techniques, inspiration and more during the next 3 weeks in June. Plus, each of us will be giving away a FREE class to a lucky winner at the end of the month, too! So when you read the “guest” blog post on my website from one of the other crochet teachers during the next 3 weeks, check out her website and enter to win!
You’ll also have a chance during the next 3 weeks to enter the giveaway on my website to win my crochet class, “Crocheting With Thread”. Just leave a comment in the comments section at the bottom of the “guest” blog post during that week’s post to enter. I’ll pick one lucky winner and will post the winner’s name on June 30th.
Please check back each week to read the guest blog post from one of the other 3 crochet teachers (or subscribe to my blog to receive an e-mail every time I post a blog entry so you don’t miss any blog posts). You’ll have many chances to win a free crochet class from Annie’s during the month of June!
Upon reading the newest issue of the Talking Crochet newsletter this morning, I realized that Crochet World magazine is offering my Purple Haze Wrap pattern for FREE now! And I wanted to share the pattern with all of my blog followers! So here it is…
Here’s the link to the free pattern and some photos of it for you to see:
This wrap was a lot of fun to design and make with Lion Brand (LB Collection) Silk Mohair yarn, which I LOVED using! I was careful to watch my stitching so I didn’t make too many mistakes that needed to be ripped out and restitched, since mohair yarn is “tricky” to rip out! The yarn blocks beautifully to really show off the stitch pattern to it’s full potential! This yarn (and the wrap I made) is as light as a feather!
I remember when the box of yarn arrived for me to crochet this wrap. The box was about 8″ square and weighed maybe a pound at the most! It was hard to believe that inside that small, light-weight box there was enough yarn to make a whole wrap! To see all the beautiful colors of LB Silk Mohair yarn, go to the Lion Brand website here.
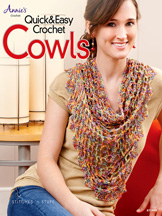
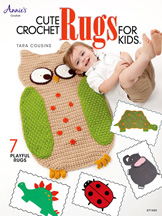
A few months ago, I got 2 new crochet leaflets: “Quick & Easy Crochet Cowls” by Stitches ‘n Stuff (Sue Childress & Frances Hughes) and “Cute Crochet Rugs for Kids” by Tara Cousins, both by Annie’s. I’ve made some crocheted rugs before, but I’d never made a crocheted cowl before, until recently (I know, I’m a little behind the times!).
What is it about cowls that appeals to so many fiber lovers these days? And why are there so many different sizes that can be made? There are short, narrow cowls that just drape around your neck like a wide necklace all the way up to long, wide cowls that can go around your neck several times and also fit over your head. They can even be made much like triangular scarves, but worn backwards with the wide edge at the front and tied or buttoned in the back! Cowls can be made from many different fibers and weights of yarn, from super fine to chunky, too!
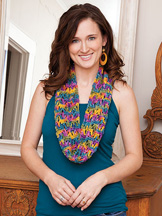
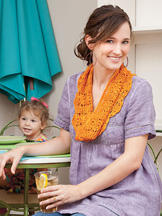
There are 6 projects in this Annie’s cowl book (4 easy and 2 intermediate skill levels). The cowls range from being made in many narrow rows, to less rows with more width in the rows, to a triangular shape. Some are made in solid yarns and others are made in multi-colored yarns. Some have popcorns, shells, V-stitches or clusters for lots of choices. And there are lots of different sizes to choose from, as well. Here are photos of the front cover and a few of my favorite cowls in the book:
Quick & Easy Crochet Cowls front coverBohemian CowlSummer Sorbet Cowl
This is a really nice leaflet and I look forward to making some of the cowls in it. In fact, I’ve already taken the plunge and designed a hooded cowl for a major crochet magazine (I’m sorry, but I have to keep the name of the magazine and month of the issue a secret for now). It was really fun to design and I love the colors in the yarn! It’s very soft and fluffy, which I think will be great for the winter! You can find this cowl book for sale at Annie’s here.
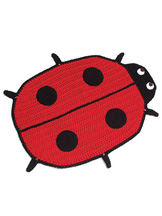
The rug book for kids that I got has 7 different rugs: a dinosaur, elephant, turtle, monkey, ladybug, butterfly and an owl. All of the rugs in the book were made with Deborah Norville Everyday Soft Worsted Solids, which is a medium weight acrylic yarn. I’m sure you could substitute any worsted weight acrylic yarn if you have lots of another brand in your stash! Here are photos of the front cover and some of my favorite rugs in the book:
Cute Crochet Rugs for Kids front coverGranny Shell Turtle RugSpots the Ladybug RugMischievous Monkey Rug
These are really cute and I bet kids will just love them! Of course, my kids are too old for rugs like these (my 3 sons are all in their 20’s). But perhaps when I have grandkids (hint, hint!), I can crochet them some fun rugs like these! You can see all of the rugs in the book on the Annie’s website here.
I hope you’ve enjoyed this look at 2 new crochet leaflets with lots of new crochet patterns in them.
Have you ever been happily crocheting away and the skein of yarn you’re using starts falling apart in front of your eyes? Well, that happened to me over the past month while working on a crochet design for a publisher. I was crocheting a project that is done in the Fair Isle technique. Oh, you haven’t heard of that technique yet, you say? Karen Whooley has designed a lot of projects in the Fair Isle Crochet technique, which is similar to the Tapestry Crochet technique, but not quite the same. You can see some Fair Isle projects that Karen Whooley has designed over the past 7 years on her Ravelry designer page. Check out Karen’s Fair Isle Crochet class on Craftsy, too. It looks like it would be a great class to take for those who want to learn to do Fair Isle Crochet!
In Karen’s Fair Isle Crochet technique, she works her single crochet in the BACK LOOP of the stitches (this is different from Tapestry Crochet, which is worked in BOTH LOOPS of the stitches). Karen also carries the non-working color on top of the stitches, encasing it until needed again, just like in the Tapestry Crochet technique. I worked my project in this style of Fair Isle, which worked very well, since the stitches don’t slant (like they do in Tapestry Crochet) and the back of the project looks as neat as the front!
Anyway, back to the trouble I was having with my yarn misbehaving! Since I was using 2 colors in each row of my project, I had to change back and forth between the colors often. And since I always crossed the colors the same way each time (whether that is correct or not, I’m not sure!), the 2 yarns wrapped around each other after a certain number of color changes. So I had to take one skein of the yarn and unwrap the 2 yarns, bringing the skein over and under the strand of the other color yarn many times so they wouldn’t get tangled. But that wasn’t too bad, all things considered. What was bad was how the skein of yarn that I handled a lot to unwrap the 2 yarns starting falling apart on the outside like this:
Yarn falling apart and getting messy!
After working many rows of my project and having the skeins do this, I decided to do something about it! So I purchased some yarn sleeves to keep the outside of the skeins intact! Here’s one of the skeins with the yarn sleeve in use:
Yarn sleeve in use
This yarn sleeve really saved my life (that may be a little bit of an exaggeration, but not too far from it)! I had never used or owned a yarn sleeve before, but it was time to give them a try. And I’m so glad I did. The yarn sleeve worked really well at keeping the yarn together when I handled it so much. And that saved a little of my sanity! When I told a friend of mine that I had bought the yarn sleeves to use, she said I could do the same thing with some panty hose! I hadn’t thought of that, but it sounds like it would work. Have you used something else to keep your yarn under control like this?
When I was done with my project, I decided to use my handy yarn winder and turn all the leftover skeins of yarn into neat “cakes” so they’d fit better into the box for storage. They’ll also be easier to use the next time I need to design something with these yarn colors instead of pulling my hair out in the middle of the project trying to untangle them! This is how some of the yarns looked before winding them up for storage:
Messy yarn!
And this is how they looked after winding them up:
Neat cakes of yarn
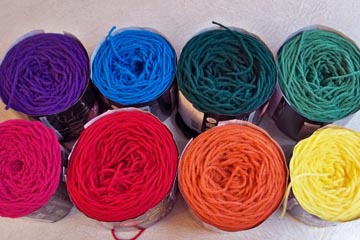
Don’t they look organized and ready to use again? These 8 yarn colors above, plus black, are the colors I used in the project I just completed, which I recently shipped off to the publisher. I can’t show you the project now, but I can show it to you in July or August, after it’s published.
If you’re looking for a way (or 2) for controlling your yarn, I hope you’ll give yarn sleeves and winding the yarn into cakes a try! And if you’re looking for a new/different crochet technique to try, why not try the Fair Isle Crochet technique? It’s actually quite fun and the results are spectacular!
If you’re new to crochet or you learned to crochet from someone else, how do you know if you’re crocheting correctly? Do you hold the hook correctly? Are you holding your yarn correctly? Are you yarning over correctly? These are some of the questions you may be asking yourself. Whenever I’m doing something in crochet incorrectly, I really appreciate someone telling me the correct way to do it so I can improve my crochet skills and knowledge. So I thought I’d share with you the correct way to do a “yarn over” in crochet.
Every stitch in crochet uses a yarn over at some point in time, whether it’s at the beginning, in the middle or at the end of the stitch (or in all 3 places). There are many good crochet books written that explain and show how to do the yarn over and the crochet stitches formed by the yarn over correctly. Also, in this age of the internet and internet/website videos, there some great crochet videos to watch that will show you a multitude of fabulous crochet stitches and techniques. I think it’s wonderful to have so much helpful information at my fingertips to learn more about crochet. You probably share this enthusiasm for learning new crochet stitches and techniques, too!
But you know the saying: “Buyer Beware”! Disclaimer:NOT ALL CROCHET VIDEOS ARE CORRECT!
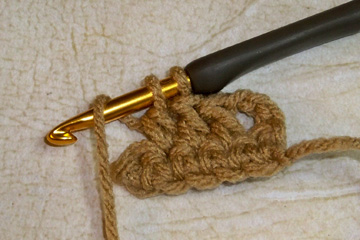
I’d love to be able to say that all of the crochet videos I’ve watched on the internet are sharing the correct information, but that’s simply not true. I’ve seen some videos where the person demonstrating the stitch is saying “yarn over”, but she’s simply grabbing the yarn (with the yarn in front of the crochet hook) and isn’t doing the yarn over correctly. To do a “true” yarn over, you must bring the yarn around the back of the crochet hook, over the top and to the front, like this:
Yarn Over done correctly
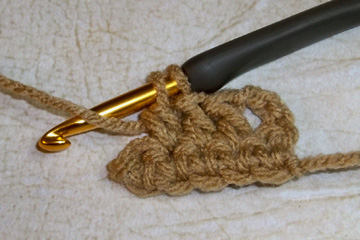
If you’re not making your yarn overs in this manner, then you’re doing them incorrectly. Here’s the incorrect way to do your yarn overs:
Yarn Over done incorrectly
Do you see the difference? When you’re doing your yarn overs correctly, the yarn goes over the top of the hook from the back to the front. It doesn’t just sit in front of the hook to grab it: that’s NOT a “yarn over”!
To see some crochet videos, including the correct way to do a yarn over, please visit the CGOA website here if you’re right-handed or here if you’re left-handed. In each of these videos, Kim Guzman, a respected crochet designer, teacher and author, shows how to do a yarn over correctly. The yarn over is used for making the chain, single crochet, half double crochet, double crochet and treble crochet. It’s also used for many other crochet stitches and techniques, including Filet Crochet, Bruges Lace, Wiggly Crochet, Tunisian Crochet, Hairpin Lace, Broomstick Lace and more. As a CGOA Board member, we discussed adding crochet videos to the CGOA website last year and Kim was enthusiastic about doing them for us (thank you so much, Kim). Kim is a wonderful crochet teacher with lots of knowledge and patience! So check out the crochet videos on the CGOA website to make sure you’re doing your yarn overs correctly! And if you don’t know about all that CGOA (the Crochet Guild of America) has to offer, then check out the rest of the updated CGOA website while you’re there!
As one of the co-chairs and a portfolio reviewer in the CGOA Masters program, I enjoy discussing crochet stitches, techniques and patterns to find out how some people work their stitches (correctly and incorrectly). I learn so much from these discussions! They help me to understand how the written crochet instructions can be interpreted in different ways, which in turn helps me improve my pattern writing and technical editing skills! I’m all for improvement throughout my life!
Are there any crochet stitches, techniques or patterns you’d like to discuss?
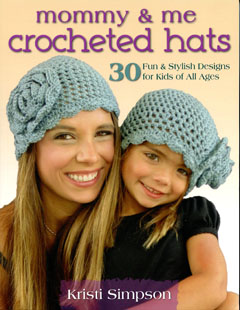
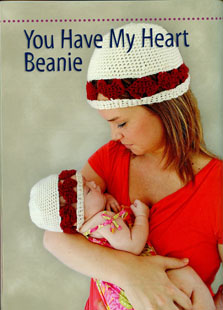
I recently met a crochet designer through the internet. Her name is Kristi Simpson and she’s a very talented crochet designer. She has a website and an Etsy shop. To celebrate the release of her new book, “Mommy & Me Crocheted Hats”, published by Stackpole Books, I’d like to do my first “blog interview” with Kristi today. You can see and order this book on Amazon here. I’ll share a few photos of my favorite hats in her book toward the bottom of this blog post, too.
Kristi Simpson
S: How long have you been crocheting?
K: I have been crocheting for 6-7 years! Wow! Time flies!
S: How long have you been designing?
K: I have been designing for 5 years…but I have only been selling designs since 2010. I knew shortly after I learned to crochet that I wasn’t happy with a lot of just plain designs. I wanted to make functional things cute and so I was determined to design things that were fun and cute to crochet. I now have over 350 designs.
S: What are your favorite things to crochet or design?
K: Obviously I have a soft spot for babies and small children. My husband and I have 5 inspirational children: Jacob, Kimberly, Allison, James and Ryan that keep us on our toes! They inspire me to keep my designs fresh, and kid friendly. I understand what it means to be on a budget, but still want all of the ‘cute’ designs for my little ones….and now I make them!…but when it comes down to patterns, I know there’s a demand for all ages. My new book is about giving everyone a chance to jump in on the fun and having cute hats to wear!!
S: Where/when/how do you get your design inspiration?
K: I honestly LOVE to go yarn shopping. I might walk out with 1 skein…and on the fun days my husband is with me, I might walk out with 10 (I love it when he goes!). He is my biggest support and encourages me to try new designs and yarns! The colors, textures and different weights of yarn will jump out at me and even though I might have an idea in my head, it becomes more real when I can see the yarns. Now, I will never ever say I have enough yarn– and my husband knows that. Ha!
Also, my family inspires me. They know my passion for crocheting and even when we shop in the mall, they’ll bring a jacket or a fabric headband and say– look at this! I am a huge fan of magazine clipping! I have a 3 ring binder with taped down ideas from sales papers, store ads and what others would call ‘junk mail’. I love to see what’s in season and what’s in store for the next! I also have a separate notebook that I jot down my ideas and sketch them out so that I can return to them when specific inspiration hits!
S: Do you use your children as models for your crochet patterns?
K: Yes, all the time! My kids’ ages range from 5 year old twins to 14 and 16 year old daughters…. I never miss that opportunity to use them. Plus, they love seeing their photo online!
S: Do you have a favorite color, yarn brand or yarn weight to use in your designs?
K: One? I have to pick JUST one? Right now I would say it is Yarn Bee, “Hint of Silk” in Oriental Teal. It’s so luxurious! It is 85% Bamboo and 15% silk. It is classified as a weight 4 yarn, but to me it is on the thinner side of the scale. However, it’s perfect for clothing, hats and the new baby–it’s SO SOFT! If you were to ask me last week, I would have said Red Heart Soft in purple…. I can never pick JUST ONE!
S: What does RAKJ stand for?
K: Have you ever tried to pronounce RAKJ? Well, I’m sure you had a tongue twisting try and made some sneeze-like sounds….but it’s actually pretty simple: R-A-K-J. It is our family initials! Ryan, Allison, Kristi, Kim, Jason, James and Jacob!
S: What else can you tell us about your Mommy & Me Crocheted Hats book?
K: The book was a blast to design. I not only managed the patterns in this book but also the photography. It was amazing to have every day people model the hats. I mean, not only models wear them! I enjoyed the ‘almost candid’ theme, and it was so much fun! Not only photographing the hats, but seeing the mom and child (or sometimes grandma or dad!) playing together and being sweet! It is something that I will always remember. I hope the photos make you smile and giggle… and inspire you to make a few sets for you AND your friends and family!
Well, that’s it for the interview with Kristi. I hope you enjoyed getting to know Kristi a little bit. I definitely enjoyed interviewing her! I look forward to many more wonderful designs from Kristi in the future.
I can’t imagine having a career AND raising 5 kids! My 3 sons are grown and out on their own now. My life was very busy while my husband and I were raising them, with all of the things they did in school, sports, Boy/Cub Scouts, church and more! It makes me dizzy just to think about my crazy, busy schedule back then!
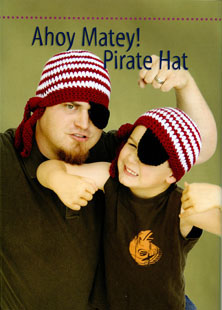
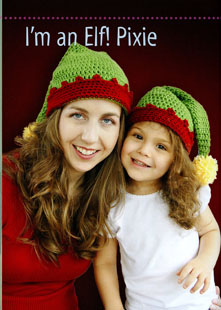
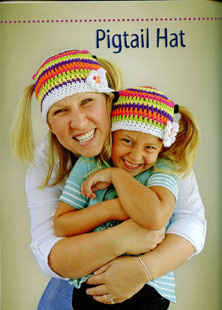
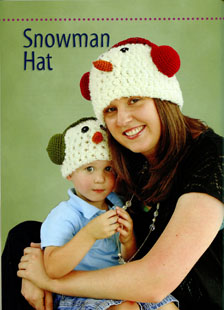
As promised, here are photos of some of my favorite hats in Kristi’s new book (and a photo of the cover of the book, too):
Wouldn’t the pirate hat be great to wear on National “Talk Like a Pirate Day”? And what little boy doesn’t want to have a beard? I think the Elf hat is really cute. It could be made with red and white for a Santa hat without the added chain spaces in the last round of the hat. If your little girl (or a little girl you know) likes to wear her hair in pigtails, then the pigtail hat is perfect (with holes to poke the pigtails through)! Since I LOVE snowmen, the snowman hat is great, especially with the ear muffs! And if I had a baby girl, I’d definitely want matching heart beanies for us!
These hat patterns come in multiple sizes and different skill levels, so there’s something for everyone. And with 30 hats to choose from, you’re sure to find some hats that you’d like to make. The book retails for $19.95 in the US and $22.95 in Canada.
You can see all of the hats/projects in this book on the Stackpole website here.
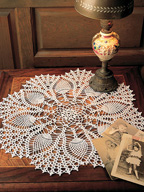
You may ask: What is a doily? And how do you pronounce it? Well, it’s pronounced “doy lee” or “doi´lē” (definitely NOT dolly!). Think of it this way: “doy” rhymes with “toy” and “Lee” is a man’s name. According to Webster’s dictionary, a doily is “any small, ornamental mat, especially one of embroidery or lace”. Of course, many forms of crochet are lacy, so it stands to reason that many doilies are made in crochet! Doilies are used most often to protect wooden surfaces from scratches and moisture.
I LOVE doilies! I have hundreds, if not thousands, of doily patterns and I still enjoy purchasing new doily patterns to add to my collection. I love to crochet doilies and they make wonderful gifts, too! I have a box of finished, blocked doilies that I can turn to when I need a gift for someone, especially if they love doilies, too. I’ve learned a lot about crocheting and designing through making crochet doilies. I’m a “threadie” at heart, so I love crocheting almost anything with crochet thread (especially cotton crochet thread because it blocks so nicely).
I love the different shapes and stitches that are in doilies. Each one is unique, almost like snowflakes. Doilies come in circles, squares, rectangles, ovals, hexagons, triangles, octagons, or just about any shape. Some doilies are done in Filet crochet, while others are done in Bruges Lace, Irish crochet or regular crochet. Some doilies have lots of textural stitches or aremade in multiple layers. Some are one solid color, while others are made with many colors (and I definitely LOVE colors!). I love anything crocheted that has pineapples in it, too! Two of my favorite doily designers are Patricia Kristoffersen, who designs doilies with textural stitches, and Kathryn White, who designs doilies in Irish crochet. You can see a lot of Patricia’s work on her Ravelry page. Kathryn White has a Raverly page and a website where you can see her designs. I won several books from each of these talented designers!
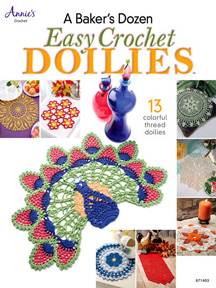
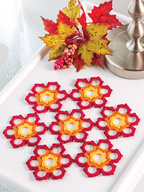
A few weeks ago, I got a new doily book. It’s called “A Baker’s Dozen Easy Crochet Doilies”. As everyone knows, a Baker’s Dozen is 13. This book has 13 different doilies in it (and one of them is mine; from the October 2013 issue of Crochet World magazine). There are round, octagonal and rectangular doilies in this book. Four of them are filet doilies, one is Irish crochet, one has an added layer in the center, 6 are regular crochet (3 with pineapples) and mine is worked over bone rings (it’s actually a table mat, but it’s in the shape of a doily!). All of these designs are beginner or easy skill levels, so there’s nothing too difficult to make in this book. Here’s the front cover and a few of my favorite doilies in the book:
A Baker’s Dozen Easy Crochet Doilies book cover
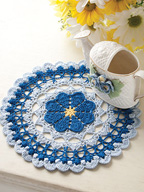
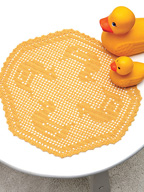
Blue Skies DoilyDuck Pond DoilyPineapple Fan DoilyAutumn Blaze Table Mat (my design)
Aren’t these doilies pretty? To see all the doilies in this book, visit Annie’s website. This book retails for $9.95 in both print and digital formats. With 13 doilies in the book, that makes each doily pattern less than a dollar!
I’m thrilled to be taking part in Crochetville’s National Crochet Month (NatCroMo) Blog Tour again this year. Thank you very much, Amy Shelton and Donna Hulka, for putting together this year’s blog tour. I hope you’re enjoying each stop along the blog tour, learning more about crochet and getting your creative crochet juices flowing! Please check out the other stops along the blog tour on the Crochetville blog.
All of the designers and participants in this blog tour are members of CGOA (Crochet Guild of America). I’ve been a member of CGOA for over 10 years. It’s a fantastic organization with giving, caring, sharing, encouraging members. I’m also the secretary on the CGOA Board of Directors, as well as Co-Chair on the Masters Committee and a senior portfolio reviewer in the Masters program. For more information about CGOA and all we have to offer, including the Masters program, visit the CGOA website and the CGOA blog.
As you may already know, we’re supporting the charity, Halos of Hope, during the blog tour. If you’re not familiar with Halos of Hope, they’re a non-profit organization that collects and distributes donated hats for cancer patients who have gone through chemo and lost their hair. Please check out their website for more information about them. You can find out where to donate handmade hats on their website, as well. If you don’t knit or crochet, you can also get involved by donating monetarily to help pay for shipping the finished hats to cancer centers across the US.
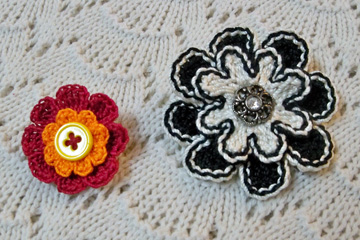
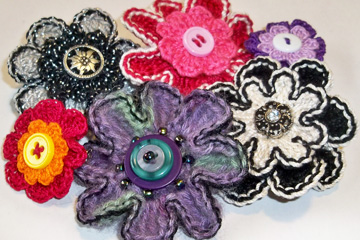
To celebrate National Crochet Month, I have a free crochet pattern for you: my “Button Flower Pin”:
Button Flower Pins
Click here to get the free PDF pattern download, available for free only until April 15, 2014. After that date, the pattern will be available for purchase for $2.95.
I hope you enjoy making this flower pin with your favorite button in the center! You can use crochet thread or yarn, it’s your choice! So get creative and whip up some quick Button Flower Pins to adorn your wardrobe or to give as gifts! What woman or girl doesn’t love a pretty pin to wear? And what crocheter doesn’t love a quick project? It’s a great way to use up some scraps of yarn or thread, too.
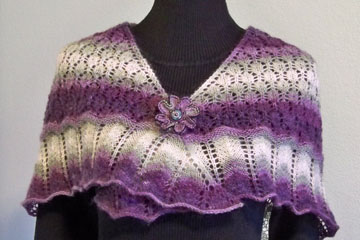
You can even use this pin as a shawl pin to help hold your shawl in place, like I’ve done here with my knit shawl and crocheted shawl pin (You can see a close up photo of this pin in the following photo with multiple pins):
Knit Shawl & Button Flower Pin
The shawl and button flower pin were made with Patons Lace (the free knit shawl pattern is available on the Patons website here). This button flower pin was made with only the bottom layer of petals, since I didn’t have enough yarn to make both layers. I stacked some buttons in the center and added some beads around the buttons. I also used some size 10 crochet thread for working the edging around the petals. So mixing and matching colors, yarns, threads, buttons, beads and fibers is definitely allowed (and encouraged) for these pins!
I really enjoyed making these pins and found it hard to stop! Here are the button flower pins I’ve made so far:
Button Flower Pins
I’m sure you’ll come up with ideas of how you can make some of these pins and customize them to your wardrobe, or give them as gifts throughout the year.
Aren’t buttons wonderful? If you’re like me, you have a stash of buttons that are just waiting to be used. I have some fabulous old buttons and some newer buttons. Some of them are quite interesting and unique! If you’ve bought or inherited some vintage buttons, what better way to use them than by wearing them as a pin on your favorite outfit! Crochet mixes well with many other mediums and buttons are one of those mediums.
One of my favorite things to design and crochet is jewelry, such as these button flower pins. Crocheted jewelry is a wonderful project that doesn’t have to “fit” like garments, so it’s right up my alley! And buttons are great to use in crochet jewelry, too. Check out the free crochet necklace pattern that I designed (with buttons) for Red Heart Yarn on their website here. I used simple, new buttons in that necklace, but the buttons add so much visual interest to my Mod Flower Necklace!
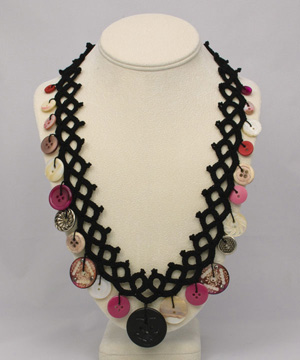
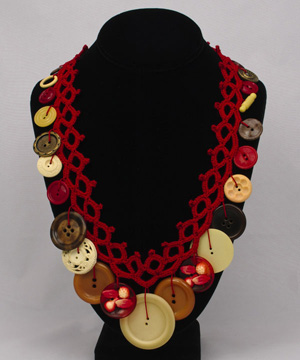
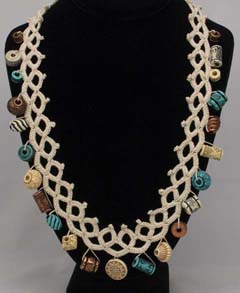
If you’re a button lover and a crochet lover, you may even want to use a bunch of buttons to make a unique “Faux Tatted Crochet Necklace” (the pattern is available here at The Crochet Architect.com). This fun-to-wear necklace is crocheted to look like tatting. Size 10 cotton crochet thread, a size 7 (1.65mm) steel crochet hook and 21 buttons are used to make this necklace. I’ve made many of these necklaces over the years with some vintage buttons from my stash! Here are photos of a few of my necklaces using those buttons:
If you look closely, you’ll see a black Navy peacoat button with an anchor on it at the bottom, center of the black necklace! My middle son was in the Navy a few years ago, so that’s a special button to me!
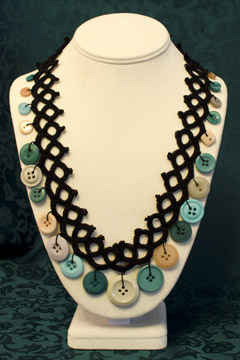
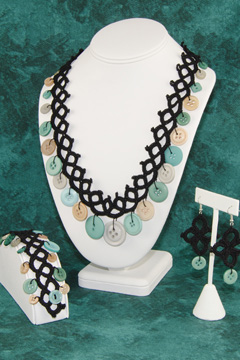
You don’t need to have vintage buttons to make a Faux Tatted Necklace, though. I’ve made some with an assortment of new buttons and they look great, too! The secret to these necklaces is the “assortment” of buttons you use. I try to use different sizes (the largest size should be at the bottom center and the smallest size should be at the top left and right of the necklace), as well as several coordinating colors in my necklaces. Here’s one that I gave away as a prize during National Crochet Month last year for you to see:
2013 giveaway “faux” tatted necklace
And don’t limit yourself to using buttons in these necklaces. You can use beads or charms just as easily instead of buttons. Here’s a Faux Tatted Necklace that I made with some beads from my stash:
Faux Tatting Crochet Necklace with beads
One of the nice things about this necklace is that it’s big enough to fit over your head without needing a clasp. If you’re like me, fastening a necklace clap can sometimes be very difficult! And this necklace is easy to clean, too. When the necklace gets dirty, simply soak it in water in the sink with some liquid laundry detergent added. If needed, use an old, clean toothbrush and dab the laundry detergent directly on the dirty spot to remove stubborn dirt. Then rinse and let dry. Voila! It’ll be clean again and ready to wear in no time! These necklaces take just a few hours to make, so they’re also great to make and give as gifts.
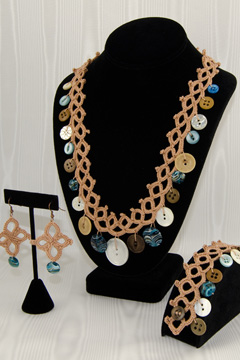
If you’d prefer a whole set of crocheted jewelry, why not make a Faux Tatted Necklace, Bracelet and Earrings (this pattern is available here, too)?
Faux Tatted Jewelry SetFaux Tatted Jewelry Set
If you’ve never crocheted with crochet thread before and would like to learn, I would love to have you in either of my online classes with Annie’s: “Crocheting With Thread” or “Beginner’s First Doily”. You can find out more about these classes by clicking on the picture of me near the top right-hand corner of the screen. Once you learn to use thread in your crochet projects, you may become a “threadie” and not want to go back to using yarn!!!
If you’re new to my blog, I’d like to say “thank you” for visiting and I hope you’re enjoying this designer blog tour. I regularly post book reviews, crochet news and more. I have a few tutorials with plans to add many more tutorials (and crochet videos) in the coming years. If you’d like to receive updates, including when new patterns are available for purchase, please subscribe to my blog by inputting your e-mail address in the field to the right. As you can see, I don’t blog all the time, so you won’t be inundated with e-mails from me (I respect your privacy and your time)! And if you have a request for a crochet tutorial, I’d be happy to work on that for you (as time allows). I love teaching others more about crochet and learning more myself, too.
Another way I’d like to celebrate National Crochet Month is to give away a free crochet pattern (of your choice) to 2 lucky winners. I’ll pick and notify the winners on March 31st. To enter this contest, you’ll need to do 2 things: 1) leave a comment on this blog post, 2) subscribe to my blog. Because of “spam” comments sometimes being a problem, you’ll need to make an account before commenting, but that’s quick and painless. With an account, you can leave comments on any of my blog posts now and/or in the future! And if you ever want to unsubscribe, you’re free to do that, as well. There are no strings attached!
I wish everyone a very happy National Crochet Month and good luck in the giveaway!