Do you enjoy decorating your home? I definitely do! This pattern has been several years in the making. Two years ago, 2 of our 3 grown sons bought their first house (and we bought our new/used house that year, as well). Then last year, our third son bought his first house, too! So there have been lots of houses purchased in our family lately! What a blessing!
What’s a mom to do when she sees a need and gets an idea? Fill that need, of course! So I set off to design and crochet a “Home Sweet Home” piece for each of my sons. Filet Crochet is one of my favorite crochet techniques, so that’s what I used. Now I’m releasing this pattern so you can crochet your own “Home Sweet Home” for you, your family or friends, too.
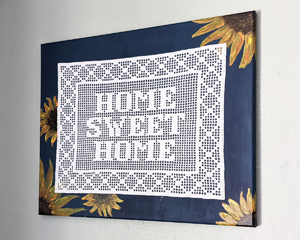
The first son/daughter-in-law I made this for didn’t want to frame it. She chose to mount it on canvas. She’s very creative and she painted the canvas before we mounted it (with the help of spray adhesive). Here’s their finished “Home Sweet Home”:
Isn’t that beautiful? I think so!
The second son who bought a house has a Japanese wife, so she chose washi paper and some strips of wood (with magnets) to mount her “Home Sweet Home” piece. This is where she purchased the magnetic strips to hang their piece. This is their finished “Home Sweet Home”:
I love her choice of mounting, too!
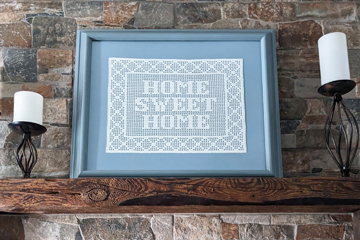
My husband and I bought a home in 2021, as well. So I set out to crochet one for our new/used home. I’m more traditional than my daughters-in-law, so I decided to frame mine. I used a 16″ x 20″ frame that I painted to match the blue matboard. Here’s our “Home Sweet Home”:
I gave a “Home Sweet Home” to my oldest son and daughter-in-law at the end of last year, after they purchased their first home. They haven’t framed theirs yet (I don’t think). I know whatever they choose will be just right for their first home!
If you love Filet Crochet as much as me (and you don’t mind using size 30 crochet thread), check out my new Filet “Home Sweet Home” pattern here. If you’re not a fan of size 30 crochet thread, you could always use a larger crochet thread to create a larger “Home Sweet Home” piece of your own! And don’t forget to block your piece for professional results!
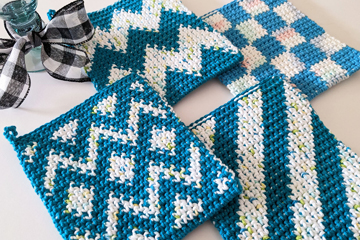
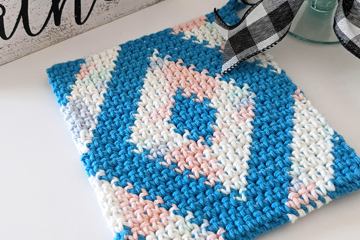
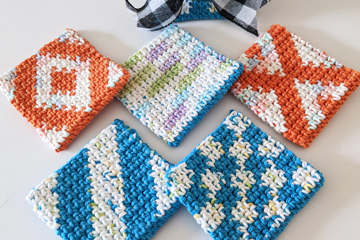
I’ve enjoyed doing the Thermal Stitch for quite a few years now. Last month, Heather (on my YouTube channel) asked if I could make a video showing how to do a potholder in Thermal Stitch with 2 different colored sides. I thought about it and I’ve been playing around with it for a few weeks now. However, I took it to another level! I’m happy to introduce the marriage of Tapestry Crochet with the Thermal Stitch in my new YouTube video and my new Tapestry Thermal Stitch Potholders and Coasters patterns!
If you’ve ever done the Thermal Stitch, you know that you insert your hook in a completely different place than in regular crochet. And if you’ve ever done Tapestry Crochet, you know that you carry the unused yarn under the stitches you’re working and change colors across the row, as needed. So when I thought about doing color changes in Thermal Stitch, I immediately thought about using the Tapestry Crochet technique! And it works!!!
If you’d like to take your Thermal Stitch projects to the next level with designs on one or both sides, watch my YouTube video.
And if you’d like to give Tapestry Thermal Stitch a try, check out my new Tapestry Thermal Stitch Potholders and Coasters patterns on the crochet patterns page.
Do you enjoy crocheting decorations for holidays? I certainly do! I’ve got a brand new crochet pattern for an Easter Egg Potholder for you. This potholder is worked with 2 pieces: a front and a back for double thickness. Using worsted (#4) weight cotton yarn, it’ll keep your hands and fingers protected when removing a hot dish from the oven.
Easter Egg Potholder
The potholder is worked in rows of single crochet with increases and decreases, as necessary, to form the egg shape. After crocheting 2 egg-shaped pieces, one round of single crochet is added to join the pieces together and to form the hanging loop at the top.
This pattern is easy enough for a beginner crocheter, since basic stitches are used. I’ve done a YouTube video for this pattern, as well, so you can follow along with me in the video and learn to read a crochet pattern while making this cute, useful potholder!
Here’s the pattern page to snag a copy of this pattern at a great price! Then you can crochet some potholders for your Easter celebration (with about 27 days until Easter!) or give one/some to a friend or family member.
I hope you enjoy this pattern and all your crochet projects!
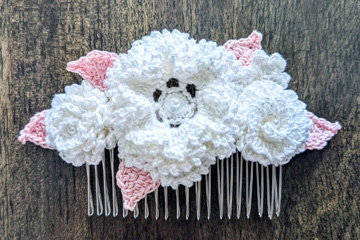
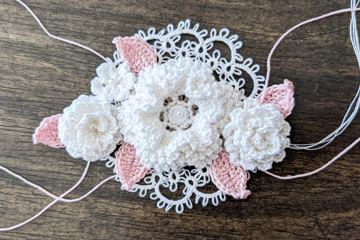
My oldest son is getting married next month (woohoo!) and I wanted to help out with the wedding somehow. My soon-to-be daughter-in-law said she wants to wear a hair comb for the wedding and she texted me a photo of an expensive one to see. I asked if she’d like to have me crochet one for her and she said “yes”! So I did some online research and found more photos of hair combs that are really pretty for inspiration. She didn’t want one that was too big; just something pretty and functional. So I started looking for good flower patterns to use (instead of taking extra time to design my own flowers).
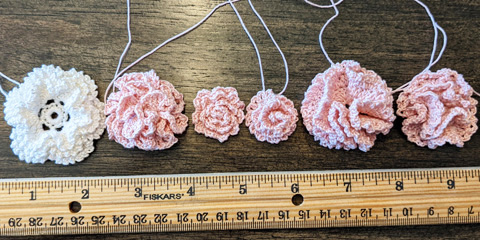
My future DIL picked out the crochet thread colors she’d like me to use from my stash of crochet threads. Since I didn’t have a lot of the iridescent white thread for the flowers, I tried out some of the flower patterns with the pink thread first to see how I liked them. Once she and I picked out which ones we liked best, I crocheted the top 4 flowers in white with size 10 crochet thread and a 1.5mm hook. Then I crocheted some pink leaves to go around the edges.
Possible flowers for hair comb
These are the flower patterns I used:
Large flower in center: 6-petal frilled rose with 3 layers from page 14 in the book, “The Go-To Book for Irish Crochet Motifs” by Kathryn White (book #871388), published by Annie’s. A digital edition of this book is available (as of this blog post) here.
free pattern from https://persialou.com/make-crochet-flower-hair-combs/ This is a great blog post about how she made a hair comb. She used hot glue to attach her flowers and leaves to the hair comb, but I sewed mine in place. Either way works!
I decided the iridescent flowers could use a little more bling, so I sewed a small iridescent white pearl bead to the center of each one (I don’t know what size I used because I just found some in my stash of beads!). Since the large flower in the center had a somewhat large hole in the middle, I used a little larger bead and added an iridescent sequin behind the bead to keep it in place. I used a package of iridescent sequins from my local Hobby Lobby. They worked out great!
Here is a quick, free pattern for the leaves that I made up off the top of my head:
Ch 8, sc in 2nd ch from hook, *hdc in next ch, 2 dc in next ch, dc in next ch, 2 dc in next ch, hdc in next ch, sc in last ch**, ch 2, sl st in top of last sc made to form a picot; working in free lps on other side of ch, sc in first ch (in same ch as last sc); rep from * to **; join with sl st in first sc. Finish off, leaving a long tail for sewing.
For the hair comb, I bought a package of 5 silver hair combs from Amazon. Here’s a link to the hair combs I purchased. Some of the teeth were a little bent when I got them in the mail, but they straightened out nicely with very little effort! And the metal is a really nice quality! They also come in black or gold, if you’d prefer another color/finish. These hair combs have 20 teeth. They also come in other sizes, with more or less teeth, which would make them narrower or wider. The one I used with 20 teeth is about 3” wide.
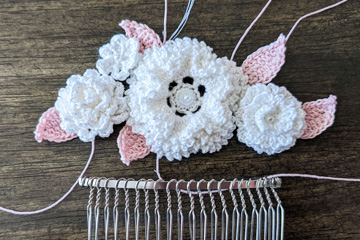
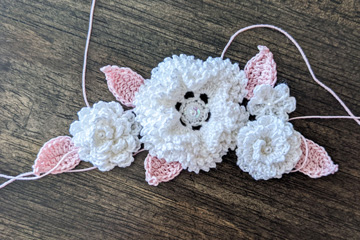
After I crocheted all the flowers and leaves, I arranged them a few times until my future DIL and I liked the arrangement. I also tried an arrangement with a tatted piece that I had made quite a while ago. It’s too frilly for my future DIL, but you might consider something like this for your hair comb.
Trial flower arrangement
Another trial flower arrangement
Trial flower arrangement with tatted lace
Then I had to decide how I wanted to attach the flowers and leaves to the hair comb. I decided to buy an ebook of Irish Crochet patterns by Kathryn White from Annie’s (on sale), since there was a hair comb in that ebook (book #871106E). Here’s a link for that ebook.
While the hair comb in this book is lovely, it wasn’t what the bride wanted (I LOVE the doily in this book, so I’ll be crocheting that in the near future). However, I liked the way Kathryn attached the flowers and leaf sprays to her hair comb in the book, so that’s what I did. Basically, you wrap some extra crochet thread around the top of the hair comb between the teeth of the hair comb and secure the ends of the thread. That gives you a nice base of thread to attach the flowers and leaves to the hair comb. I actually sewed the leaves to the back of the flowers (not to the hair comb) after I sewed the flowers in place on the hair comb.
What do you think? Do you like this hair comb? What would you do differently?
I can’t wait to see my future DIL wearing this hair comb in her upcoming wedding to my son!
I’ve been wanting to film a video to teach the Thermal Stitch for quite a while and I finally have one for you. But first, a little background on how/where I learned this fabulous stitch.
I first learned the Thermal Stitch from Darla Fanton at the 2008 CGOA Conference in Manchester, NH. Darla is a great teacher and I learned a lot in that class. However, life got in the way and I never pursued doing anything with the Thermal Stitch.
Fast forward to around 2015 when a good crochet friend named Jackie showed me the thick potholder she had made from a free pattern on the internet. She shared the link to the free pattern (by Heather Tucker of Stitchery Project) and taught me the stitch (which I had somehow forgotten from Darla’s class). I was immediately hooked! I’ve been making Thermal Stitch Potholders ever since! They’re so easy to make once you learn where to insert your hook! It’s just simple rows of single crochet, which is pretty mindless (sometimes I need a mindless project!).
Thermal Stitch Potholder
One thing I changed in Heather’s pattern was the placement of the hanging loop. Heather makes her hanging loop at the bottom of the potholder. I decided I wanted to make my hanging loop at the top of the potholder. The reason for this is sometimes I want to make a hot pad without a hanging loop instead of a potholder. So I just don’t work the hanging loop at all. Since I changed Heather’s free pattern, I decided to type up my version of this potholder as a free pattern. You can download my free pattern here.
You can find Heather’s free potholder pattern (named “The Best Crocheted Potholder”) here.
The potholders are economical to make. When I see a sale on worsted weight cotton yarn, I stock up on it. This makes the potholders about $1 each, which I love!
These potholders make great gifts! I’ve given them to friends and family for Christmas and/or birthdays, as “thank you” gifts, and as wedding (or bridal shower) gifts, as well.
To learn the Thermal Stitch, watch my new YouTube video here.
I hope you enjoy crocheting these potholders as much as I do!
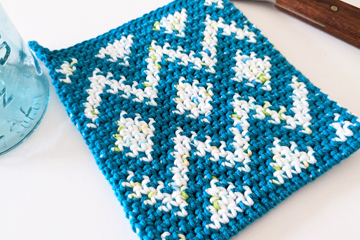
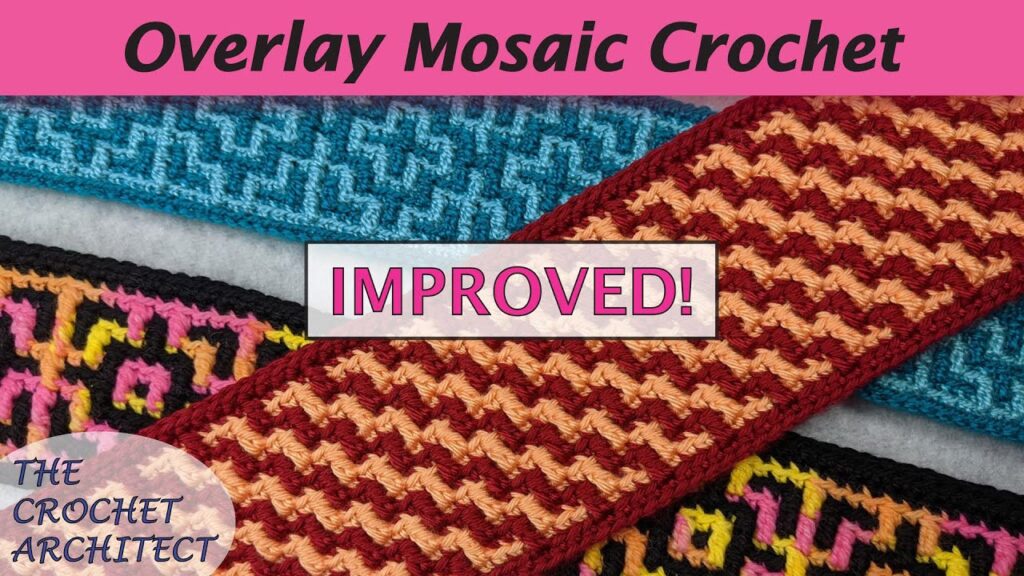
Do you love the look of Mosaic Crochet, but wish it was reversible? Well now it is, with no extra work!
I’ve been having fun with a hybrid style of Mosaic Crochet using Spike DC stitches (SPdc for short). With this style of Mosaic Crochet, you still work 1 row of each color and each row on the right side, like Overlay Mosaic Crochet. You work chain spaces, like in Inset Mosaic Crochet, but you only work 1 row of each color. Instead of working your dc, drop down dc, Anchored dc (or whatever you want to call them) in front of the other stitches, you work your Spike DC stitch “around” the other stitches, which makes your projects reversible!
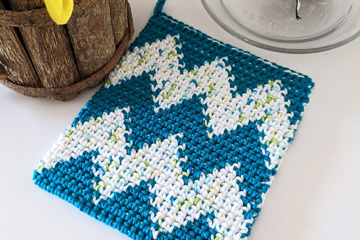
Reversible Sashiko Mosaic Crochet Rug
I also have a brand new Mosaic Crochet pattern using the Spike DC Mosaic Crochet technique. This pattern is my Reversible Sashiko Mosaic Crochet Rug. It uses some Lion Brand Thick & Quick yarn, along with some Lion Brand Hometown USA yarn that I’ve had in my stash for several years.
When I saw this Lion Brand Wool-Ease Thick & Quick yarn in the Hudson Bay color at my local Walmart store, I knew I had to design something special with it. I used this yarn, along with 3 coordinating solid colors of Lion Brand Hometown USA to design and crochet my Reversible Sashiko Mosaic Crochet Rug pattern. This pattern shows the contrast between the solid, dark colors and the lighter, multi-colored yarn perfectly!
You may ask me why I used the word “Sashiko” in the name of this pattern. Well, I’ve been looking at and playing/designing with Japanese Sashiko embroidery patterns for several years now and I LOVE them!!! They’re mostly geometric, which I LOVE! I’ve got more Sashiko crochet patterns in the works, so stay tuned for those in the near future. I’ve even started learning to do Sashiko embroidery! What fun!!!
So back to my new rug pattern. It’s made with 5 skeins of yarn: 2 skeins of the LB Wool-Ease Thick & Quick and 3 skeins of the LB Hometown USA (1 skein in each of the 3 solid coordinating colors). I used a size “N” crochet hook, which is 10 mm. I started and ended each row, turning the tails into fringe after crocheting all the rows of the rug. I absolutely love this rug being reversible!
To learn this technique, watch my new YouTube video, where I demonstrate the Spike DC Mosaic Crochet technique.
I also created a FREE download for a Spike DC Mosaic Crochet swatch that I demonstrate in the YouTube video. You can download the free chart, along with instructions for working the swatch with either my COM technique (with very little tails) or with traditional Mosaic Crochet, starting and ending each row (with 2 tails for each row).
I hope you’ll give this Spike DC Mosaic Crochet technique a try very soon. It’s a fabulous technique for crocheting reversible Mosaic Crochet projects with no extra effort!
I hope you had a wonderful Christmas/holiday season and are doing well in the New Year!
I’d like to announce that I’ll be teaching an online class for new/aspiring crochet designers on Wednesday, January 19 and 26 for CGOA (Crochet Guild of America). This class will teach you everything you need to know to successfully write your own crochet patterns. If you’re anything like me when I first started designing crochet patterns and writing the pattern up so others could follow them, you struggle with many things, especially how to write repeats! I’ve been writing crochet patterns for over 20 years (and editing crochet patterns since 2004), so I know a lot about writing them and I’m excited to share what I’ve learned with others to help them/you be successful with your crochet patterns!
To learn more about this class, called “Let’s Get Writing”, check out the CGOA website. This is a 2-part Professional Development class. Each part is 90 minutes long and takes place from the comfort of your home. There’s no traveling necessary!
The last day to register for this class is next Friday, January 14. If writing better crochet patterns is one of your New Year’s resolutions, don’t put it off! Register today!
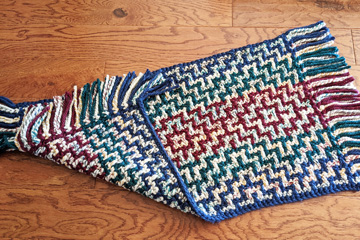
Mosaic Crochet is one of my favorite crochet techniques. Have you heard of Mosaic Crochet before? It’s an absolutely wonderful crochet technique! With Mosaic Crochet, you can create something that looks much more complicated than it actually is! There are several styles of Mosaic Crochet. The Overlay Mosaic Crochet style is worked in alternating rows of a dark color and a light color (only one color of yarn is used in each row). Each row is worked on the right side, so each row starts and stops (joins and finishes off), creating ends/tails at the beginning and end of each row. I like to turn these ends into fringe, especially when making a Mosaic Crochet scarf. Then there are no ends to weave in on the project!
Overlay Mosaic Crochet video on YouTube
If you’d like to learn this fabulous crochet technique, I have a new YouTube video teaching the Overlay Mosaic Crochet technique. Check it out and let me know what you think! In this video, you’ll learn everything you need to know while crocheting a swatch along with me (there’s a free chart that goes with the video, as well). Then you’ll be successful with your Overlay Mosaic Crochet projects!
My style of Overlay Mosaic Crochet differs from other designers because I use an Anchored double crochet (Adc) stitch instead of a regular double crochet (dc). This eliminates gaps on the back of the mosaic piece and gives it more stability. You can learn the Adc in my “Improved Overlay Mosaic Crochet” YouTube video, as well as in my separate “Anchored Double Crochet” YouTube video for more success with your Overlay Mosaic Crochet projects.
Anchored Double Crochet video on YouTube
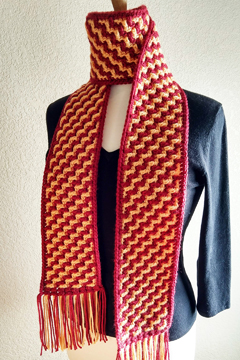
Flight of Stairs Scarf
While planning and creating this video, I decided to design another Mosaic Crochet Scarf pattern for your enjoyment. It’s been many years since I designed my first Mosaic Crochet Scarf pattern. They’re so much fun to crochet and wear! Since this new mosaic pattern looks like stairs, I’ve called it the “Flight of Stairs Scarf”. This scarf is easy to make, following the written instructions and the included charts in the pattern. It’s made similarly to the mosaic swatch in the video with a few differences. If you can crochet the swatch from the video, I’m sure you’ll be successful in crocheting this scarf!
If you’ve never done Mosaic Crochet before, give it a try! You’ll be glad you did!
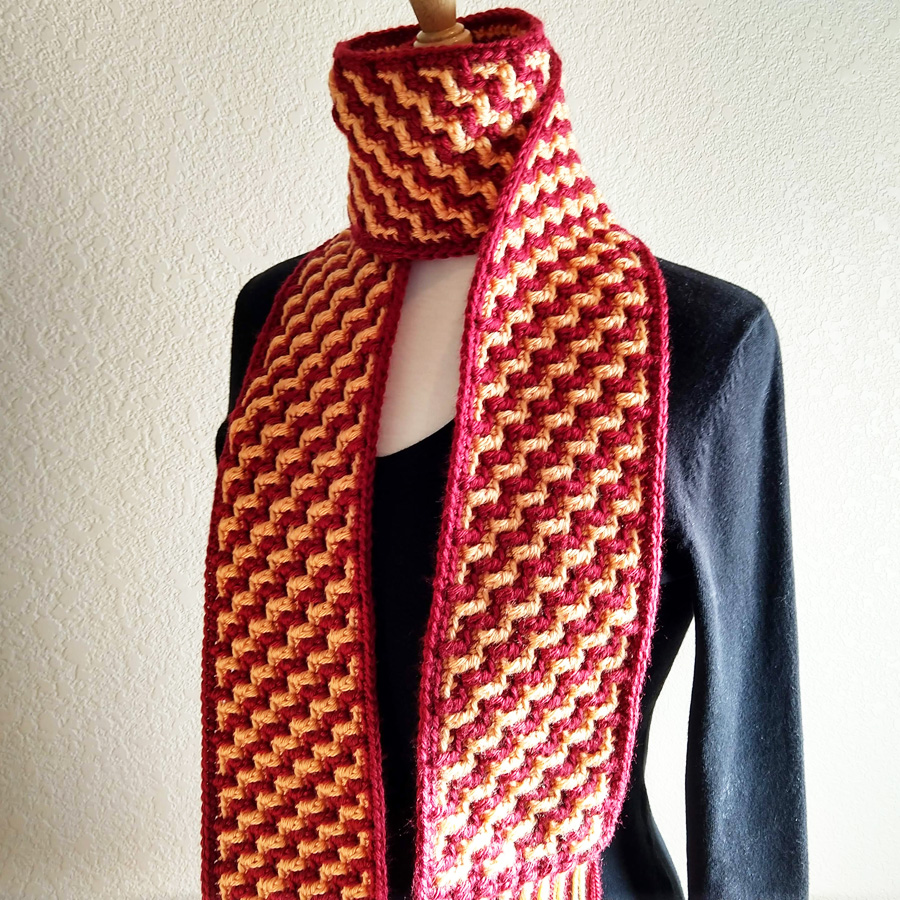
It’s that time of year when we start wearing lots of accessories to help keep us warm (here in the Northern Hemisphere)! I sometimes wear a scarf or cowl inside my house to help keep my neck warm, which helps keep my whole body warm (my house isn’t that cold, but I often get cold)!
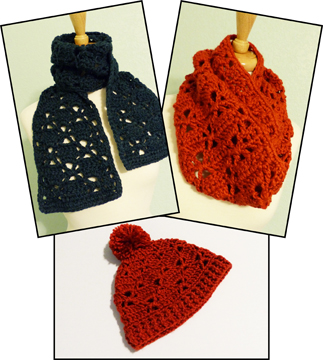
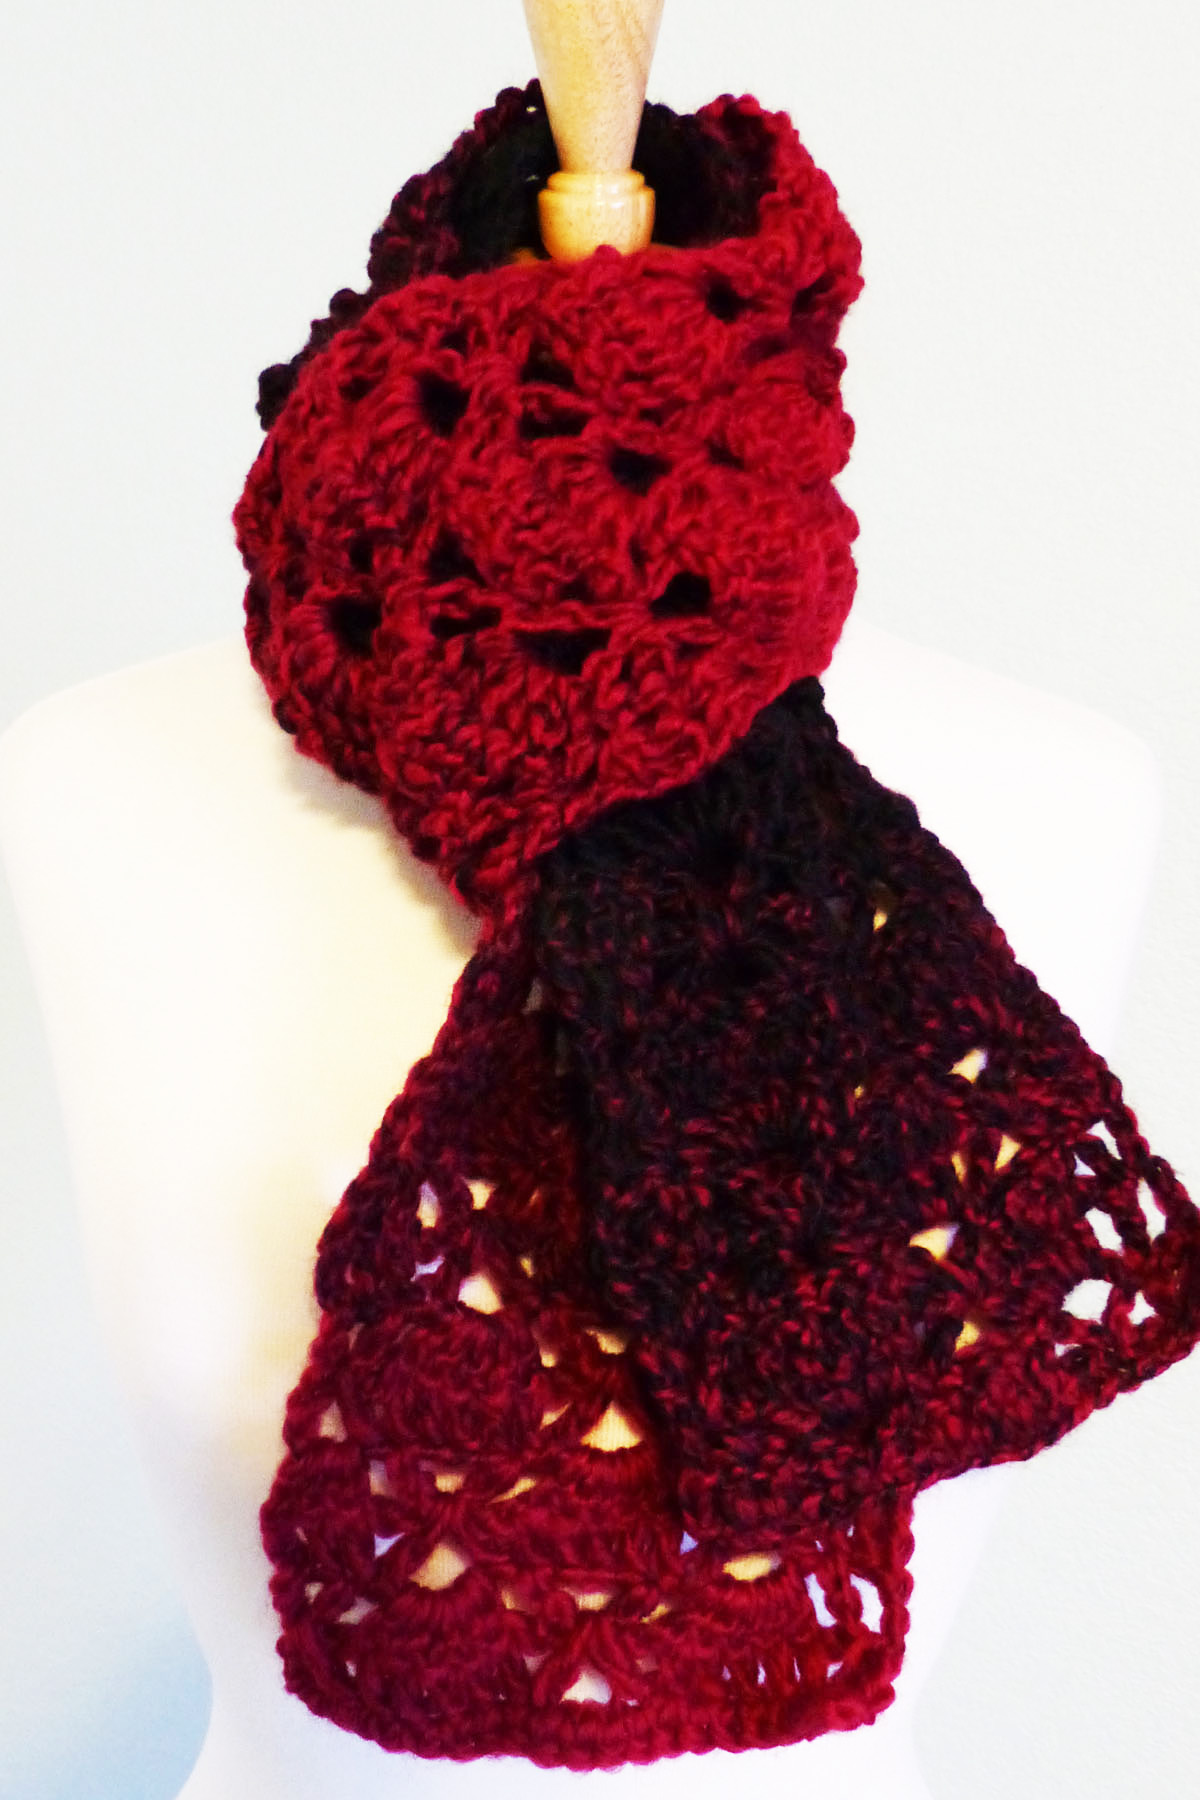
Scarfie, Cowlie & Hattie pattern
I’ve been working on new designs lately and I just finalized a pattern for a scarf, cowl and hat. This new pattern is called “Scarfie, Cowlie & Hattie”. I named this pattern after the yarn that I originally used to make a cowl and hat set for my daughter-in-law and a scarf and hat set for a friend of hers. I used Lion Brand Scarfie yarn for those projects, which took only 1 skein of yarn for each of the 2 projects (scarf and hat or cowl and hat). Because that yarn didn’t photograph as well as I’d hoped for the pattern photos (and because I wanted to test and fine-tune the pattern), I crocheted more of these accessories. Who doesn’t love wearing more accessories or giving them to others?
Scarfie made with Lion Brand Scarfie yarn
Cowlie made with Lion Brand Scarfie yarn
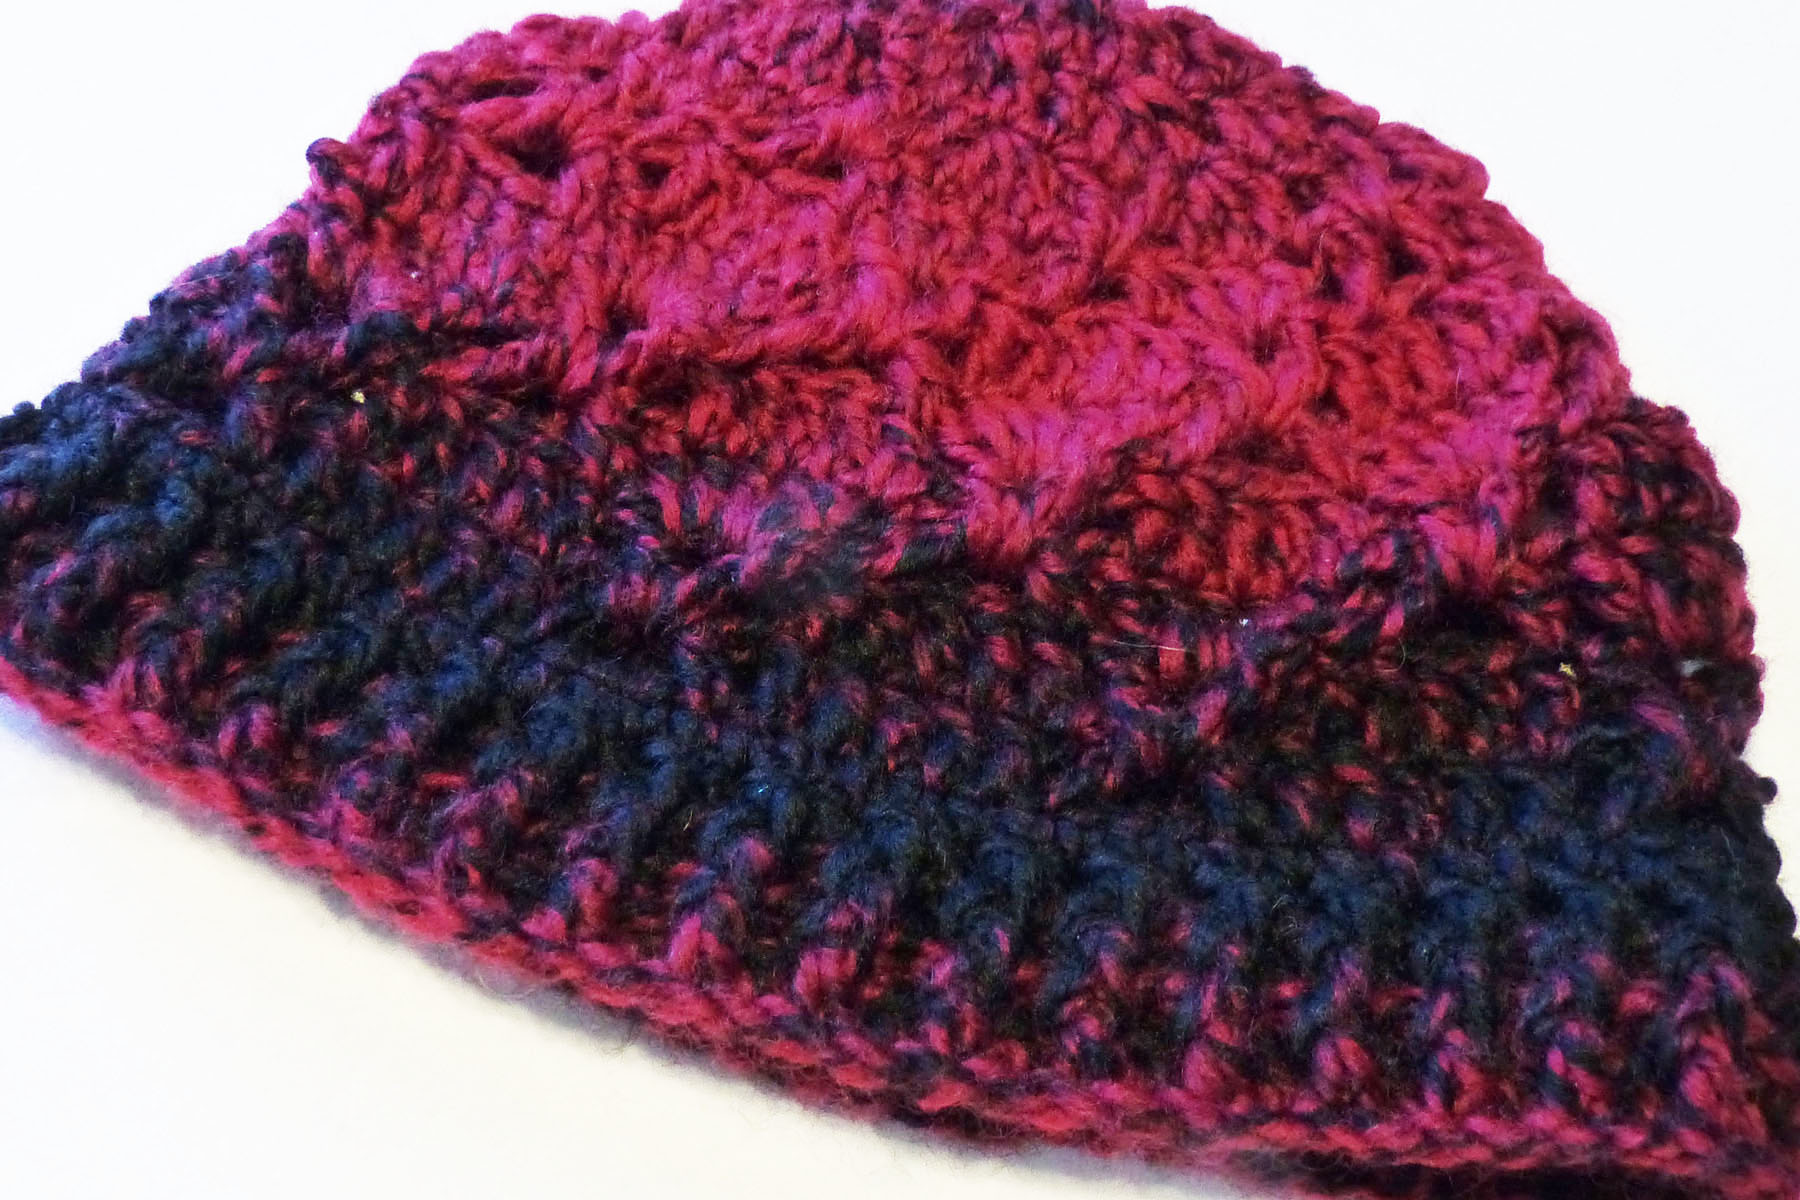
Red Hattie made with Lion Brand Scarfie yarn
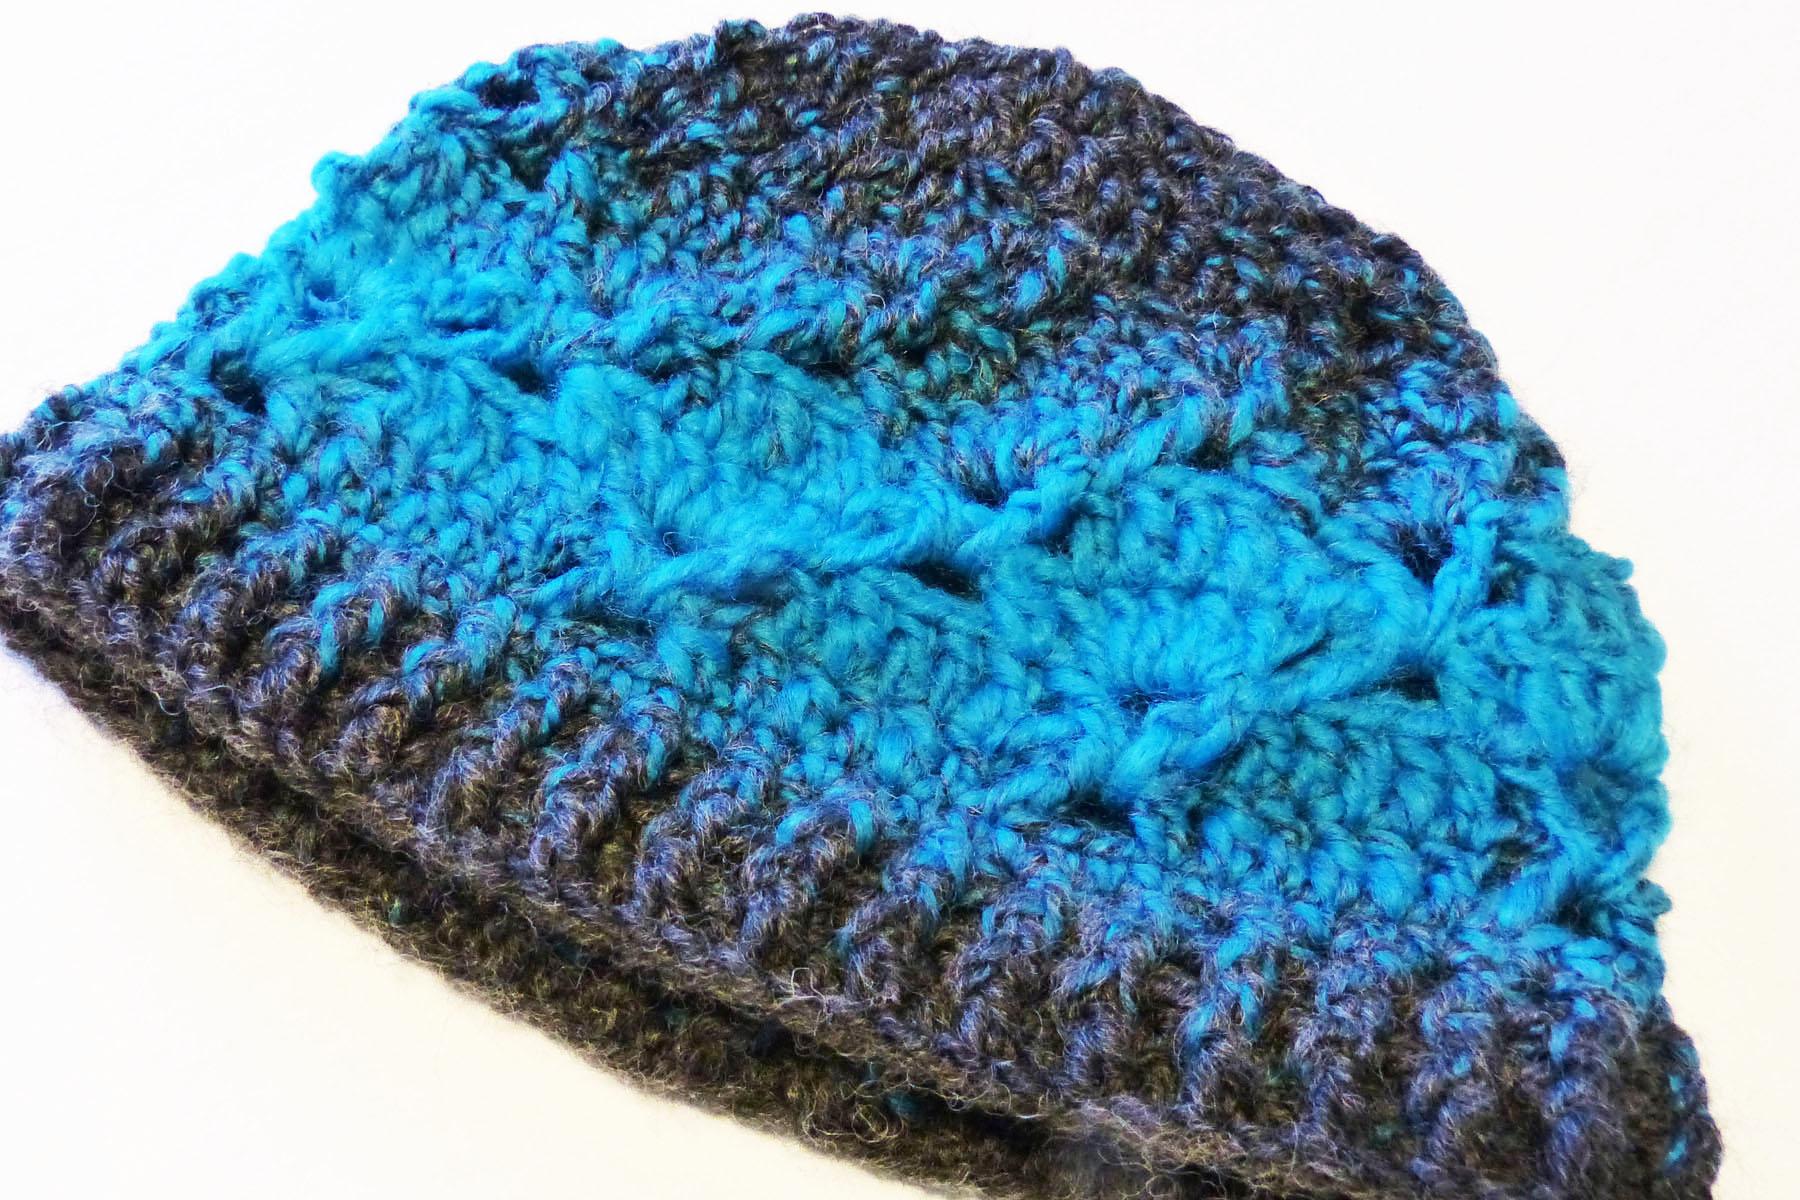
Blue Hattie made with Lion Brand Scarfie yarn
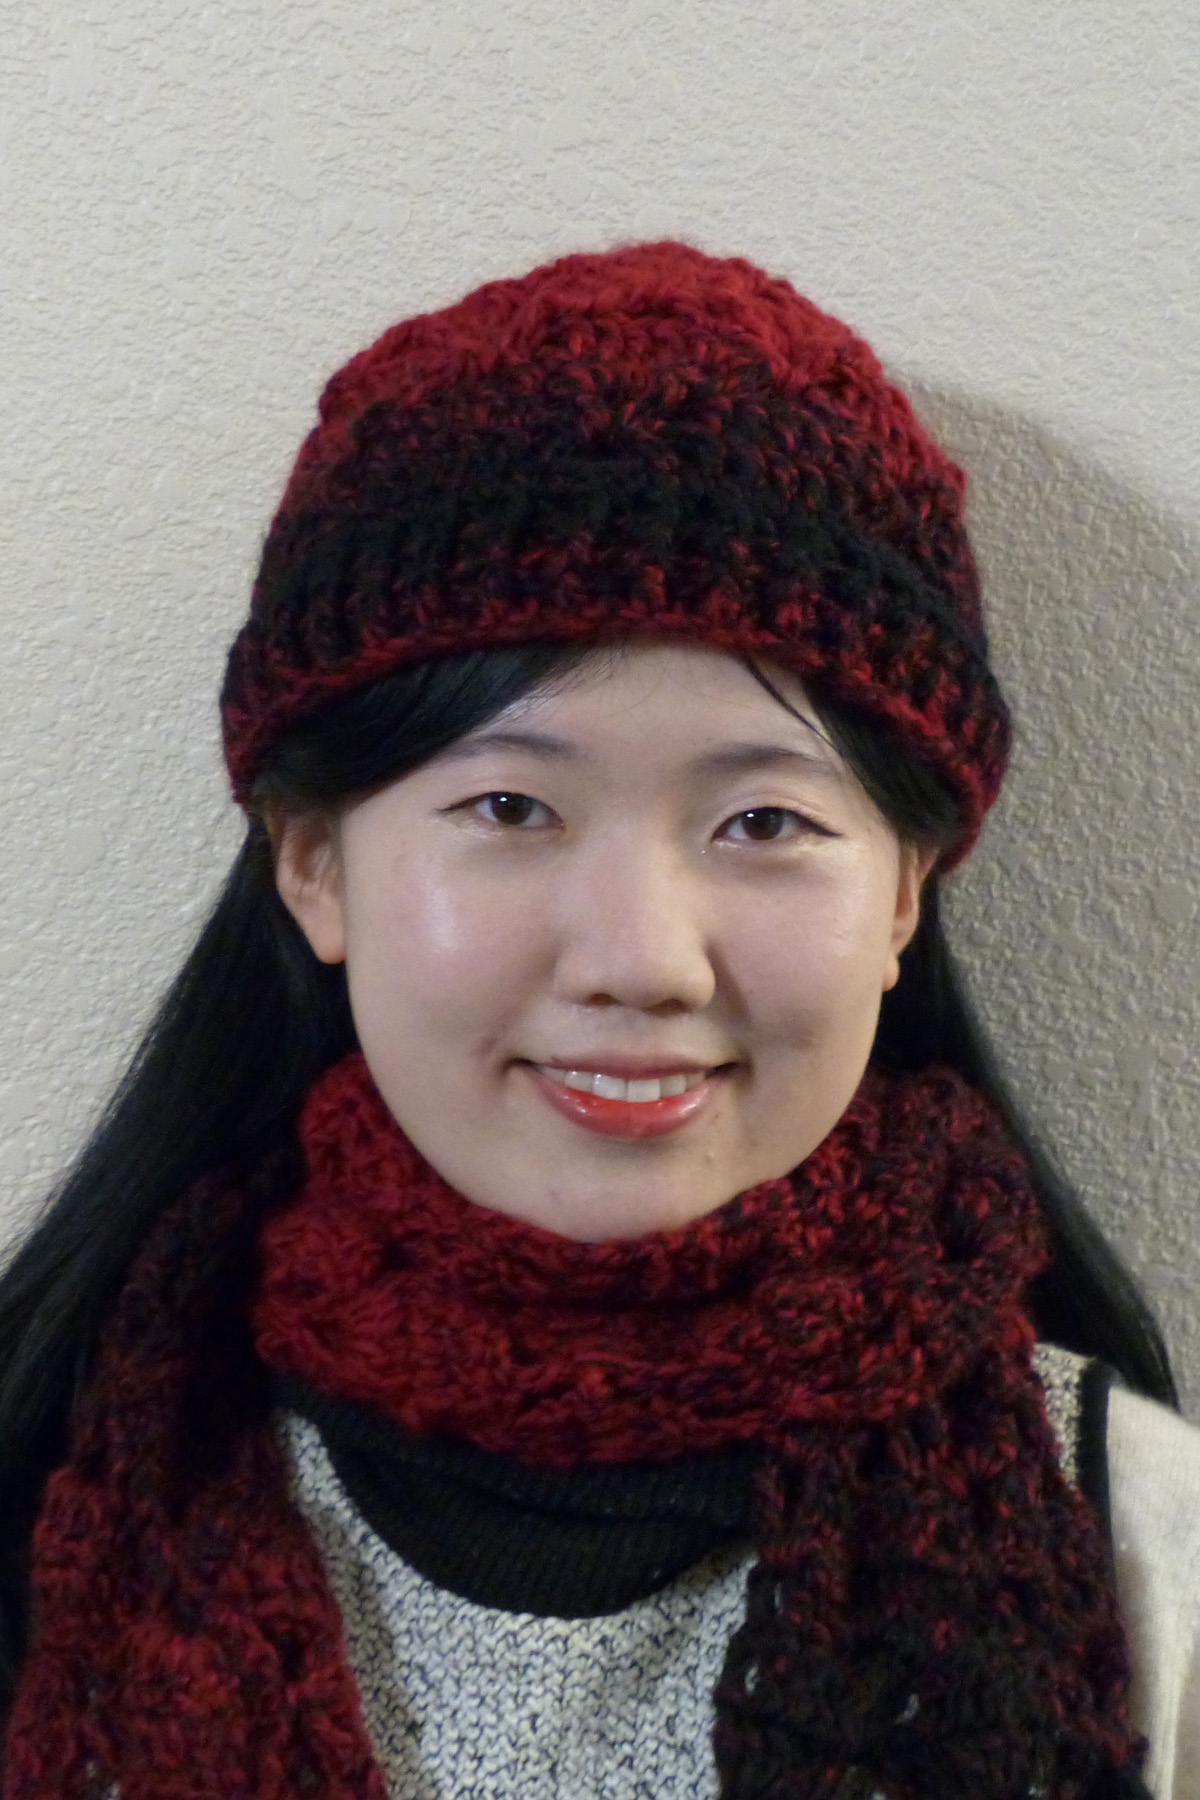
My daughter-in-law’s friend wearing her scarf and hat
The pattern is written in both US and UK crochet terms, so you can choose which pattern to download based on which crochet terms you’re used to using. If you like this feature of having my patterns available in UK crochet terms, please let me know and I’ll update my other published crochet patterns to include UK crochet terms. I want my patterns to be as user-friendly as possible!
I’ve included written instructions and symbol crochet charts for each of the 3 projects in the pattern, which is available for $5.95 (that’s just shy of $2 per project!). For more information about this pattern, check it out on the pattern page.
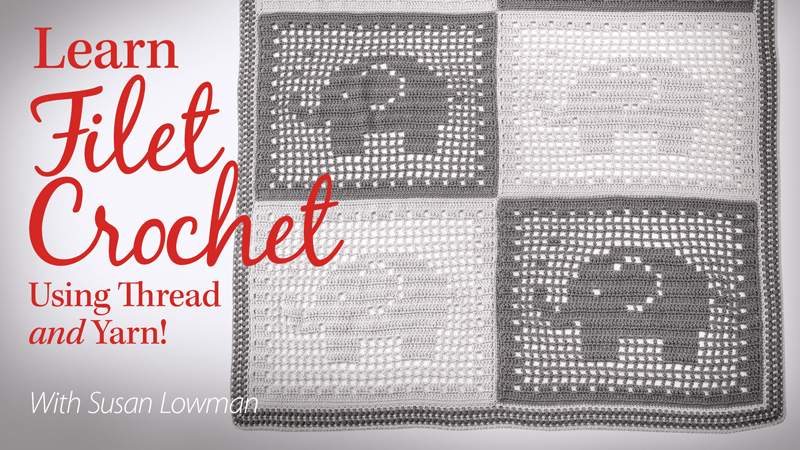
I have another announcement for you this month! It’s my newest Annie’s crochet video class: “Learn Filet Crochet Using Thread and Yarn!”.
Filet Crochet is such a great crochet technique! I’ve been doing Filet Crochet for several decades now! I’ve designed a bunch of Filet Crochet patterns and taught this technique at the CGOA Conference many times, as well as at the 2018 Interweave Yarn Fest. I LOVE Filet Crochet! You can crochet so many different kinds of things with it! You can combine it with other crochet techniques, as well.
Here are a few of the designs I’ve done over the years, some simple and others more complex:
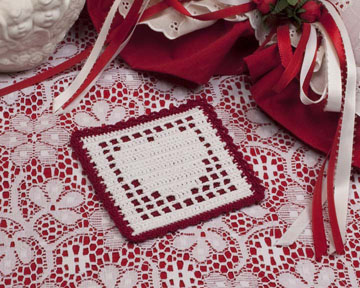
Filet Heart Coaster, published on TheCrochetArchitect website
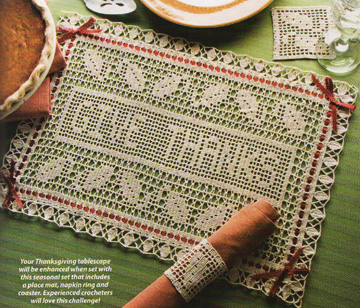
Give Thanks Placemat Set, published in Oct. 2008 Crochet World magazine
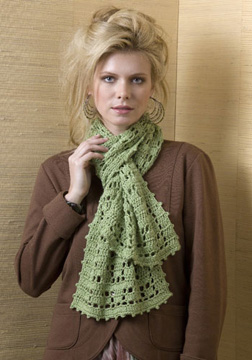
Europa Scarf, published by Caron Yarns
Filet Coaster from my Annie’s class, “Learn to Crochet With Thread”
Lovely Decor in Filet Crochet book, published by Leisure Arts in 2010
If you’d like to see all of my published Filet Crochet designs in the past 20+ years, check out this Ravelry search. Most of these designs are done with crochet thread, but a few of them are done with yarn. If you’re interested in the Europa Scarf, which I designed in 2010 with Naturally Caron Spa yarn (a now discontinued yarn), you can download the free pattern here. You can also download several free Filet Crochet patterns on the Red Heart website.
No matter what you use for filet crochet, the technique is the same! It’s just the size of the yarn/thread and hook that makes the difference (and, of course, the pattern)!
This Filet Crochet video was filmed at the same time as my other new video, “Crochet ER: Fixing Damage & Mistakes”, which came out last month. You can read all about that video in my previous blog post here.
Here are a few photos from filming this new Filet Crochet video:
Filet Crochet set and swatch
Learn Filet Crochet set with projects
And here are the 2 class projects from my new Filet Crochet class that you’ll be able to make when you sign up for this class:
Filet Elephant Baby Blanket
Filet Name Banner
In this class, I teach how to work the closed mesh, open mesh and lacets that comprise Filet Crochet patterns. I also teach how to read and follow Filet Crochet charts, as well as how to calculate the number of chains in the starting chain for a Filet Crochet pattern that is only charted (not written). And I teach 2 ways to make your Filet Crochet mesh more square.
The first thing we work on in the class is a practice swatch. With this swatch, you will learn to work the open and closed Filet mesh, as well as lacets. You’ll also get practice following a Filet Crochet chart. Once you’ve mastered the swatch, you can move on to make either or both of the class projects: the Filet Elephant Baby Blanket and the Filet Name Banner.
The Filet Elephant Baby Blanket pattern includes written instructions and a Filet Crochet chart. In the video, I demonstrate how to make the elephant blocks, as well as how to join the blocks to create the blanket. There are 2 edging options, which are both demonstrated in the video, along with the special stitches used in each edging. Because this blanket is made with yarn, it’s a great way to learn to do Filet Crochet (without any intimidation that using crochet thread and small steel hooks might present!).
Seaming/joining blocks for Filet Elephant Baby Blanket
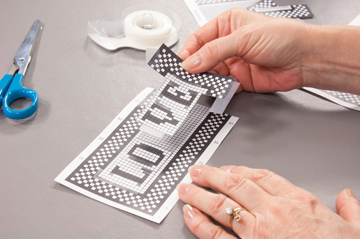
The Filet Name Banner pattern includes a chart for the whole alphabet, as well as the edging, so you can make any name or word you’d like for your Filet Banner. In the video, I demonstrate how to make your customized chart for the name or word you choose to crochet. Then I demonstrate how to crochet several of the rows, following your custom chart.
Making Filet chart for Filet Name Banner project
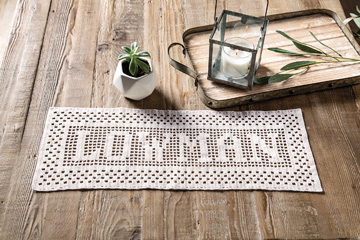
You can get creative with how you’ll use your Filet Name Banner. You may want to use it as is or mount it in some way. To give you an idea of how you may want to mount your banner, here’s a photo of another Filet Name Banner that I crocheted many years ago showing how I mounted the filet piece on some fabric and hung it on the wall with a painted wooden dowel:
Filet “Lowman” Banner
If you’re not comfortable using crochet thread and you’d like to learn to crochet with thread, you may want to check out my other crochet video class with Annie’s called “Learn to Crochet With Thread”. In this thread crochet class, my goal is to help you feel comfortable using crochet thread for your crochet projects. Who knows? You may come to love thread crochet as much as I do!
I hope you’ve enjoyed this look at my new Filet Crochet class for Annie’s! If you’d like to take a look at this video class, as well as watch the free class overview and introduction segments, check it out HERE (Note: This is an affiliate link, so if you click on this link and purchase the video through the link, I’ll receive a small commission to help compensate me for my hard work! It won’t cost you any extra to purchase the video through this link and I would appreciate your support!).
I hope you’ve enjoyed this look at my new Annie’s video class!