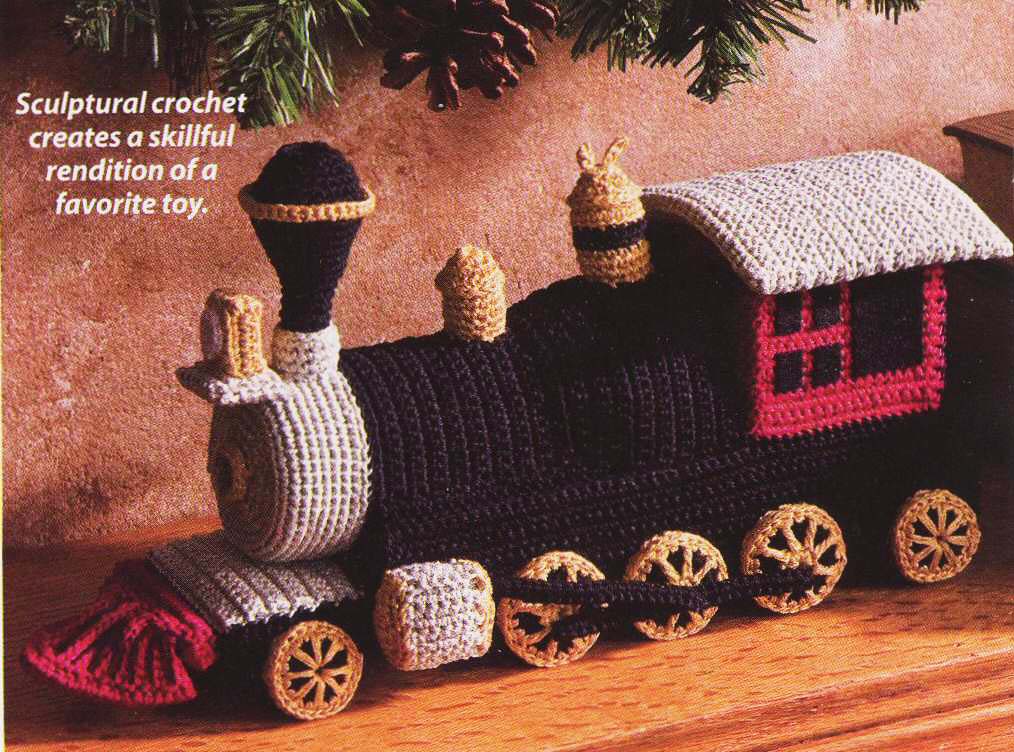
Locomotive Toy (published in Crochet World magazine, Dec. 2009)
Where did February go? It’s almost March already! And that means National Crochet Month will be starting! Yahoo!!! Do you have plans to do anything “special” for National Crochet Month? I do!
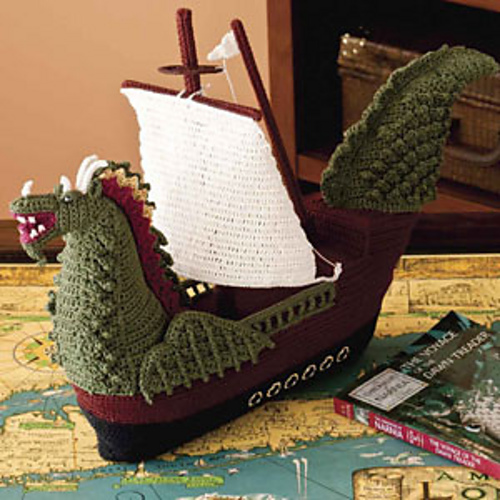
Dragon Ship (published as a web bonus online in Crochet World magazine, Feb. 2011)
There will be a blog tour called “A Tour through Crochet Country” starting tomorrow, March 1st, and running every day in March on Crochetville. Each of the 31 days in March, 1 or 2 crochet designers from the Crochet Guild of America (CGOA) will be blogging about crochet. Most of the crochet designers live in the US, but there is at least one designer taking part in the blog tour who lives outside the US (in Australia). Go here to see the list of designers and the schedule for the day each one is participating in the blog tour. There will be some really fantastic crochet designers participating; some you may not know yet! I’ll be blogging on March 26th for this blog tour. It should be a blast!!! I can’t wait! I’m sure we’ll all learn something new about crochet or about some of our favorite crochet designers. I hope you enjoy this blog tour and have a wonderful “National Crochet Month”!!!
Stay tuned for the announcement of the winner in my Wiggly Crochet Dishcloths giveaway tomorrow morning! Thanks for reading and commenting on my blog this month! I really enjoy the feedback!
This is the last stop on the Wiggly Crochet Dishcloths blog tour. Boohoo. I’m sad to see it come to an end! It’s been a lot of fun!
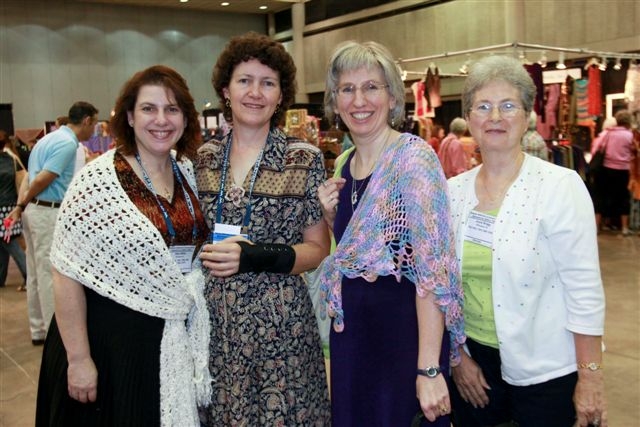
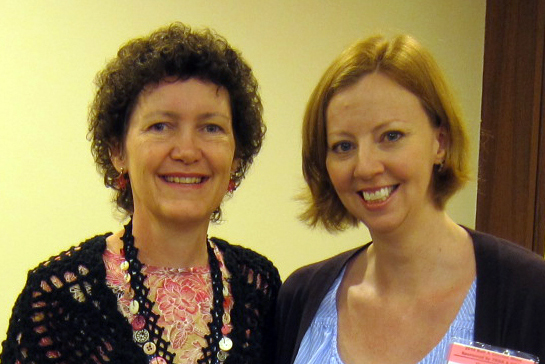
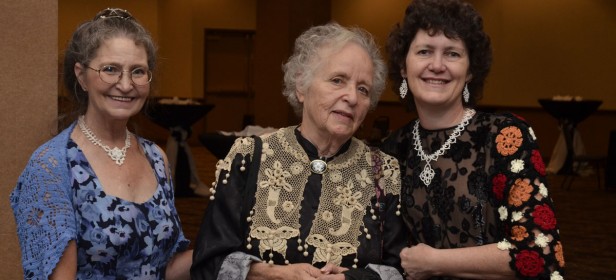
Today, we’re going to visit the blog of Andee Graves. I first met Andee at a CGOA Conference (I think it was in 2009 in Buffalo when I had a broken wrist – I definitely wasn’t able to crochet for a while then!). Here’s a photo of Andee and I, along with Shari White (one of my mentees and a very talented designer) and Joyce Bragg (another very talented designer), waiting to meet with the editors at the Buffalo conference (from left to right: Shari, me, Andee and Joyce):
Waiting for Editors at CGOA Conference in 2009
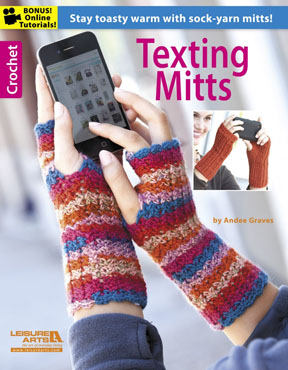
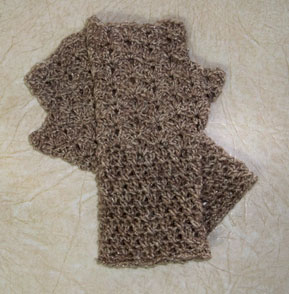
If you’ve been reading my blog for more than a few weeks, you might recognize Andee’s name. I wrote a blog post for Andee’s blog tour of her new Texting Mitts booklet, published by Leisure Arts, on February 10th. Here’s a photo of the front cover of her booklet:
Texting Mitts front cover
Andee’s texting mitts are fun to make! I made 2 pairs of them when I was preparing for her blog tour. You can read more about this booklet on my Feb. 10th blog post or on Andee’s blog!
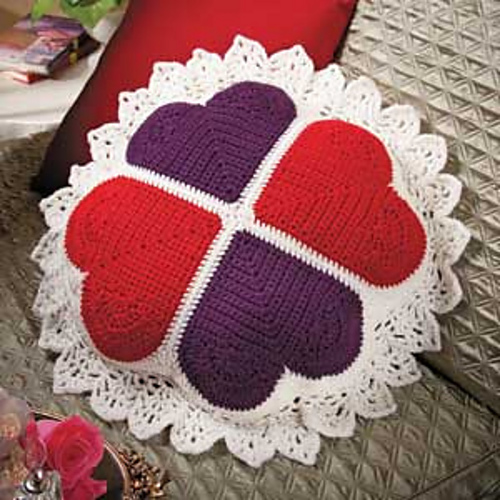
Andee is a fantastic newer designer (newer than me). She is a bundle of energy and a wealth of information! And she’s a really nice person, too! Andee already has over 50 published designs in just the last 3 years! Wow! Way to go, Andee! You can see all of Andee’s published designs on her Ravelry designer page. This is one of my favorites of Andee’s designs:
Andee’s Heart Pillow
This heart pillow was published in Crochet World magazine’s Feb. 2012 issue. Isn’t it pretty?
Please hop on over to Andee’s blog to read what she’s written about my Wiggly Crochet Dishcloths booklet and the dishcloth she’s made from the booklet.
Since this is the last stop on my blog tour, I will be picking and announcing a winner for the free autographed copy of my Wiggly Crochet Dishcloths booklet on Friday. If you haven’t entered yet, just leave a comment by 6PM (Arizona time) tomorrow on my blog post from either Jan. 27 or Feb. 9. I wish you all good luck in the giveaway!
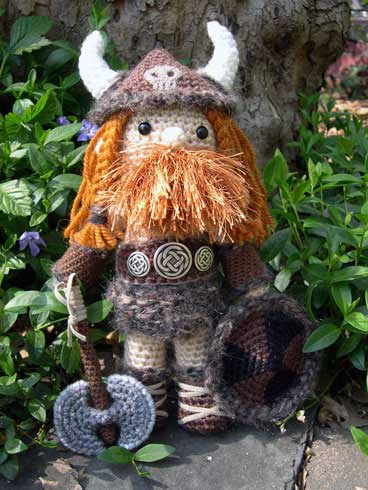
Today we’re visiting a very talented crochet designer named Kara Lyon. Kara designs amigurumi dolls that are absolutely amazing! Here’s a photo of one of her dolls:
Kara Lyon’s Viking Doll
Isn’t that awesome? To see all of her amigurumi dolls, visit her website.
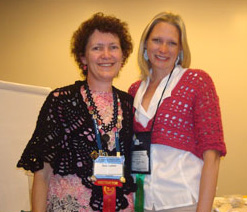
When I first saw Kara’s amazing dolls online, I contacted her and encouraged her to attend the CGOA Conference in Manchester, NH in 2010, where we met face-to-face. We had previously communicated through e-mails and it was wonderful to meet her in person! Here we are at that conference:
Susan and Kara
Kara took my wiggly crochet class at the conference and I think she really enjoyed it. She designed her own wiggly crochet rug the following year. You can see and read about her rug on her blog. It’s very creative!
Today Kara is blogging about my Wiggly Crochet Dishcloths booklet. I can’t wait to read what Kara has written and see what kind of wiggly crochet dishcloth she’s created (she’s so creative!). I hope you’ll visit her blog to read about what she’s done!
If you haven’t already entered to win a free, autographed copy of my Wiggly Crochet Dishcloths booklet, you still have a few more days. Just leave a comment on either my Jan. 27 or Feb. 9 blog post to enter. Good luck!
Our 3rd stop on this blog tour is with the very talented Ellen Gormley of Go Crochet. Ellen has been blogging for many years and always has something wonderful to share with her readers! She’s a very talented designer and one of the experts on the Knit and Crochet Now show.
Ellen Gormley (right) and Susan Lowman (left)
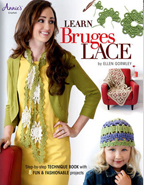
In 2010, Ellen took my Beginning Bruges Lace class at the CGOA Conference in Manchester, NH. She really took to Bruges Lace and started designing in it almost immediately. Last year, she had a booklet published by Annie’s called “Learn Bruges Lace”! Here’s a photo of Ellen and me in that class:
And here’s a photo of Ellen’s Bruges Lace booklet:
Learn Bruges Lace front cover
If you missed my blog post about Ellen’s booklet, you can read it here. Bruges Lace is a lot of fun. I’m not sure which I like better: Bruges Lace or Wiggly Crochet!!! They’re both wonderful crochet techniques!
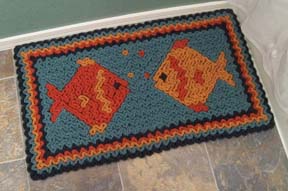
Last year at the CGOA Conference in Reno, I had some of my wiggly crochet projects on display in the Designer Showcase that the extremely talented Doris Chan spent many hours organizing! Thanks so much, Doris!!! Many crochet designers participated in the Designer Showcase and it was a huge success!!! Here’s a photo of my Wiggly Fish Rug on display there:
Wiggly Crochet Fish Rug
I self-published this pattern last year. It’s available as a PDF download right here on my website (under “Patterns”), on Ravelry, and on Craftsy.
If you’ve never tried wiggly crochet, please download my “FREE” May Flowers Hot Pad & Coaster pattern on the Coats & Clark website. That way, you can give this crochet technique a try before purchasing any wiggly crochet patterns to see if you like it. After giving it a try, you might be “hooked” on wiggly crochet (pun intended!) like I am! And if you’d like to make some Wiggly Crochet Dishcloths, you can purchase my Wiggly Crochet Dishcloths booklet on the Annie’s website as a hard copy in the mail or as an instant PDF download for $8.95.
So head on over to Ellen’s blog today to read what she has to say about wiggly crochet and crochet in general!
If you missed the first stop of my Wiggly Crochet Dishcloths blog tour on Feb. 13th, you can still read what Brett Bara wrote on her Facebook page that day. Brett is a super talented lady who wears many hats (and her cat, Fifi, is adorable!!!). You can read her blog and see photos of what she’s up to (and Fifi) on her website. Brett is currently the host of the Knit and Crochet Now show on PBS. Brett was the first editor of Crochet Today magazine for many years. I tech edited for Crochet Today for several years before I met Brett at a CGOA Conference in Manchester, NH. She’s just as nice in person as she looks in her photos!!! Brett is putting on a full day of craft classes called the Brooklyn Craft Camp on Saturday, March 16th in Brooklyn (where else?). I wish I lived closer so I could attend!!! Here’s a photo of Brett, in case you haven’t gotten acquainted with her yet:
Brett Bara
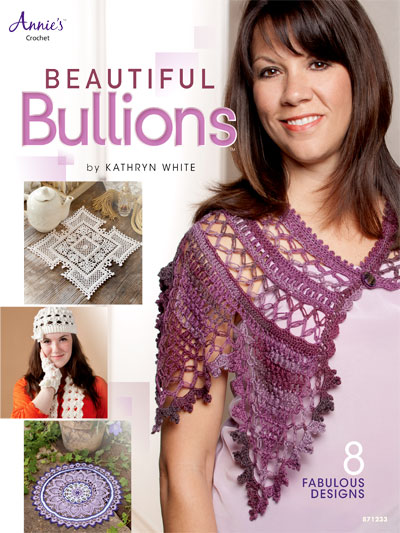
Today’s stop on the Blog Tour is with Kathryn White. Kathy is a very talented crochet designer who has won numerous awards in the CGOA Design Contest in the last 2 years. She’s also a really good friend of mine. We met at the CGOA Conference in Greensboro, NC in Sept. 2011. We quickly became friends and learned that we lived only 130 miles apart! We see each other every month when Kathy drives up here to attend the monthly crochet group that I’ve attended for many years. You can read more about Kathryn White on her blog, her website and her Facebook page. Kathy is a very accomplished thread crochet designer in the crochet world. She’s a great source of inspiration for me! Here’s a photo of Kathy (on the left), the famous Rita Weiss (in the middle) and me (on the right) at the fashion show/dinner at the CGOA Conference last year in Reno, NV:
Kathryn White, Rita Weiss and Susan Lowman
Kathy’s newest booklet of crochet designs is Beautiful Bullions. This is a wonderful booklet of fabulous designs! Kathy never fails to impress me with her designing abilities!!! Here’s the cover of that booklet:
Beautiful Bullions booklet cover
Click here to see and/or order this booklet from Annie’s.
And if you haven’t yet entered to win a free, autographed copy of my Wiggly Crochet Dishcloths booklet, you still have time. Just leave a comment on my blog post from Jan. 27 or Feb. 9 to be entered. There aren’t too many entries yet, so your chances of winning are great!!!
My good designing friend, Andee Graves, has had her first crochet booklet published by Leisure Arts. Way to go, Andee!!! Woohoo!!! It’s always very exciting to have your first crochet booklet published and Andee has done an excellent job with her designs in this one! If you’re not familiar with Andee’s work yet, you can read about her and follow her blog here.
Texting Mitts front cover
This booklet includes patterns for 8 pairs of fingerless gloves, which are ideal for texting! I suppose you could use them for doing just about anything that involves having your fingertips free while keeping your hands warm, like talking on your cell phone, crocheting, etc. Since I’m not a big texter (I have to put my reading glasses on to read the small letters, so I don’t text every day), I’d be more likely to use these gloves for keeping my hands warm while crocheting!
These 8 patterns are very nicely designed, mostly starting from the wrist and worked to the fingers. With different stitch patterns and skill levels, there is something for everyone! There is 1 beginner pattern, 3 easy patterns, 2 easy+ patterns (Whatever that means! Perhaps it’s somewhere between easy and intermediate!) and 2 intermediate patterns. Andee has used super fine weight yarn (#1 weight on the yarn label) and a size E (3.5mm) or F (3.75mm) crochet hook for each pattern. A list of the specific yarns used in each pattern is included at the back of the book.
What I find to be very exciting and innovative in this booklet is the online videos for different stitches and techniques that are available on the Leisure Arts website for some of their booklets. Whenever there is a different/challenging stitch in this booklet, a video camera icon is printed in the booklet, letting the reader know that she/he can watch the video online for that particular stitch/technique! I LOVE that!!! If you’ve never done a Front Post double crochet, a foundation single crochet or any of the other “special stitches” in this booklet, all you have to do is watch the video for that stitch/technique that is associated with the pattern in this booklet on the Leisure Arts website and you’ll be mastering that stitch/technique in no time!!! It’s almost as good as having a crochet teacher right next to you to show you how to do these stitches/techniques! Make sure you type in the website link on the first page of this booklet to go straight to the videos for these texting mitts patterns, though. I spent a while looking around their website one day trying to find the videos and finally found them after a lot of time spent looking!
Another nice thing in this booklet is how they used different colors of print in the patterns for the stitch counts and information in each of the 3 different sizes of mitts (some of the mitts patterns include 3 sizes and others have only 1 size). This makes it much easier to find the information you need associated with the size of mitts you’re making!
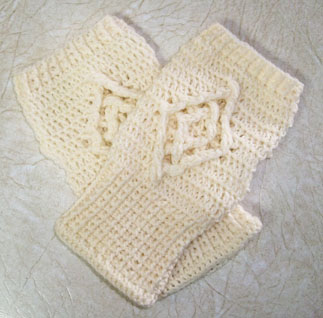
I made 2 pairs of these mitts last week. Here are photos of the texting mitts I made:
My Diamond Back Texting MittsMy Seashell Texting Mitts
The lighter-colored mitts are from Andee’s Diamond Back Mitts pattern (intermediate skill level) and are made with Patons Kroy Socks yarn. The darker-colored mitts are from Andee’s Seashell Mitts pattern (easy skill level) and are made with Red Heart Stardust yarn. I had both of these yarns already, so I was able to make a small dent in my stash crocheting these mitts!!! I really enjoyed making both of them, especially since I’ve never crocheted mitts/gloves before for some strange reason! I decided to make a few modifications to the lighter-colored mitts (I couldn’t help it! It’s the designer in me! Or maybe it was my “gauge issue” rearing its “ugly head” again!). Anyway, I can still crochet while wearing these, so they’re very handy for keeping hands warm and still being able to crochet (or text or type or whatever) with your fingertips!
To see and purchase this booklet online (and see photos of all 8 of the texting mitts), visit the Leisure Arts website. This booklet is available in print or digital format.
All in all, I like Andee’s first booklet very much. The patterns are well-written and easy to follow. Well done, Andee!!! I look forward to seeing your next booklet when it comes out!
To celebrate the publication of my “Wiggly Crochet Dishcloths” booklet, I’m going to have the first of many giveaways on my blog. At the end of the blog tour for this booklet, one lucky winner will receive an autographed copy of “Wiggly Crochet Dishcloths” in the mail. To enter the giveaway, just leave a comment on this blog post (or the blog post from January 27th on my “Wiggly Crochet Dishcloths” booklet, where you’ll find more information about the patterns inside). Good luck!!!
Front cover of Wiggly Crochet Dishcloths
I’ve finalized the blog tour dates of this booklet with my crochet friends. Here they are in the order in which they’ll appear:
Please visit these blogs to read more about my Wiggly Crochet booklet and what each of these very creative people think of it! You’ll also see some fantastic designs and ideas on each of these websites and blogs from some very talented ladies!
As many of you probably already know, Brett Bara is very crafty. She was the editor of Crochet Today magazine for many years and is the host of Knit and Crochet Now, along with other crafty endeavors!
Kathryn White is an extremely talented, award winning thread designer. Her designs are fabulous!!! And she’s a very good friend, too.
Ellen Gormley is a force to be reckoned with in the crochet world! She has many published crochet designs and is a crochet expert on the Knit and Crochet Now show.
Andee Graves is an up and coming crochet designer. She’s gotten a great start on her designing career. She just had her first crochet booklet published by Leisure Arts called “Texting Mitts”. Check it out on her blog or on my blog post for her blog tour (on Feb. 10th)!
Kara Lyon has an awesome talent for designing amigurumi figures. You’ve got to see her designs! I love them!!!
I hope you enjoy this blog tour and getting to know these very talented ladies!
Last month, I had the pleasure of traveling to Berne, IN for a secret project. I can’t tell you what the project was yet, but stay tuned for the big news to be announced in 3 – 4 weeks! Unfortunately, I can’t confirm or deny any ideas of what I was doing in Berne, so please don’t ask!!! Just be patient and wait for the big news when it comes! Like I said, it’s a “secret”!!!
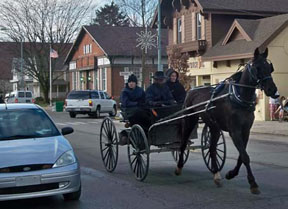
If you’ve never heard of Berne, IN, you can learn more about this quaint little town on their Chamber of Commerce website. Apparently, the population is only about 4,400! That’s a lot smaller than my town of 39,000 and a far cry from the big metropolitan cities across the US. Since I’d never seen any Amish people in real life (besides on TV), I was fascinated when they drove by in their horse and buggies! I got a decent photo of one of them for you to see.
Amish in Horse & Buggy
Here’s a photo of Main Street with the famous clock tower in Berne in the background:
Main Street in Berne, IN
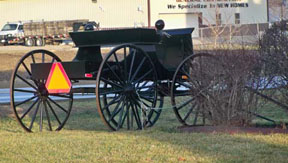
I stayed at the Black Bear Inn & Suites in Berne on U.S. 27. It was a nice place to stay with comfortable rooms. I had a Jacuzzi suite, but I didn’t know how to work the Jacuzzi, so I just had a warm bath one night instead of a Jacuzzi bath! If you know me, you understand my “challenges” with anything electronic or with buttons that I can’t read without my reading glasses!!! I still have a “stupid” phone and I’m quite happy with it, thank you very much! Here are a few photos of the Black Bear Inn, along with the buggy they have outside by their sign:
Black Bear Inn & Suites in Berne, IN
Sign at Black Bear Inn & SuitesAmish Buggy by Black Bear Inn
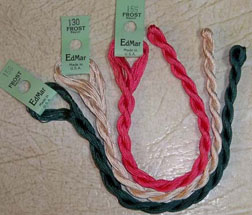
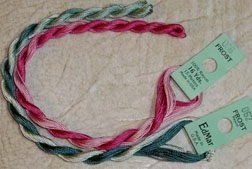
I had some time to do a little sightseeing one afternoon, so I browsed in some of the shops on Main Street. I went into the Engine House Quilt Shop and talked with Carol, the employee there that day. She showed me some really nice rayon embroidery thread by EdMar Co. I bought 5 skeins of Frost, which is a 3 ply thread with 16 yards per skein. I’m going to use this gorgeous thread, which has a beautiful sheen, for crocheting a new design or two. If you’d like to learn more about EdMar rayon thread, which is used for Brazilian embroidery, please visit their website. These are the embroidery threads I bought for designing:
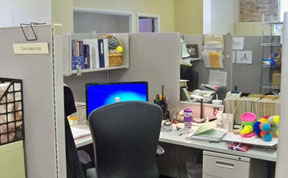
I had a great time in Berne and met some fantastic people there. I also had the pleasure of touring the Annie’s offices while I was in Berne. If you’re somehow not familiar with Annie’s, please take a look at the Annie’s website. They produce/publish patterns and kits for many different crafts, including crochet, knitting, paper crafts and more! I saw and talked to Carol Alexander, the editor of Crochet World and Crochet magazines, who I’ve met at many CGOA Conferences over the years and took a picture of her cubicle in the office. Here is her cubicle:
Carol Alexander’s cubicle at Annie’s
I met Brenda Gallmeyer, who I had contacted in 2011 about some tech editing I did for Annie’s (then called DRG). I also met some other people, but I don’t remember all of their names (that happens as we get older, doesn’t it!). Here are a few photos outside of the Annie’s office:
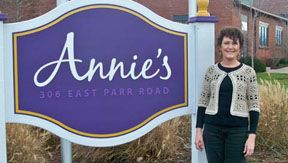
Front door of the Annie’s officeMe by the Annie’s Sign on a windy day!
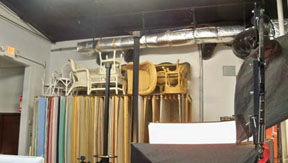
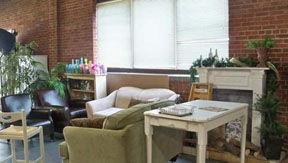
I met 2 photographers at the Annie’s office and one of them gave me a tour of the photography studio with all their props, lights and cameras! That was really nice! Since my husband and I are learning to photograph my crochet designs for self-publication, it was really interesting to see. I even learned how they store and use some of their props. I was told that they use 2 sheets of painted wood behind the props for a colored wall. To hide the line where the boards meet, they just remove it from the photo with Photoshop! It’s too bad we don’t have room in our house for lots of wonderful photo props. I would love to have a photo studio like theirs!!! Here are some pictures of their photo studio:
Camera & Lights at Annie’s Photo StudioPhotography Props at Annie’s Photo StudioMore Photo Props at Annie’s Photo Studio
All in all, it was a very nice trip and the weather wasn’t bad, either. It got up to the 50’s one day while I was there, which is warmer than it was back home in Prescott, AZ (I really expected the weather to be worse than it was in Berne, so I was pleasantly surprised)! There was light rain one day, but the rest of the time it was dry. I was in Berne for 3 full days, with 2 additional days for traveling. I got a few crochet projects made on the airline flights on the way there and back, too. I thoroughly enjoyed myself and would love to return there again someday!
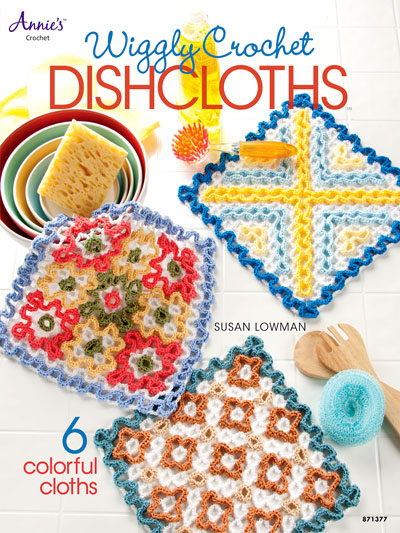
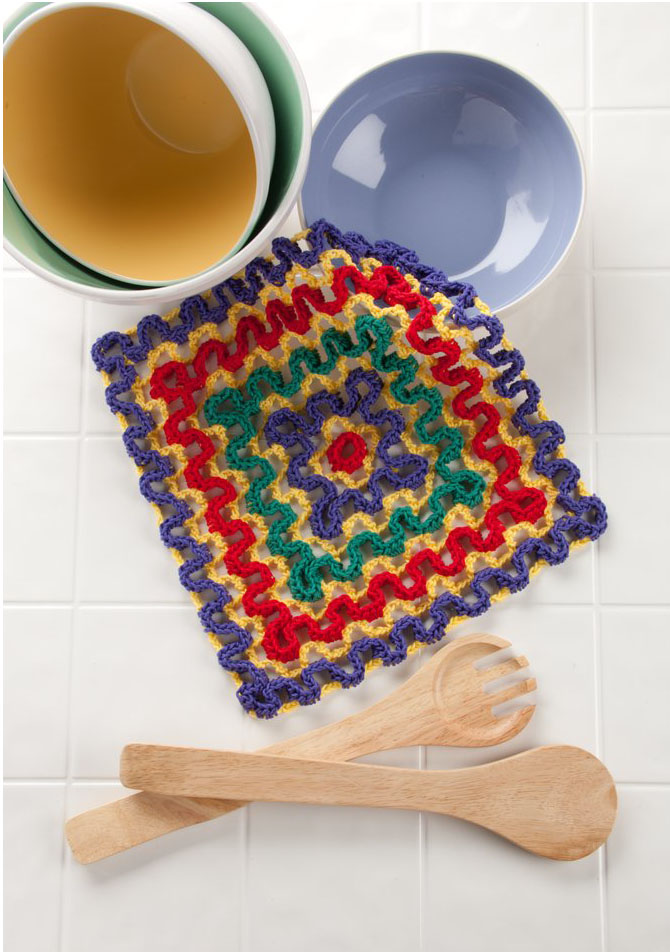
I’m very excited to announce the publication of my newest crochet booklet, “Wiggly Crochet Dishcloths”, published by Annie’s! Here are photos of the front cover and the other 3 dishcloths that aren’t shown on the front cover:
Front cover of Wiggly Crochet DishclothsFour Squares dishcloth
Concentric Squares dishcloth
Diagonals dishcloth
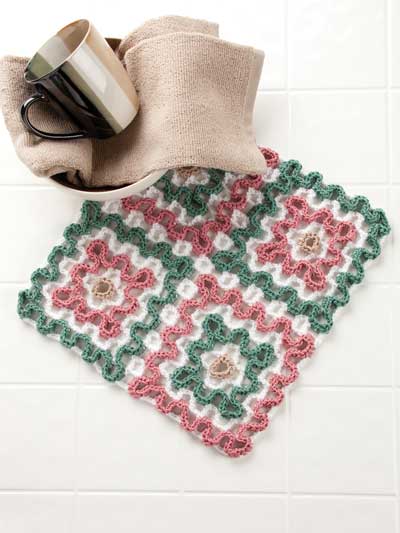
This booklet includes photos, instructions and charts for 6 different wiggly crochet dishcloth projects. These dishcloths are made in an array of beautiful colors of Omega Sinfonia yarn, which is a light worsted weight cotton yarn. Each project measures from 10 ½” x 11” to 12” square, the perfect size for dishcloths. These dishcloths are fun to stitch and make fantastic gifts! If you’d like to order a copy of this booklet, you can find it on the Annie’s website.
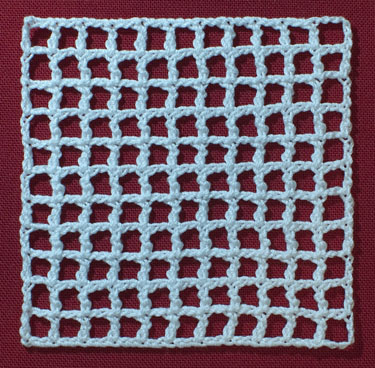
If you aren’t familiar with Wiggly Crochet, let me tell you how it’s done. Wiggly Crochet is made in 2 steps. The first step is to crochet the foundation mesh. This mesh looks a lot like the open mesh of filet crochet, made with double crochets and chain-2 spaces. Here’s a photo of a Wiggly Crochet foundation mesh:
Wiggly Crochet foundation mesh
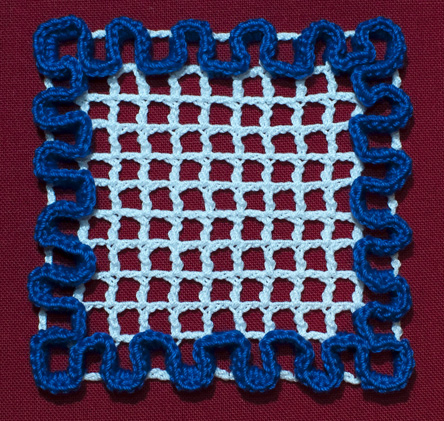
The next step is to crochet the “wiggles” onto the top of the foundation mesh, which makes these wiggles stick up and gives the wiggly crochet piece dimension and thickness, which is not found in most other crochet techniques. The wiggles are usually made up of double crochets worked on top of the foundation mesh: around the post of the double crochets and in the chain-2 spaces (not IN the chains themselves, but in the spaces created by the 2 chains). You work the specified number of double crochet in/around each post/chain-space, making a 90 degree turn each time to fill the appropriate areas with the wiggles. It’s the act of turning 90 degrees that makes these stitches wiggle and stick up instead of lying flat! Here’s a photo (taken from the top) of the first round of wiggles worked on a wiggly crochet foundation mesh:
Wiggles shown from top
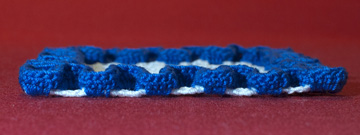
Here’s a photo of those same wiggles (taken from the side), so you can see how dimensional they are:
Wiggles shown from side“Hot Stuff for the Holidays” booklet
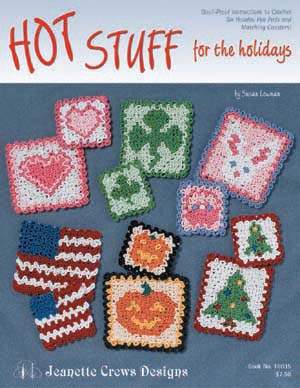
Isn’t that cool? I love this technique so much that I’ve previously had 2 crochet booklets published on it. The first one was “Hot Stuff for the Holidays”, published by Jeanette Crews Designs in 2003. There are patterns and charts for 6 “holiday-themed” hot pads and coasters in this one (for Valentine’s Day, St. Patrick’s Day, Easter, July 4th, Halloween and Christmas). This booklet is extremely hard to find, so if you find one for sale online (and it’s not too expensive), you might consider snatching it up! These designs are worked with size 10 cotton crochet thread (for all of us “threadies”!). Here’s a photo of the front cover of that booklet:
“Wiggly Crochet Rugs” booklet
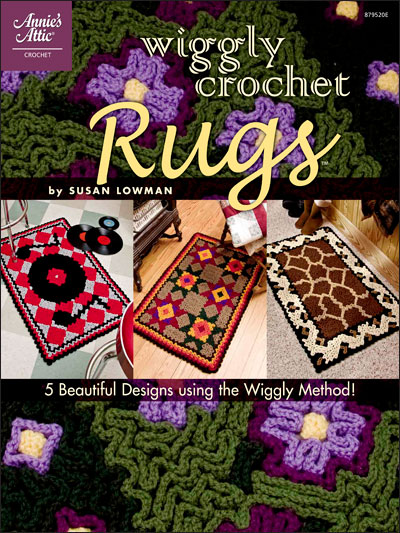
The 2nd wiggly crochet booklet was “Wiggly Crochet Rugs”, published by Annie’s Attic (now just called “Annie’s”) in 2009. This booklet has 5 wiggly crochet rugs in it, complete with instructions and full-color charts. These rugs are made with yarn: the foundation mesh is made with sport weight yarn and the wiggles are made with worsted weight yarn. This booklet might be easier to find, since it was published just 4 years ago. Here’s a photo of that cover:
I’ve also designed some other wiggly crochet projects, which were published by Annie’s (mostly in Crochet World magazine from June 2008 to Feb. 2010). If you’d like to see all of them, please visit my Ravelry designer page. Oh, I almost forgot! I have a FREE wiggly crochet pattern, available on the Red Heart website. You can try this technique for free and see how you like it! Isn’t that great?
If you’re more of a “hands on” type of learner and would like to learn to do wiggly crochet, I’ll be teaching a Wiggly Crochet class at the CGOA Conference this year in Indianapolis. The class schedule hasn’t been made yet, but this class should be scheduled between July 17 and 21 (either from 9AM-12Noon or 2-5PM). To read about this CGOA Conference, please visit the CGOA website (look under the “events” tab on the left-hand side of the page). I would be thrilled to meet you and teach you how to do wiggly crochet in my class!
To celebrate the publication of my new Wiggly Crochet Dishcloths booklet, I’m doing a Blog Tour in February with several of my crochet friends/designers. Each person will blog (or post on Facebook) about this new booklet and possibly give away a copy to a lucky entrant. Please visit each of these blog posts to find out more about my new booklet, as well as reading the blogs of these extremely talented individuals!
The blog participants are as follows (dates to be announced next month):
At the end of the blog tour, I’ll be giving away an autographed copy of this new booklet to a lucky winner (US residents only please). To enter the contest, just leave a comment on this blog post telling me which of these dishcloth patterns is your favorite. It’s that simple! A winner will be chosen at random from all of the comments at the end of the blog tour. Good luck to you all!
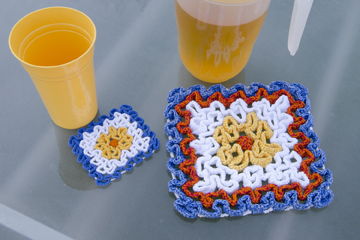
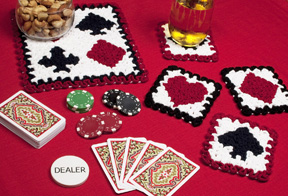
If you’ve never tried wiggly crochet, you don’t know what you’re missing! If you have tried it and are looking for more wiggly crochet patterns, we have a few of them here at The Crochet Architect. Here they are for your viewing and crocheting pleasure:
Wiggly Flower Hot Pad & Coaster
Our Wiggly Flower Hot Pad & Coaster Set is the perfect pattern for learning to do wiggly crochet. The small size of the coaster is a quick project and the hot pad is a natural progression for increasing your wiggly crochet skills. The cotton crochet thread that is used makes them ideal for soaking up the moisture from any glass or pitcher in humid weather!
Wiggly Crochet Playing Cards Set
This Wiggly Crochet Playing Cards Set includes a centerpiece and 4 coasters: one for each of the suits of playing cards. This set is unique and would make a great gift for that special person!
Wiggly Crochet Fish Rug
When you’ve learned to do wiggly crochet and want to take your skills to the next level, this Wiggly Fish Rug is just the thing! It’s great in any fish-, seashell-, ocean- or tropical-themed bathroom. The texture of the wiggly crochet makes this rug “squishy” to walk on, too!
I hope you’ll give wiggly crochet a try and come to love it as much as I do!
Do you love crocheting with FREE patterns? Everybody loves a bargain and I’m no exception! When the pattern is FREE, that leaves more money in our budgets to purchase the yarn or crochet thread for the projects we’re going to make! I’ve designed some FREE crochet patterns over the past few years and I thought I’d share photos, as well as links, to my FREE patterns that are available on the internet. It’s my Christmas/Holiday gift to YOU! I hope you enjoy these FREE patterns!!!
Available from Coats & Clark:
Star Table Runner
Star Table Runner
This table runner is made with 4 balls of Aunt Lydia’s Fashion Crochet Thread, size 3 in #926 Bridal White, or in any color of your choice. It is made with a total of 28 stars (join-as-you-go) and measures 15” x 50”, but can be made longer or shorter, if desired. The pattern includes written instructions, symbol crochet charts and an assembly diagram. If you are new to thread crochet, size 3 crochet thread isn’t as “intimidating” as size 10 (or smaller) crochet thread! For free Star Table Runner pattern, click here.
Mosaic Basketweave Placemat
Mosaic Basketweave Placemat
This placemat is made with Red Heart Super Saver yarn in #885 Delft and #320 Cornmeal, or any colors of your choice. Each placemat measures 13” x 19” (including the fringe) and 1 skein of each color will yield many placemats! These placemats are made in the mosaic crochet technique of working into previous rows to make the vertical lines of the basketweave design. The rows alternate back and forth between the light and dark colors. There are no ends to weave in because the ends form the fringe on the 2 side edges. Who doesn’t love a project with no ends to weave in? What a time-saver!!! For free Mosaic Basketweave Placemat pattern, click here.
May Flowers Hot Pad & Coaster
May Flowers Hot Pad & Coaster
This hot pad and coaster set is made with 7 colors of Aunt Lydia’s Classic Crochet Thread, size 10. The hot pad measures 6” x 5.5” and the coaster measures 4” x 3.75”. They are made in the Wiggly Crochet technique of making a foundation mesh for the base of the piece, then adding the wiggly crochet stitches on one side of the base to make the design on top (the flowers, leaves, edging and white background). The pattern includes written instructions and 2 wiggly crochet charts. Wiggly Crochet projects have thickness, making them ideal for hot pads, rugs and more! For free May Flowers Hot Pad & Coaster pattern, click here.
Celtic Placemat
Celtic Placemat
This placemat is made with 1 ball of Aunt Lydia’s Classic Crochet Thread, size 10 in #226 Natural. It measures 11.5” x 19.5” and is made in the filet crochet technique with open and closed mesh. The pattern includes written instructions and a filet crochet chart. For free Celtic Placemat pattern, click here.
Available from Caron:
Starlight Baby Blanket
Starlight Baby Blanket
This blanket is made with 6 colors of Caron Simply Soft Light yarn. It measures 36” x 47.5” and is made in the filet crochet technique. The pattern includes written instructions, a filet crochet chart and an assembly diagram. If you’re not a fan of using crochet thread, you’ll love making this blanket in the filet crochet technique with yarn instead! For free Starlight Baby Blanket pattern, click here.
Sorrel River Sweater/Tunic
Sorrel River Sweater/Tunic
This sweater/tunic is made with Naturally Caron Spa yarn. The pattern comes in 3 sizes: S/M, L/1X and 2X/3X and is made with motifs set on point, joining as you go for no seaming! The pattern includes written instructions, as well as symbol crochet charts and schematics for each size. This is one of the few garments I’ve designed!!! For an extra chart showing how to join 4 motifs, visit the Ravelry page for this design here. For free Sorrel River Sweater pattern, click here.
Europa Scarf
Europa Scarf
This scarf is made with Naturally Caron Spa yarn. It measures 12” x 54” and is made in the filet crochet technique. The pattern includes written instructions and a filet crochet chart. This is another filet crochet project made with yarn instead of crochet thread! For free Europa Scarf pattern, click here.
Vail Mountain Wrap
Vail Mountain Wrap
This wrap is made with Naturally Caron Spa yarn in #0008 Misty Taupe and #0007 Naturally for exceptional drape. It measures 66” x 18” and is made in the Bruges Lace technique with 33 join-as-you-go motifs. The pattern includes written instructions and an assembly diagram. If you love Bruges Lace, or simply want to try Bruges Lace, give this free pattern a try! For free Vail Mountain Wrap pattern, click here.
Available from the Crochet Architect (me!):
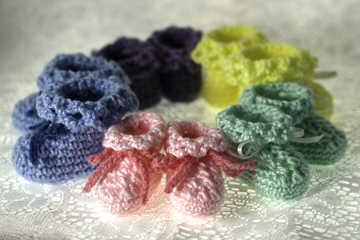
Baby Booties
Baby Booties
These baby booties work up quickly with sport weight yarn. They measure approx. 3” long and are worked from the sole up to the top edge. There is an optional drawstring added near the top to help keep the booties on the baby’s foot! These are smaller than many baby booties, making them perfect for preemies and hospitals!
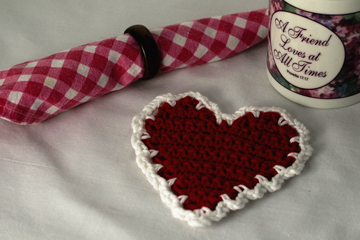
Heart Coaster
Heart Coaster
This coaster is made with worsted weight cotton yarn. It measures 4.75” x 5” and is worked in rows of red, then edged with white. It is a great pattern for learning to make increases and decreases.
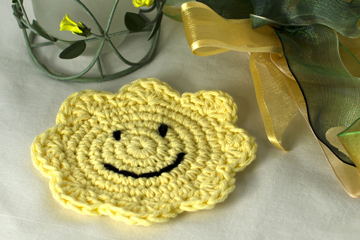
Smiling Face Coaster
Smiling Face Coaster
This coaster is made with worsted weight cotton yarn. It measures 4.75” diameter and is worked in rounds from the center to the outer edge. The face is embroidered on after the coaster is crocheted. It is a great pattern for learning to work in the round.
To download the PDF files for these free patterns (from The Crochet Architect), just visit the “Free Patterns” page here.
I hope you enjoy all of these FREE patterns, courtesy of The Crochet Architect, Coats & Clark and Caron!!! I’d love to see photos of your finished projects made with these FREE patterns linked to my designer page on Ravelry. If you’re not already a member of Ravelry, check it out. It’s a FREE website for knitters and crocheters to share their projects, look for new projects, communicate with other knitters/crocheters and get inspired by each other!
I hope you’ll give some of these crochet techniques a try (Filet Crochet, Mosaic Crochet, Wiggly Crochet and Bruges Lace). They’re a lot of fun to learn and to make!
May you have a very Merry Christmas, Happy Holidays, Happy Hanukkah, etc.