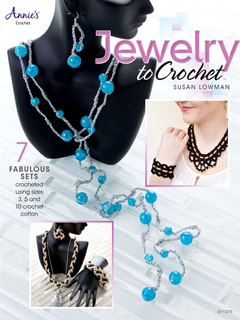
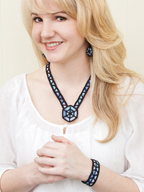
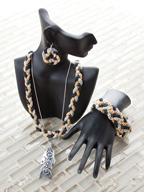
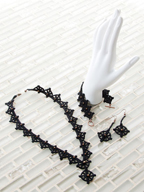
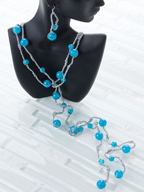
Are you an avid crocheter who likes to crochet jewelry? Have you admired crochet jewelry for a long time and wanted to make some for yourself or others? I love to design and wear crochet jewelry! If you’re like me, you might be interested in a new crochet book I have by Annie’s. It’s called “Jewelry to Crochet” and it was just released for purchase last week. Included are 7 sets of jewelry, made with size 10, 5 or 3 cotton crochet thread, or with Kreinik metallic thread. Many of the sets also include beads. Each set includes a necklace, as well as a bracelet, earrings or both.
I haven’t received my designer copies of this book, yet, so I don’t know how the inside looks. But I think they did a nice job with the photos!
Here are some photos from this book:
Jewelry to Crochet front coverBlack and Gold SetOval Pendant SetDaisy SetStained Glass SetWoven SetBlack Shells SetLariat Set
There are many reasons why I love crochet jewelry. Here they are (in no particular order):
1. It takes only a small amount of time to make a crochet necklace, pair of earrings and/or bracelet, so I get almost instant gratification!
2. I can make my crochet jewelry in any colors to coordinate with my various outfits.
3. Crochet jewelry doesn’t require much money in materials to make!
4. I love crocheting with thread and crochet jewelry is very conducive to thread crochet!
If you love crocheting jewelry, too, what are the reasons why you love it?
I had a blast designing and crocheting these sets of crochet jewelry. I designed some of them years ago and others just last year. If you’re interested in crocheting some jewelry, you can read more about this book and purchase it on the Annie’s website.
Why not crochet some jewelry today and wear it tomorrow?
In May of last year, I blogged about the Continuous Crochet Motifs method of making and joining motifs so there are less ends to weave in at the end of the project. This is a really cool crochet technique/method. You can read that blog post here and see photos of the Japanese crochet book that I bought to learn this crochet technique. Since then, I purchased Kristin Omdahl’s book called “Seamless Crochet”. I haven’t had the time to make anything from that book, but it’s definitely the same method of joining motifs as in the Japanese book I bought.
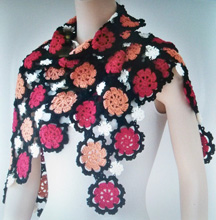
At the time I wrote that blog post, I was designing a shawl to enter in the CGOA Design Contest, made in the Continuous Crochet Motifs method. Well, I got the shawl finished and entered it in the contest. Unfortunately, I didn’t win anything for this shawl and I think the reason was that I didn’t have an edging on it (I couldn’t think of an edging that would work at that time). A few months ago, I added an edging to the shawl and it really finishes off the shawl nicely. I tried many different color combinations for the edging, but in the end, I decided to make the edging all black so it wouldn’t take away from the beauty and design of the shawl itself. I’ll be publishing this shawl design when the pattern is ready (it still needs a little tweaking first!). Here’s a photo of the shawl before I added the edging:
Byzantine Shawl in 2012 CGOA Design Contest
I still need to take some new photos of this shawl with the edging added before I can publish this pattern. But I promise to get to it sometime soon! I’ve veered from my original topic of the Continuous Crochet Motifs method a little, so I’ll get back to that topic now.
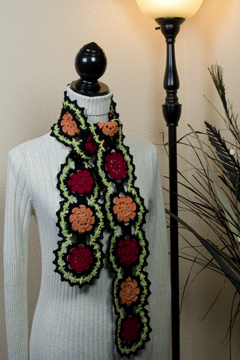
After designing the shawl, I designed a scarf using the same Continuous Crochet Motifs method and some of the same motifs as the shawl. It’s called the “Byzantine Scarf”. I just finished up the pattern and added it for sale here yesterday. You can see the pattern here.
Here’s a photo of the Byzantine Scarf:
Byzantine Scarf
What I love about this scarf (besides the colors) is the Continuous Crochet Motifs method I used for the 2 rounds of black, which are joining the red and orange motifs together (not the final round of black, but the black rounds inside the lime green rounds). With this method of crocheting, I was able to work these 2 rounds of black edging around each of the 15 motifs in the scarf in one long pass! And that means I only had 2 tails of black yarn to weave in on these 2 rounds.
Okay, I realize that the rest of this scarf has plenty of tails to weave in. But by using the Continuous Crochet Motifs method of joining the motifs, I saved myself 28 whole tails to weave in (30 – 2 = 28). I don’t know anyone who enjoys weaving in the tails/ends on their crochet work and I don’t, either. But it’s a necessary evil and has to be done! I love using color in my crochet designs, so I’ve been known to weave in hundreds of tails on larger projects with multiple colors. I just bite the bullet and do it!
I realize that not everyone wants to learn a new crochet technique, so I included the instructions for joining the motifs in the traditional motif joining method (joining with a sl st to the adjacent motif). But when you join the motifs this way (in the traditional method), you’ll have 30 tails of black to weave in on these 2 rounds of motif edging (2 tails for each of the 15 motifs in the scarf). So to me, it’s a “no brainer” to use the Continuous Crochet Motifs method to join the motifs together! But I’m an adventurous crocheter and I love to learn new techniques. I’m sure that not everyone is as adventurous as me, so that’s why I included the instructions for joining the motifs the other way.
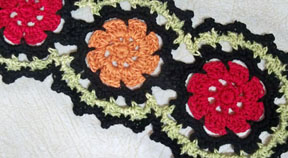
Here’s a close up photo of the scarf:
Byzantine Scarf close up
Now you can see the 2 rounds of black around the red and orange motifs better. I also made a symbol crochet chart for each method of joining the motifs (these charts are included in the pattern). So if you like symbol crochet charts and learning new crochet techniques, you might want to give this scarf pattern a try!
Here are photos of 4 swatches of motifs that I made from the Japanese Continuous Crochet Motifs book a few years ago (right after I got the book in the mail!):
Motif swatch #2Motif swatch #6
Motif swatch #36Motif swatch #43
These swatches haven’t been blocked, so they don’t look as good as they could. What I want you to notice is the number of tails and the number of motifs in each of these swatches (I didn’t weave in any tails at all on them). Each swatch has 4, 7 or 9 motifs that are joined. But since I used the Continuous Crochet Motifs method to make these swatches of motifs, there are only 2 tails that would need to be woven in (if I were going to make these into projects). There would normally be 2 tails to weave in “per motif”! This is a HUGE time saver!!! It means I can spend more time crocheting and less time weaving in ends! Of course, it only works when you’re using the same color of yarn/thread for each motif (or to join each motif). But it’s not a bad thing to use 1 color of thread/yarn. It’s a design decision! And the savings in time it takes to weave in the tails is HUGE!
I hope you’ve enjoyed this closer look into the Continuous Crochet Motifs method and will come back again soon.
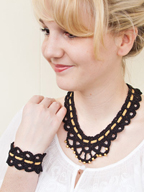
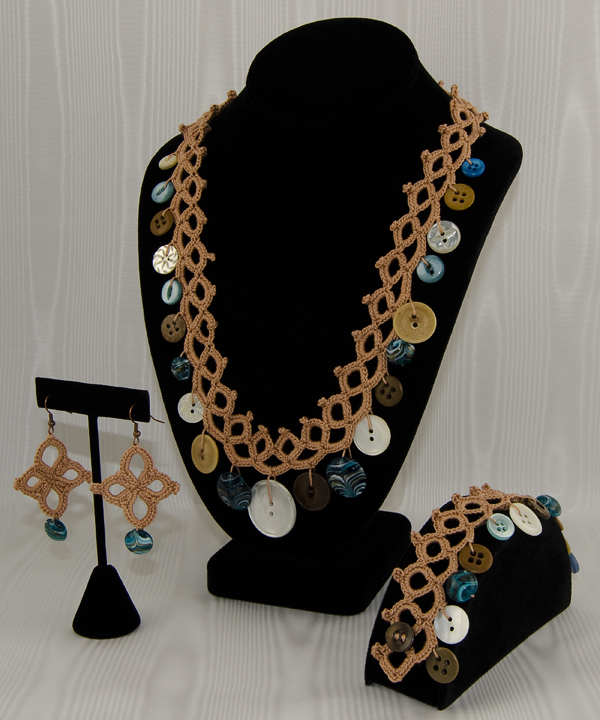
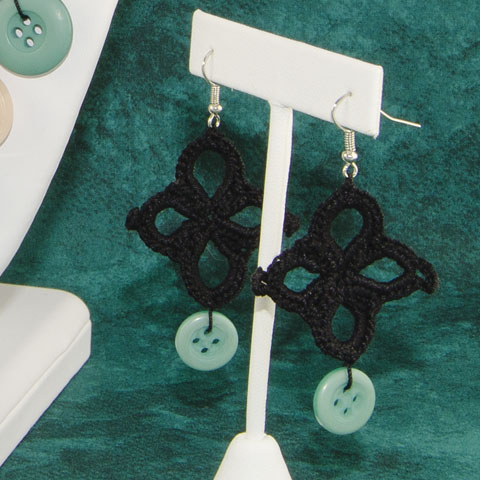
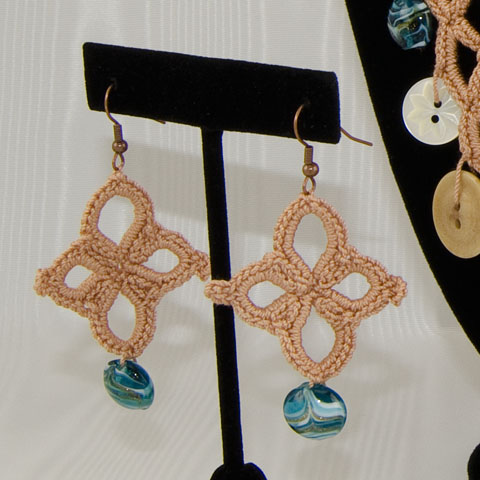
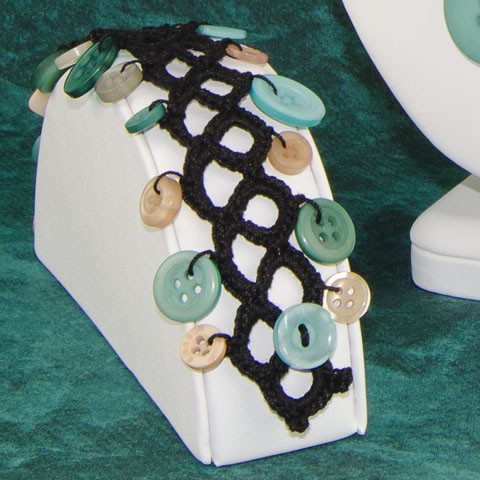
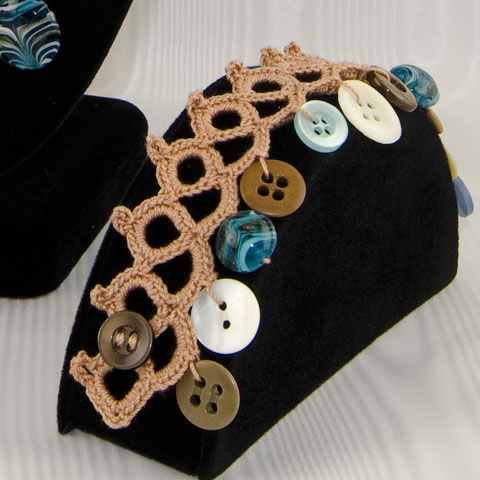
It’s finally done! If you’ve enjoyed making (or have thought about purchasing) my Faux Tatted Necklace pattern, you might be interested to learn that I just self-published a pattern for a whole set of jewelry (necklace, bracelet and earrings). If you’re wondering why I call this “Faux” Tatting, it’s because it isn’t tatted. It’s crocheted to look like tatting! The only stitches used are chains, slip stitches and single crochet. The pattern is easy to follow, includes step-by-step photos and a symbol chart for the necklace (once you’ve made the necklace, the bracelet and earrings are a piece of cake!). Each of these jewelry pieces is crocheted with size 10 cotton crochet thread (for all of us “threadies”), using any buttons, beads or charms you desire.
I designed the bracelet and earrings for this set last summer before the CGOA Conference in Manchester, where I taught a class on making the Faux Tatted Necklace. But in my usual “procrastinating” style, it’s taken me this long to self-publish it! In my defense, though, I’m busy with other crochet work, I’m a perfectionist and I may possibly have ADD because I get distracted very easily (just ask my husband)!!! Aren’t all creative people like that (or many of them)?
Focus, Susan! Back to the jewelry set. I just love making these necklaces! It only takes a few hours to make each one, so I have less chance of getting distracted! Now I can crochet the matching bracelet and earrings for each of the necklaces I’ve made for a complete set (my ears won’t be bare any more). And now YOU can have coordinating sets, too!!!
Here are some close-up photos of the bracelet and earrings for you to see:
The bracelet pattern includes instructions for buttons/beads/charms on 1 side (in the brown/blue bracelet photo) or on 2 sides (in the black/green bracelet photo). The bracelet uses 12 or 23 buttons, beads or charms. The earrings have just 1 button on each of them and use earring wires (or your favorite earring findings).
I hope you enjoy this new pattern. And I hope you’ll share photos of your Faux Tatted Jewelry Sets with all of us.
This is the last stop on the Wiggly Crochet Dishcloths blog tour. Boohoo. I’m sad to see it come to an end! It’s been a lot of fun!
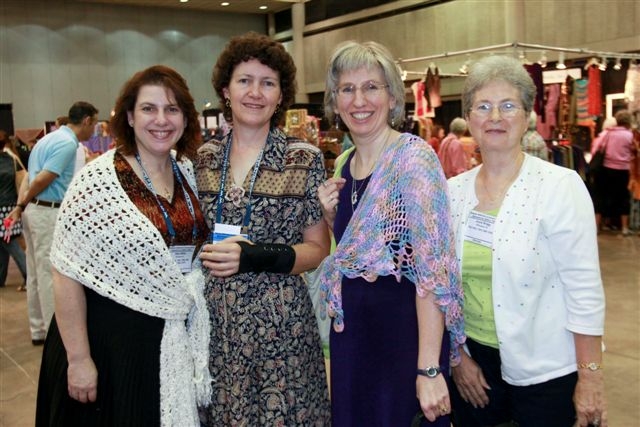
Today, we’re going to visit the blog of Andee Graves. I first met Andee at a CGOA Conference (I think it was in 2009 in Buffalo when I had a broken wrist – I definitely wasn’t able to crochet for a while then!). Here’s a photo of Andee and I, along with Shari White (one of my mentees and a very talented designer) and Joyce Bragg (another very talented designer), waiting to meet with the editors at the Buffalo conference (from left to right: Shari, me, Andee and Joyce):
Waiting for Editors at CGOA Conference in 2009
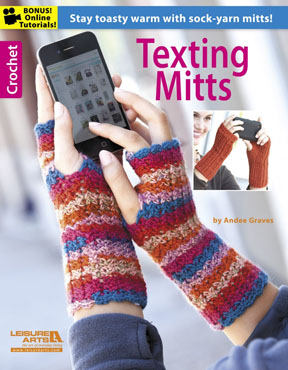
If you’ve been reading my blog for more than a few weeks, you might recognize Andee’s name. I wrote a blog post for Andee’s blog tour of her new Texting Mitts booklet, published by Leisure Arts, on February 10th. Here’s a photo of the front cover of her booklet:
Texting Mitts front cover
Andee’s texting mitts are fun to make! I made 2 pairs of them when I was preparing for her blog tour. You can read more about this booklet on my Feb. 10th blog post or on Andee’s blog!
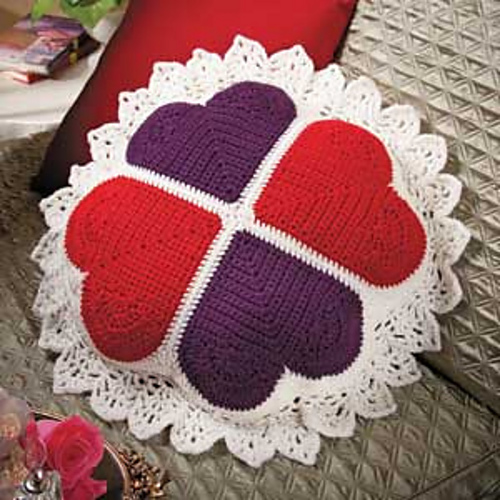
Andee is a fantastic newer designer (newer than me). She is a bundle of energy and a wealth of information! And she’s a really nice person, too! Andee already has over 50 published designs in just the last 3 years! Wow! Way to go, Andee! You can see all of Andee’s published designs on her Ravelry designer page. This is one of my favorites of Andee’s designs:
Andee’s Heart Pillow
This heart pillow was published in Crochet World magazine’s Feb. 2012 issue. Isn’t it pretty?
Please hop on over to Andee’s blog to read what she’s written about my Wiggly Crochet Dishcloths booklet and the dishcloth she’s made from the booklet.
Since this is the last stop on my blog tour, I will be picking and announcing a winner for the free autographed copy of my Wiggly Crochet Dishcloths booklet on Friday. If you haven’t entered yet, just leave a comment by 6PM (Arizona time) tomorrow on my blog post from either Jan. 27 or Feb. 9. I wish you all good luck in the giveaway!
If you missed the first stop of my Wiggly Crochet Dishcloths blog tour on Feb. 13th, you can still read what Brett Bara wrote on her Facebook page that day. Brett is a super talented lady who wears many hats (and her cat, Fifi, is adorable!!!). You can read her blog and see photos of what she’s up to (and Fifi) on her website. Brett is currently the host of the Knit and Crochet Now show on PBS. Brett was the first editor of Crochet Today magazine for many years. I tech edited for Crochet Today for several years before I met Brett at a CGOA Conference in Manchester, NH. She’s just as nice in person as she looks in her photos!!! Brett is putting on a full day of craft classes called the Brooklyn Craft Camp on Saturday, March 16th in Brooklyn (where else?). I wish I lived closer so I could attend!!! Here’s a photo of Brett, in case you haven’t gotten acquainted with her yet:
Brett Bara
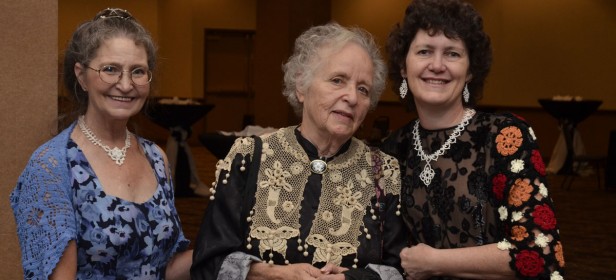
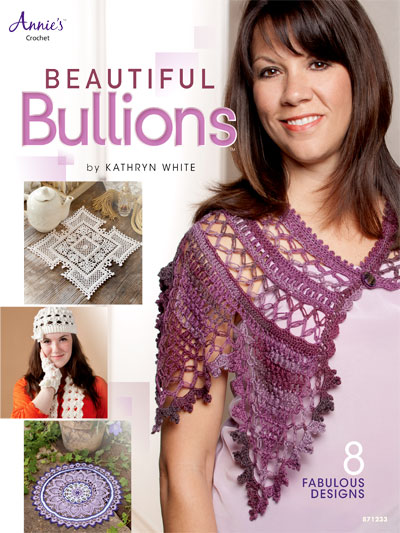
Today’s stop on the Blog Tour is with Kathryn White. Kathy is a very talented crochet designer who has won numerous awards in the CGOA Design Contest in the last 2 years. She’s also a really good friend of mine. We met at the CGOA Conference in Greensboro, NC in Sept. 2011. We quickly became friends and learned that we lived only 130 miles apart! We see each other every month when Kathy drives up here to attend the monthly crochet group that I’ve attended for many years. You can read more about Kathryn White on her blog, her website and her Facebook page. Kathy is a very accomplished thread crochet designer in the crochet world. She’s a great source of inspiration for me! Here’s a photo of Kathy (on the left), the famous Rita Weiss (in the middle) and me (on the right) at the fashion show/dinner at the CGOA Conference last year in Reno, NV:
Kathryn White, Rita Weiss and Susan Lowman
Kathy’s newest booklet of crochet designs is Beautiful Bullions. This is a wonderful booklet of fabulous designs! Kathy never fails to impress me with her designing abilities!!! Here’s the cover of that booklet:
Beautiful Bullions booklet cover
Click here to see and/or order this booklet from Annie’s.
And if you haven’t yet entered to win a free, autographed copy of my Wiggly Crochet Dishcloths booklet, you still have time. Just leave a comment on my blog post from Jan. 27 or Feb. 9 to be entered. There aren’t too many entries yet, so your chances of winning are great!!!
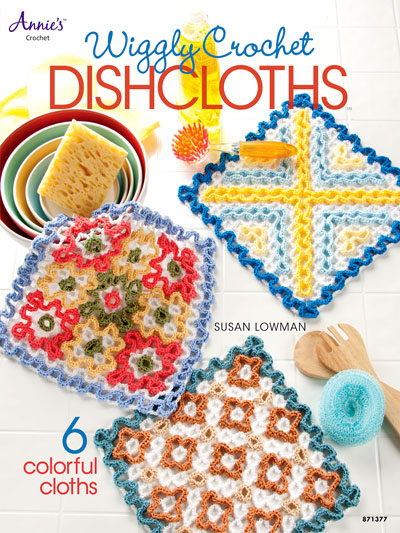
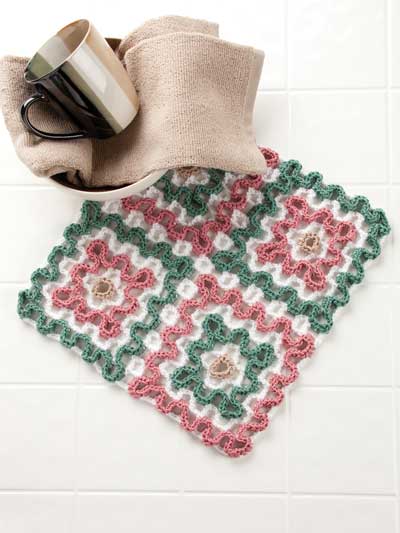
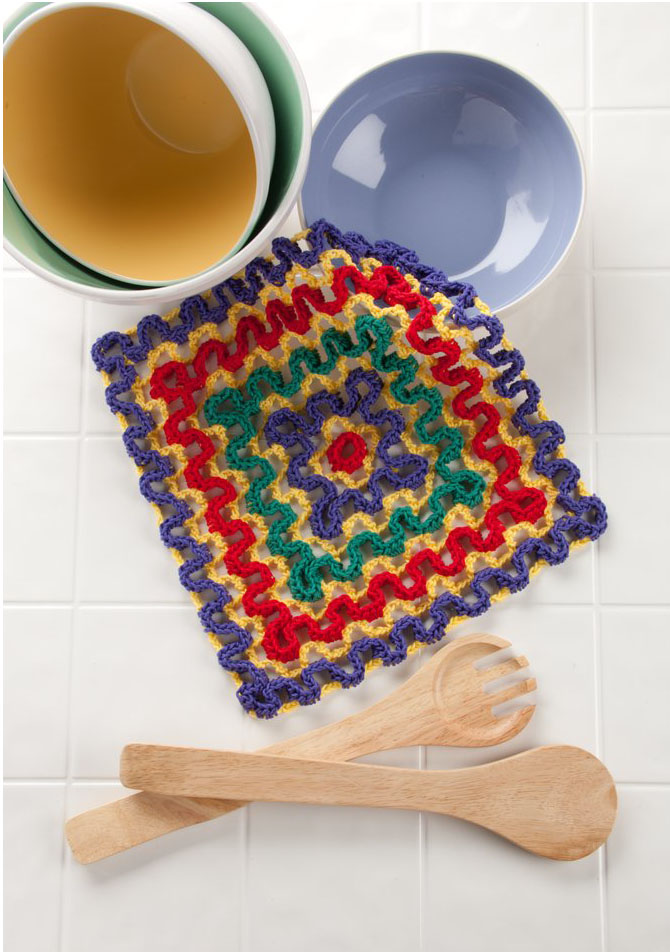
I’m very excited to announce the publication of my newest crochet booklet, “Wiggly Crochet Dishcloths”, published by Annie’s! Here are photos of the front cover and the other 3 dishcloths that aren’t shown on the front cover:
Front cover of Wiggly Crochet DishclothsFour Squares dishcloth
Concentric Squares dishcloth
Diagonals dishcloth
This booklet includes photos, instructions and charts for 6 different wiggly crochet dishcloth projects. These dishcloths are made in an array of beautiful colors of Omega Sinfonia yarn, which is a light worsted weight cotton yarn. Each project measures from 10 ½” x 11” to 12” square, the perfect size for dishcloths. These dishcloths are fun to stitch and make fantastic gifts! If you’d like to order a copy of this booklet, you can find it on the Annie’s website.
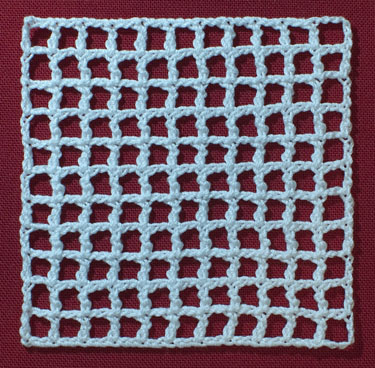
If you aren’t familiar with Wiggly Crochet, let me tell you how it’s done. Wiggly Crochet is made in 2 steps. The first step is to crochet the foundation mesh. This mesh looks a lot like the open mesh of filet crochet, made with double crochets and chain-2 spaces. Here’s a photo of a Wiggly Crochet foundation mesh:
Wiggly Crochet foundation mesh
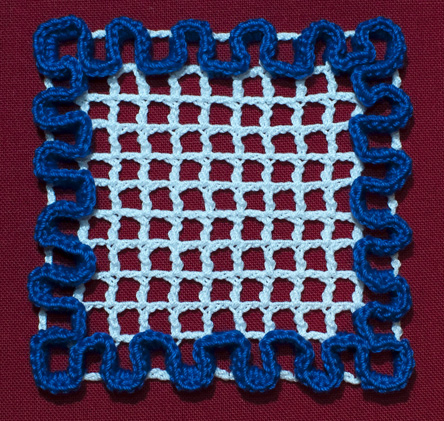
The next step is to crochet the “wiggles” onto the top of the foundation mesh, which makes these wiggles stick up and gives the wiggly crochet piece dimension and thickness, which is not found in most other crochet techniques. The wiggles are usually made up of double crochets worked on top of the foundation mesh: around the post of the double crochets and in the chain-2 spaces (not IN the chains themselves, but in the spaces created by the 2 chains). You work the specified number of double crochet in/around each post/chain-space, making a 90 degree turn each time to fill the appropriate areas with the wiggles. It’s the act of turning 90 degrees that makes these stitches wiggle and stick up instead of lying flat! Here’s a photo (taken from the top) of the first round of wiggles worked on a wiggly crochet foundation mesh:
Wiggles shown from top
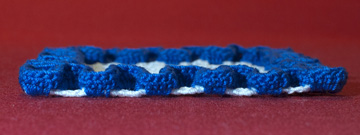
Here’s a photo of those same wiggles (taken from the side), so you can see how dimensional they are:
Wiggles shown from side“Hot Stuff for the Holidays” booklet
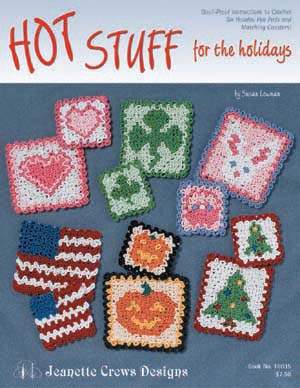
Isn’t that cool? I love this technique so much that I’ve previously had 2 crochet booklets published on it. The first one was “Hot Stuff for the Holidays”, published by Jeanette Crews Designs in 2003. There are patterns and charts for 6 “holiday-themed” hot pads and coasters in this one (for Valentine’s Day, St. Patrick’s Day, Easter, July 4th, Halloween and Christmas). This booklet is extremely hard to find, so if you find one for sale online (and it’s not too expensive), you might consider snatching it up! These designs are worked with size 10 cotton crochet thread (for all of us “threadies”!). Here’s a photo of the front cover of that booklet:
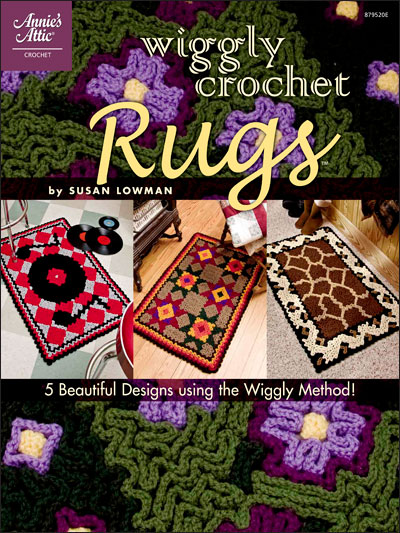
“Wiggly Crochet Rugs” booklet
The 2nd wiggly crochet booklet was “Wiggly Crochet Rugs”, published by Annie’s Attic (now just called “Annie’s”) in 2009. This booklet has 5 wiggly crochet rugs in it, complete with instructions and full-color charts. These rugs are made with yarn: the foundation mesh is made with sport weight yarn and the wiggles are made with worsted weight yarn. This booklet might be easier to find, since it was published just 4 years ago. Here’s a photo of that cover:
I’ve also designed some other wiggly crochet projects, which were published by Annie’s (mostly in Crochet World magazine from June 2008 to Feb. 2010). If you’d like to see all of them, please visit my Ravelry designer page. Oh, I almost forgot! I have a FREE wiggly crochet pattern, available on the Red Heart website. You can try this technique for free and see how you like it! Isn’t that great?
If you’re more of a “hands on” type of learner and would like to learn to do wiggly crochet, I’ll be teaching a Wiggly Crochet class at the CGOA Conference this year in Indianapolis. The class schedule hasn’t been made yet, but this class should be scheduled between July 17 and 21 (either from 9AM-12Noon or 2-5PM). To read about this CGOA Conference, please visit the CGOA website (look under the “events” tab on the left-hand side of the page). I would be thrilled to meet you and teach you how to do wiggly crochet in my class!
To celebrate the publication of my new Wiggly Crochet Dishcloths booklet, I’m doing a Blog Tour in February with several of my crochet friends/designers. Each person will blog (or post on Facebook) about this new booklet and possibly give away a copy to a lucky entrant. Please visit each of these blog posts to find out more about my new booklet, as well as reading the blogs of these extremely talented individuals!
The blog participants are as follows (dates to be announced next month):
At the end of the blog tour, I’ll be giving away an autographed copy of this new booklet to a lucky winner (US residents only please). To enter the contest, just leave a comment on this blog post telling me which of these dishcloth patterns is your favorite. It’s that simple! A winner will be chosen at random from all of the comments at the end of the blog tour. Good luck to you all!
If you’ve never tried wiggly crochet, you don’t know what you’re missing! If you have tried it and are looking for more wiggly crochet patterns, we have a few of them here at The Crochet Architect. Here they are for your viewing and crocheting pleasure:
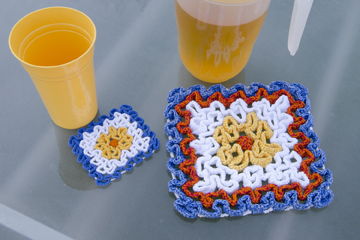
Wiggly Flower Hot Pad & Coaster
Our Wiggly Flower Hot Pad & Coaster Set is the perfect pattern for learning to do wiggly crochet. The small size of the coaster is a quick project and the hot pad is a natural progression for increasing your wiggly crochet skills. The cotton crochet thread that is used makes them ideal for soaking up the moisture from any glass or pitcher in humid weather!
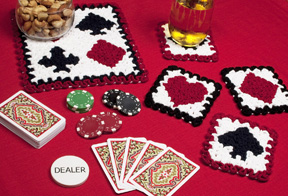
Wiggly Crochet Playing Cards Set
This Wiggly Crochet Playing Cards Set includes a centerpiece and 4 coasters: one for each of the suits of playing cards. This set is unique and would make a great gift for that special person!
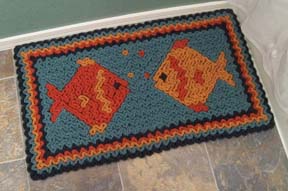
Wiggly Crochet Fish Rug
When you’ve learned to do wiggly crochet and want to take your skills to the next level, this Wiggly Fish Rug is just the thing! It’s great in any fish-, seashell-, ocean- or tropical-themed bathroom. The texture of the wiggly crochet makes this rug “squishy” to walk on, too!
I hope you’ll give wiggly crochet a try and come to love it as much as I do!
I really love to crochet and to design new crochet patterns (basically, I love to make things!). But not just the typical types of crochet projects: scarves, hats, ponchos, shawls, garments, potholders, coasters, placemats, jewelry, etc. Sometimes I like to design something different and challenging. I get bored doing the same thing over and over. That’s why I like to change what I do from time to time!
Did you know that you can make artistic, 3-D items in crochet? I’ve designed and crocheted several myself. I’ll show you those a little later in this blog post. But first, I’d like to show you some of the amazing things that some crochet artists are creating around the world. These projects are very inspiring and really amazing!!!
Lion Head from The Lionheart Project
The first artist I’d like to share with you is Shauna Richardson. Shauna spent 2 years and used 36 miles of Swaledale wool from the Derbyshire Dales to crochet three giant 29 foot lion figures, known as “The Lionheart Project”! These lions are an interpretation of the three golden lions on Richard the Lionheart’s coat of arms. These lions are amazing!!! It would be wonderful to see these in person! These are just a few of the photos of this amazing creation. In these two photos, Shauna is chatting with the Duke and Duchess of Devonshire as they stand next to her project on May 1, 2012 in Chatsworth, England. The work will tour the East Midlands before moving to London’s Natural History Museum as part of the 2012 Cultural Olympiad. There are more photos of Shauna’s work and this impressive sculpture here: www.shaunarichardson.com and www.lionheartproject.com. And here is a website where you can watch a BBC video on this project: http://www.bbc.co.uk/news/uk-england-derbyshire-17922125.
Display of The Lionheart Project
Crochet Pistols
Now for something a lot smaller! I saw these crocheted pistols online one day by Inger Carina and thought they were pretty amazing! I hadn’t seen any crocheted guns before I saw these. Isn’t it amazing what you can create with just a crochet hook, some crochet thread and some fabric stiffener (and some guns to mold them around, of course)? I would have never thought to crochet guns!!! Now that’s imagination for you! You can see more of Inger’s work at www.hellocraftlovers.com.
Piano covered with doilies
If you’re wondering what to do with all those doilies you’ve made and/or collected over the years, here is an idea for you. How about covering a piano with them? I think this covered piano is awesome!!! There are a whole lot of doilies covering this piano! Of course, I LOVE doilies!!! This was done by Joana Vasconcelos. You can see more of her work at www.joanavasconcelos.com.
These are just a few of the crochet artists in the world. Aren’t they amazing?
Well, my crochet art isn’t as nice as these fabulous pieces, but it’s not bad! First, here is my locomotive afghan and toy, which were published in the December 2009 issue of Crochet World magazine:
Locomotive Afghan
The locomotive afghan was made with 9 colors of Red Heart Super Saver yarn. It measures 48” x 60”. When designing this afghan, the first thing I needed to do was find a good photo of a locomotive at the desired angle I wanted. Since I had trouble finding a good photo, I took some photos of a plastic toy locomotive that we used many years before under our Christmas tree (it had optional smoke, too). After making a gauge swatch, I decided how many stitches and rows the afghan should have for the desired size. Then I imported the photo into my computer charting program and tweaked the colors in the chart to make a good intarsia pattern that didn’t have too many color changes involved.
Locomotive Toy
The locomotive toy was made with 5 colors of J&P Coats Royale Classic and Metallic crochet thread in size 10. Many parts of the toy are crocheted with 2 strands of crochet thread held together. I used plastic canvas, cut into various sizes, to provide a “skeleton” for the crochet to fit over for the body of the locomotive. I also used polyester fiberfill to stuff many of the pieces. Since I didn’t know much about locomotives at the time, I checked out some books at my local library with photos of locomotives. And I asked a friend’s husband with locomotive knowledge some questions about the names of the parts of the locomotive so I could label them correctly in the pattern! It was a long process, but I think it was well worth it! This locomotive toy was a challenge to design, but it was actually quite fun!
Here’s a tent, sleeping bag, beret, vest and ammo belt that I designed for a GI Joe (or similar) doll:
GI Joe Tent and Gear
This pattern was published in the August 2009 issue of Crochet World magazine (it was called “Camouflage Gear” in the magazine). The vest, beret, ammo belt and sleeping bag weren’t too difficult to design with the doll that I had received from the magazine editor to use. But the tent was a challenge!!! After trying several times to make the tent, I decided I needed to make a paper form of the tent first. Then I crocheted the pieces to fit the form. I cut a wire coat hanger and bent the wire a little to form the tent “poles”. I used pieces of a glue stick for the ends of the tent poles so they wouldn’t poke through the crochet pieces at the bottom corners of the tent. I even crocheted the door flap for the tent, with crocheted chains for tie straps to keep the door flap open or closed. I used Red Heart Sport yarn for the tent and sleeping bag and Aunt Lydia’s Classic size 10 crochet thread for the ammo belt, vest and beret. And I used bugle beads for the “ammo” in the ammo belt!
Here is my Majestic Butterfly afghan that was published as a web bonus in Crochet! magazine’s Spring 2012 issue:
Majestic Butterfly Afghan
This afghan was made as a request from Cari Clement at Caron yarns. She liked my locomotive afghan at the CGOA Conference the year before and asked me to design an intarsia afghan for Caron. So I started looking for photos of butterflies to use. I finally found one and used the same computer charting program to import the photo (after deciding how many stitches and rows the afghan would need). I had to do a lot of tweaking on this one to get the colors to work and not have too many color changes throughout the rows. I think it turned out nicely!
And last, but not least, is my Dragon Ship, which was published as a web bonus in Crochet World’s February, 2011 issue. The reason it wasn’t published in the magazine itself, but as a web bonus, is the pattern was way too long!!! I also won a Flamie award for this ship last year! The ship is designed to look like the ship in “The Voyage of the Dawn Treader” movie! The editor for Crochet World magazine at the time, Michele Maks, asked me to design this ship well before the movie was released, so finding online photos of it being built wasn’t all that easy!
Dragon ShipThe head on my Dragon Ship
This dragon ship was the biggest challenge for me so far! I made at least 3 different heads for the dragon before I got one that didn’t look dorky!!! The dragon itself has a head, neck, wings and tail. I included teeth and a tongue in the open mouth, along with a goatee under the chin, horns, ears and bead eyes with eyelids on top of the head. The crochet stitches I chose for the sides of the neck and the tail look like scales! And I used some post stitches for added texture on the dragon’s wings. The ship includes a hull with embroidered port holes, deck, stern cabin (at the back of the ship below the tail), 2 masts, a sail, flag, lookout and side railings. I used 7 colors of America’s Best Crochet Thread, size 10 for this ship. I added cardboard pieces under the deck and under the top and front pieces of the stern cabin for strength and added shaping. I put poly pellets at the bottom of the hull and stuffed the rest of the hull with polyester fiberfill. I inserted wire at the bottom of the sail to help shape it. I stiffened the flag, lookout and 2 pieces that I made to attach the masts to the deck. My only regret is not engineering the masts and deck so the masts would not flop around! But all in all, I think this dragon ship looks pretty good!
I hope you’ve enjoyed looking at these pieces of crochet art (mine and the other designer’s pieces)! And I hope I’ve inspired you to try some crochet art in the near future!
You’ve probably seen crochet jewelry all over the place, but have you made any of it yet? I absolutely LOVE making (and wearing) crochet jewelry, whether it is one of my designs or someone else’s design!
Crochet jewelry that is made with cotton crochet thread (my favorite) is hand washable, so it will last for years! You can use any colors of crochet thread for making your crochet jewelry to coordinate with your wardrobe. The fasteners on crochet necklaces can be barrel clasps or buttons. Some are even long enough to fit over the head, so they don’t need any fasteners! Many crochet jewelry pieces take just a few hours to make, so they’re instant gratification projects, which I love!!!
Here are a few pieces of crochet jewelry that I’ve made from other designer’s patterns:
My Favorite Necklace
This is my favorite necklace, made with size 20 thread. The pattern is from a Magic Crochet magazine, Issue #64, Feb. 1990. I LOVE this necklace! It looks great on and is easy to clean when it gets dirty. I wear it a lot! I even made some coordinating leaf earrings to wear with it. The clasp is a simple button and crocheted buttonhole.
Necklace With Balls
This necklace is fun to wear. It’s made with size 10 thread and includes matching “ball” earrings. I think this pattern was from a Japanese book by Kazekobo.
Irish Crochet Necklace
This Irish Crochet Necklace was made with size 20 or 30 thread. It’s too fancy to wear with just anything! The chains near the back of the necklace (at the top of the photo) twist easily, so I don’t wear this one very often. This necklace may have been from the same book by Kazekobo.
Here are some crochet jewelry pieces that I’ve designed for Crochet Today magazine over the years:
There is a large, clear crystal sandwiched in the center of the 2 sides of crochet in my Crystal Pendant Necklace! It’s pretty cool!!!
Bouquet Earrings May/June 2012
The Bouquet Earrings were made in white for a bride, but can be made in any flower color you choose!
Winter Berry Earrings Nov/Dec 2012
The Winter Berry Earrings are made with some shiny crochet thread, called Anchor Artiste Metallic. It’s a very pretty thread. The photo doesn’t do it justice!
Here are some of the other crochet jewelry pieces that I’ve designed:
This is my Beaded Shells Necklace, available for purchase at TheCrochetArchitect.com. The pattern comes in 2 versions: long and short. They both have small beads throughout, but the longer version includes 1 large center bead and 2 medium beads.
Faux Tatted Necklace with buttonsFaux Tatted Necklace with beads
This is my Faux Tatted Necklace pattern, also available for purchase at TheCrochetArchitect.com. This necklace is actually crocheted to look like tatting, which has rings, chains and picots. This pattern can be made with buttons, beads or charms. It is a fun project to make with heirloom buttons or buttons with memories attached!
I love making these crochet necklaces and earrings because they’re so versatile!
For my Faux Tatted Necklaces (I’ve made quite a few), I’ve used many different colors of size 10 crochet thread and beads or buttons to coordinate with some of the outfits in my wardrobe. This necklace doesn’t have a clasp, so you just pop it over your head and wear it (it’s great if you have an injured hand, wrist or arm!). I should be coming out with a pattern for a coordinating Faux Tatted Bracelet and Earrings soon, so you can wear a complete set of Faux Tatted jewelry, if you like!
Why not make some crochet jewelry for your next project? If you do, please drop me a line and let me know how it turned out!
For the past 2 days, I’ve been working on the contents of my Polish Stars class that I’ll be teaching at the CGOA Conference in Reno, NV in September. I had some swatches already made, but needed to make some new ones that aren’t as big for the class swatches. And, of course, I’ve been writing and checking the new patterns for these swatches, too! I tried following the patterns in some leaflets that I have on Polish Stars, but I’ve found a lot of errors in the instructions, so it’s back to the drawing board! If you’ve never seen a Polish Star in crochet, this is how it looks:
Polish Stars (after weaving loops)
They’re actually quite fascinating to make! They are worked in rows of alternating colors. The stars are formed when you weave the chain loops in a certain configuration. I found a YouTube video on weaving the stars, but she does it wrong! I pity the person who follows her directions!!! Their stars won’t turn out right at all!
Polish Stars (before weaving loops)
Here’s how this swatch looked before weaving the loops:
That’s quite a jumbled up mess, isn’t it? It almost looks as if there are mistakes in it! But have no fear! After weaving the loops, it turned into the well-mannered, finished swatch with the stars that I already showed you. Are you amazed?
Well, a few years ago, I tried the Polish Star technique that was in publication and decided to improve it a little. I came up with a less messy way to work the Polish Stars and I’ll be unveiling it in my Playful Polish Star class in Reno in September. If you’re interested in learning this technique, you can read about my class and sign up to take some crochet or knitting classes here: http://www.knitandcrochetshow.com/fall-special-events.asp?i2s3. This class will be held on Friday, September 14 from 9AM – Noon. There are a lot of other wonderful crochet and knitting classes being taught at the CGOA Conference in Reno that week, too.
If you’ve never been to a CGOA Chain Link Conference before, you don’t know what you’re missing! It’s a week of “crochet heaven on earth”!!!
We have 3 new crochet patterns for you at The Crochet Architect. They’re all fun to crochet and will be a wonderful addition to your kitchen table or to use for outdoor dining!
Wiggly Flower Hot Pad & Coaster
The first is our WIGGLY FLOWER HOT PAD & COASTER. This set is made in the wiggly crochet technique with size 10 cotton crochet thread. The hot pad is made with 3 strands of the thread and the coaster is made with only one strand.
This pattern includes written instructions and wiggly crochet charts for both designs.
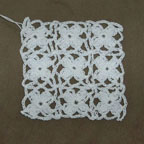
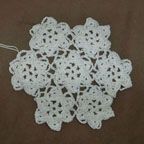
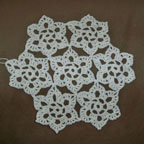
Byzantine Placemat & Coaster
The second is our BYZANTINE PLACEMAT & COASTER. This set is made with any 2 colors of size 3 cotton crochet thread. The placemat is made with large and small motifs, which are joined together while working the last round of each motif. Then an edging is worked around the joined motifs for the perfect finish. The coaster is made from only one of the large, round motifs, with an edging added to make it square.
This pattern includes written instructions, a crochet symbol chart for each project and an assembly diagram for the placemat.
Filet Woven Placemat Set
The third is our FILET WOVEN PLACEMAT SET. This placemat set is made in the filet crochet method with double crochet stitches and ch-2 spaces. It has added crochet strips of contrasting colors that are woven through the appropriate ch-2 spaces for visual interest! The placemat is made with 2 strands of size 10 cotton crochet thread held together throughout and the coaster is made with only one strand of the same threads. You can choose to make these projects in any colors you desire for spring, summer, fall or winter décor!
This pattern includes written instructions and a crochet symbol chart for each project.
I hope you enjoy these patterns and the extra pizzazz they are sure to bring to your table! If you have any questions about these patterns, please don’t hesitate to ask!