Since my last blog post, I’ve used up 2 more single skeins of yarn by designing 2 more “Skinny Scarves”! These are really fun to design and crochet! And they take almost no time at all!
I thought you might like to see my 2 newest skinny scarves, so here they are:
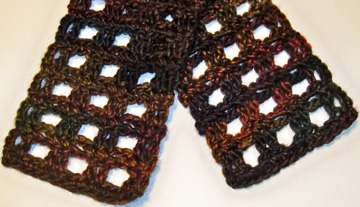
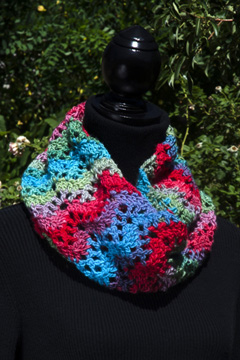
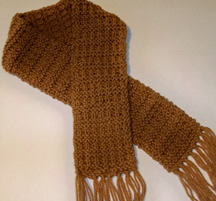
Windows Skinny Scarf
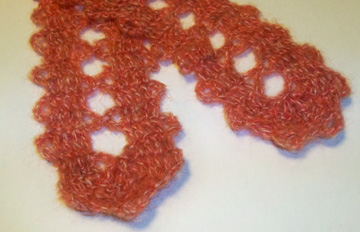
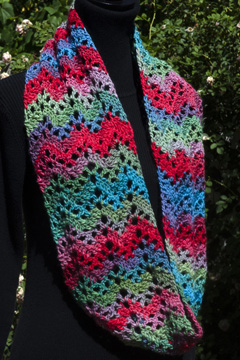
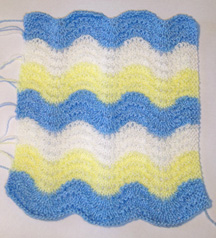
Bruges Lace Skinny Scarf
You’ll probably recognize the yarn that I used in the Windows Skinny Scarf. It’s the yarn that I showed you in my last blog post: Plymouth Yarn Stained Glazz. It’s a worsted weight yarn made of 51% wool and 49% acrylic fibers with only 99 yards in this skein, so I had to be careful what stitch pattern I used to make it long enough. This stitch pattern worked perfectly! I really like the colors in this yarn. I think it will coordinate with lots of outfits in my wardrobe.
The yarn that I used in the Bruges Lace Skinny Scarf is Berroco Cirrus. It’s 42% superkid mohair, 40% nylon and 18% merino wool extrafine. There are 114 yards in this skein of yarn. I really enjoyed working with this yarn (I like mohair yarn, but I realize that not everyone does)! It’s very soft!
These skinny scarves are lots of fun to make and I’m going to enjoy wearing them! They’re both about 4″ wide, so they’re the perfect width to wear as more of an accent than a functional scarf to keep you warm! But that was my intention for them: looks over function!
I’ll be shifting my focus for a little while away from designing. I’ll tell you why in my next blog post (in about a week).
Do you ever get in a “stash busting” mood? I’m in one currently and I think it’s great to get into this mood every now and then (otherwise my stash would be uncontrollable, which some might say it already is!). I’m also in a “quick to make” project mode, especially after working on some blankets/afghans for several months! I have many single skeins of yarn in my stash with 100-150 yards in each skein. That’s not enough for a sweater or shawl, so I thought I’d design some skinny scarves with them. I’ve been wanting to have some skinny scarves that are more decorative than functional (they won’t keep me warm, but they’ll jazz up my outfits a little!). Here’s the first skinny scarf that I designed earlier this week:
First Skinny Scarf with FibraNatura Cobblestone yarn
It’s made with 1 skein of FibraNatura Cobblestone yarn in a pretty multi-color that will coordinate with many things in my wardrobe! I think this yarn is discontinued, but that’s okay with me. I still like the colors in it and I love how the colors change within one of the 2 plies. The other ply stays the same color (in this case it’s pink, which I love!), which tones down the color changing ply so it’s not too “in your face”! This yarn is 100% superwash merino wool and has 153 yards in the 50 gram skein. It’s a sport weight yarn, which is about the weight I wanted to use for this skinny scarf. I stumbled upon this skein of yarn at one of my local thrift stores last year for 99 cents! That’s a great price for a skinny scarf (or any scarf/project), as far as I’m concerned! Because there’s so much going on with the color changes in this yarn, I chose to use a simple stitch pattern to show off the colors of the yarn better. This scarf turned out exactly how I had imagined it and I think it’ll work out great in my wardrobe!
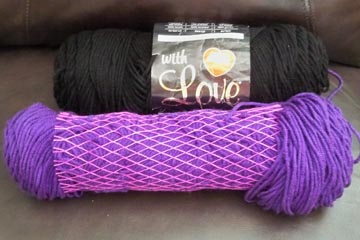
The 2nd skinny scarf that I started is going to be made with Plymouth Yarn Stained Glazz. I started this scarf last night, but when I looked at it this morning, I changed my mind to make it differently, so I frogged what I had started. According to our digital kitchen scale and a ruler, it was going to be about 27″ long, which isn’t anywhere near as long as I want it. So it’s back to the drawing board for this skinny scarf! This is a worsted/aran weight yarn with only 99 yards in the 50 gram skein. The yarn is a little heavy for a skinny scarf, so I have to be careful what stitches I use with it. I think it’ll make a pretty skinny scarf, too. It looks to be a one-ply, roving type of yarn, with solid black throughout and the rest of the ply changing colors with muted shades of red, orange, yellow, green and blue in it. It’s made with 51% wool and 49% acrylic fibers. I won this skein of yarn at the Halloween Party at the Annie’s Craft Festival last year (that was a ton of fun!). If you’d like to read about my adventures there, check out this blog post. Here’s what the Plymouth yarn looks like before this skinny scarf is made:
Plymouth Stained Glazz yarn for 2nd Skinny Scarf
What about you? What do you like to make with one skein of yarn? Do you like to make hats, scarves or something else? I’m not much of a hat person because of my curly hair. If I put a hat on, I’d better leave it on for the rest of the day, or else hide my flattened out “hat hair” at home (it’s really bad)!
I hope you’re enjoying the spring (or fall, if you live “down under”) and are taking time to enjoy the relaxing, creative benefits of crochet!
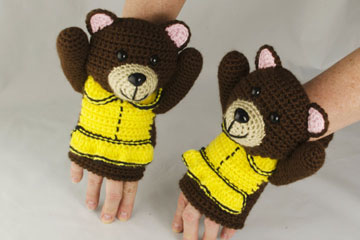
I’ve been busy working on more crochet patterns for you. Introducing my newest crochet pattern, “Bear Mitts”. Right now, this pattern is only sized for teens through adults (it’s not available in a child’s size yet, but I’ll work on that as time allows). What teenager or young adult (or “young-at-heart” adult, for that matter) wouldn’t love some adorable bear mitts in their stocking this Christmas? Without further delay, here is my bear mitts pattern for your crocheting pleasure:
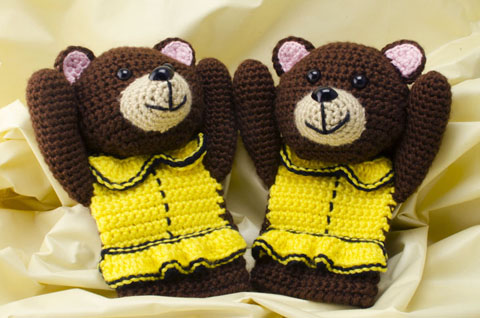
Bear Mitts
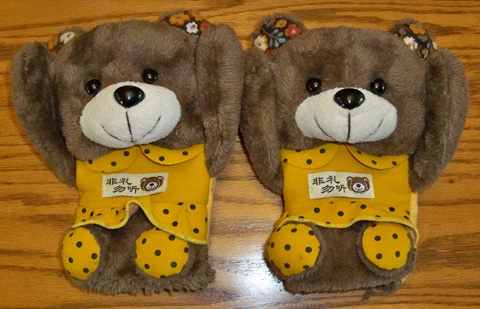
I’d like to tell you a little about this crochet pattern. I got the inspiration earlier this year when my middle son and his wife were here visiting from China. My daughter-in-law brought some adorable bear mitts with her from China and once I saw them, I fell in love with them! Here’s a photo of the original bear mitts from China:
Chinese Bear Mitts design inspiration
Aren’t they adorable? I think they’re so cute! Anyway, I decided within a few minutes of seeing them that I’d design some crocheted bear mitts similar to them. And I’m glad I did.
These bear mitts are a lot of fun to make! The head, muzzle and arms are made just like amigurumi pieces and are stuffed to keep their shape. The mitt body piece is made from the top to the bottom with the yellow dress on the front worked at the same time as the brown body. The skirt ruffle and collar are worked separately, then sewn onto the body afterward. The head and ears are separate pieces, too. Because the original Chinese bear mitts had the top of the arms sewn to the side of the face, I decided I’d do this, too, so they don’t flop around while being worn. I didn’t like the way the feet were coming out in crochet, so I decided my crocheted bear mitts didn’t need feet (besides, the fingers sticking out at the bottom can be the bear’s “legs”!). I chose to use safety eyes and noses because I like the look of them, but you could embroider the faces on your bear mitts, if you choose. This is how they look worn:
Bear Mitts worn
They’re really fun to wear! If you don’t care for the yellow dress, you can simply make your bear mitts with a different color of dress (it’s absolutely your choice on that part of the pattern)! And if you’d like to embellish your bear mitts with buttons or bows, I think they’d look great with those, as well (I think a bow at the top of the head or off to one side would be adorable!).
The 16-page written pattern for these Bear Mitts includes many photos of the individual pieces for ease of identification and construction.
As always, if you have a question about one of my patterns, I provide free pattern support for all of my patterns here at The Crochet Architect. I learn as much from my customers’ questions as they do from my answers (and I always welcome questions). That’s how we all learn, right?
If you’re an intermediate crocheter (or an adventurous beginner), I hope you’ll give these bear mitts a try. They’re great for helping to keep your hands and wrists warm! And they’re very stylish, too! You can find the pattern right here for sale on our pattern page.
We all love scarves for keeping our necks warm during the cold winter months! I know I do! But there’s one thing even better than a scarf because it doesn’t fall off easily or become crooked with wear. That item is a “cowl”! If you’ve never heard of a cowl, it’s basically the same thing as an “infinity scarf”, which is a scarf that is joined together at the ends into one big, long tube. There are no ends to be concerned about being straight or even when wearing it. You just put the cowl over your head and wrap it around your neck once or twice, depending on your preference of length and neck warmth! And presto! You have a beautiful and functional accessory to proudly wear or give as a gift. And it’s one of those gifts that doesn’t have to be a certain size, too!!!
This year, I started designing lots of scarves and cowls, since they’re a lot of fun to crochet and wear (and don’t require sizing!). I recently had my first cowl design published in the Dec. 2014 issue of Crochet World magazine and I have a new cowl pattern for you right here on The Crochet Architect. It’s called the “Unforgettable Ripple Cowl”, named after the Red Heart Boutique “Unforgettable” yarn that I chose for this cowl. This yarn comes in some absolutely “gorgeous” colors! It’s 100% acrylic, so it’s machine washable, which is a big plus for anything you might get dirty (not that I get my cowls dirty, but it could happen and I want to make sure I can get it clean without felting it)! I really enjoy crocheting with this soft, squishy yarn. Anyway, here is my new cowl design:
Unforgettable Ripple Cowl
Aren’t the colors pretty? I chose a ripple stitch pattern for this design because I like the way the changing colors are shown off to their best advantage. It’s also an easy pattern to memorize and crochet, as well as being quick to make! This cowl uses only 1 skein of the Unforgettable yarn, making it an economical project, too. There is only 1 seam to sew to join the bottom and top edges to form the tube-shaped cowl, as well as 2 tails to weave in (that’s not bad considering all the beautiful colors that change on their own!).
Here’s a photo of the cowl worn doubled:
Unforgettable Ripple Cowl worn doubled
I’m really going to enjoy wearing this cowl during the winter, which isn’t too far off now (we had our first frost on Sunday night, so winter is right around the corner here in the higher elevations of Arizona!).
Have you started any new scarf or cowl patterns lately before winter hits where you live? Do you have someone on your Christmas list who loves scarves and cowls?
To purchase the “Unforgettable Ripple Cowl” pattern, just check out our “patterns” page!
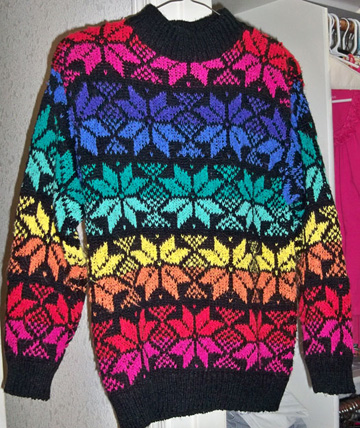
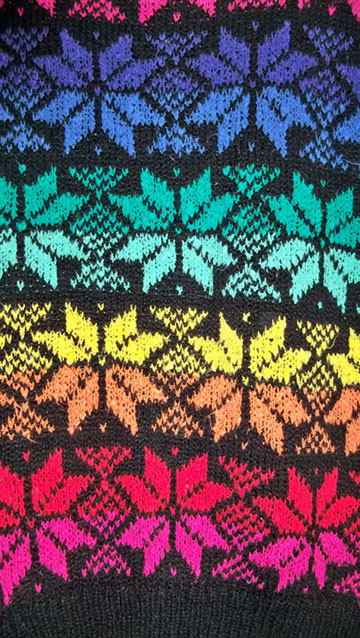
Have you ever wondered where designers get the inspiration for their designs? Well, inspiration comes from many places. For me, it can come from seeing something in a store, on a website or in a book. It can also come from seeing a garment or accessory that someone is wearing. My newest design, “It Takes All Colors Snowflakes” afghan, was inspired by a knitted sweater in my own closet! I don’t always get inspired by my sweaters, but this sweater was truly inspiring to me! It’s an older sweater and has seen its better days, especially around the bottom of the sleeves. But I love the snowflake pattern on it and the bright colors that were used, so I knew I had to use this design in a crochet pattern someday. Here’s a photo of the sweater (and a close up photo of it) for you to see:
Snowflake Sweater inspirationClose Up of Snowflake Sweater
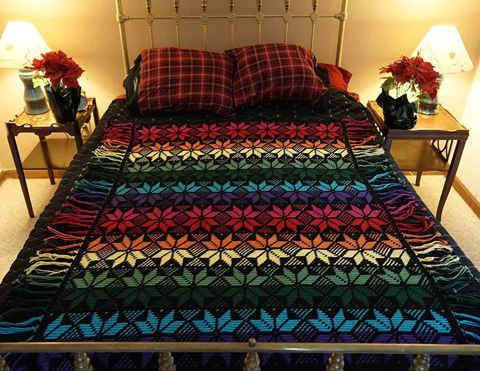
Here are photos of my snowflake afghan to compare to the sweater:
It Takes All Colors Snowflakes afghan
Close Up of Snowflakes afghan
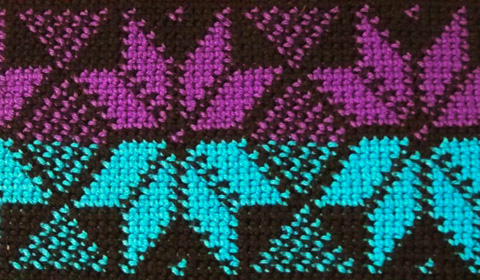
I used 8 colors (plus black) of Red Heart “With Love” yarn to make this afghan. It’s worked in the Fair Isle crochet technique in which each row is worked on the right side. The tails are all turned into fringe on the left and right edges afterward, so there are no tails/ends to weave in (yahoo!). Fair Isle crochet is a great technique that yields a fabulous finished design! And since the non-working color is worked over instead of being carried across the back, the afghan is reversible, too! Here is a close up photo of a section on the back of the afghan to see:
Back of Snowflake Afghan
You can find this pattern on the Mainly Crochet website here. If you’re not familiar with Mainly Crochet, it’s an online magazine started by Michele Maks, the former editor for Crochet World magazine. I met Michele in person at a CGOA Conference (possibly in 2009, but I could be wrong about the year!). Michele purchased quite a few of my crochet patterns during the years that she was the editor of Crochet World! She started out as a designer several decades ago, before she was the editor for Crochet World magazine. She’s a fabulous designer and a great magazine editor with a keen eye! A few years after leaving Crochet World, Michele decided to start her own online magazine called “Mainly Crochet”. The Mainly Crochet website went live in the summer of 2013 and has been going strong ever since! It is a subscription magazine that costs $24 per year. There are over 190 patterns on the website now. They’re all accessible to paid subscribers to download as PDF files onto their computers or tablets. Mainly Crochet has a lot of fabulous patterns by many talented designers! There are patterns for all skill levels and for all types of projects: from afghans to accessories to doilies and lots more! Check it out!
I hope you’ve enjoyed this look at the inspiration behind my “It Takes All Colors Snowflakes” afghan design and will give this crochet technique a try.
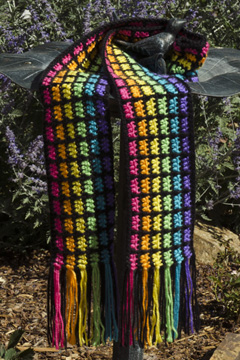
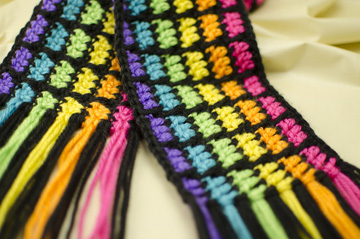
I’ve been busy designing lots of scarves this past 6 months and I’ve had a blast with them! I have one of the patterns ready for your crocheting pleasure. This scarf is called “Easy Rainbow Scarf” because it’s an “easy” pattern and because of the rainbow colors I used to crochet it! I just love rainbows, don’t you? Here’s a photo of the scarf:
Easy Rainbow Scarf
As you can see, the scarf is completely reversible, thanks to the special stitch worked in the black rows. This scarf, as shown, measures 4 ½” wide x 54” long, plus the fringe. However, the size is adjustable in width by working more or less rows and in length by working more or less repeats across the rows. So you can make your scarf whatever size you desire!
I used 6 colors (plus black) of Caron Simply Soft yarn to make this scarf, but you can use as few as 2 colors to make your scarf, if you wish. I used worsted weight yarn for this scarf, but feel free to use a heavier or lighter weight yarn instead to make your scarves. This is a great pattern for using up scraps of yarn, since only 25 yards of each color are required (for each colored strip in the scarf), plus 175 yards of black, to make the scarf the size shown. You can use whatever colors you like to coordinate with your outfits, coats or jackets.
This scarf is quick and easy to make. The skill level is “easy”, so if you haven’t been crocheting for very long or simply want an easy pattern to make, this scarf fits the bill!
Easy Rainbow Scarf close up
If you’re new to working more than one crochet stitch in a pattern, have no fear! The pattern is easy to follow and includes full instructions for making the scarf with the fringe. It also includes close-up photos of the scarf and fringe, instructions and step-by-step photos for working in the back bump of the foundation chain, making a Long double crochet (Ldc), starting a row (joining) with a sc or a hdc and making the fringe. And there are no yarn tails to weave in, since the tails are included into the fringe!
If you already know how to make a chain, single crochet, half double crochet and double crochet, as well as how to read and follow a crochet pattern, you’re ready to make this scarf. If you’re eager to learn something new and enjoy making new, unique projects, it’s time to get started on this fun scarf today! And Christmas is coming, so this is the perfect time to get started on those Christmas gifts for the loved ones on your list!
This pattern is available right here at The Crochet Architect as an instant PDF download for $4.95. And, as always, I’m available to answer any questions you may have about any of our patterns while you’re making the items. If you find a mistake, please let me know right away so I can correct it. I strive to create fun, error-free patterns for your enjoyment!
Have you ever been happily crocheting away and the skein of yarn you’re using starts falling apart in front of your eyes? Well, that happened to me over the past month while working on a crochet design for a publisher. I was crocheting a project that is done in the Fair Isle technique. Oh, you haven’t heard of that technique yet, you say? Karen Whooley has designed a lot of projects in the Fair Isle Crochet technique, which is similar to the Tapestry Crochet technique, but not quite the same. You can see some Fair Isle projects that Karen Whooley has designed over the past 7 years on her Ravelry designer page. Check out Karen’s Fair Isle Crochet class on Craftsy, too. It looks like it would be a great class to take for those who want to learn to do Fair Isle Crochet!
In Karen’s Fair Isle Crochet technique, she works her single crochet in the BACK LOOP of the stitches (this is different from Tapestry Crochet, which is worked in BOTH LOOPS of the stitches). Karen also carries the non-working color on top of the stitches, encasing it until needed again, just like in the Tapestry Crochet technique. I worked my project in this style of Fair Isle, which worked very well, since the stitches don’t slant (like they do in Tapestry Crochet) and the back of the project looks as neat as the front!
Anyway, back to the trouble I was having with my yarn misbehaving! Since I was using 2 colors in each row of my project, I had to change back and forth between the colors often. And since I always crossed the colors the same way each time (whether that is correct or not, I’m not sure!), the 2 yarns wrapped around each other after a certain number of color changes. So I had to take one skein of the yarn and unwrap the 2 yarns, bringing the skein over and under the strand of the other color yarn many times so they wouldn’t get tangled. But that wasn’t too bad, all things considered. What was bad was how the skein of yarn that I handled a lot to unwrap the 2 yarns starting falling apart on the outside like this:
Yarn falling apart and getting messy!
After working many rows of my project and having the skeins do this, I decided to do something about it! So I purchased some yarn sleeves to keep the outside of the skeins intact! Here’s one of the skeins with the yarn sleeve in use:
Yarn sleeve in use
This yarn sleeve really saved my life (that may be a little bit of an exaggeration, but not too far from it)! I had never used or owned a yarn sleeve before, but it was time to give them a try. And I’m so glad I did. The yarn sleeve worked really well at keeping the yarn together when I handled it so much. And that saved a little of my sanity! When I told a friend of mine that I had bought the yarn sleeves to use, she said I could do the same thing with some panty hose! I hadn’t thought of that, but it sounds like it would work. Have you used something else to keep your yarn under control like this?
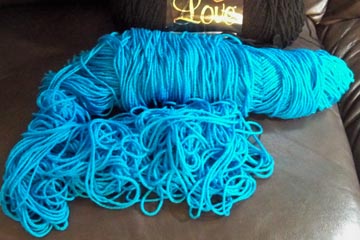
When I was done with my project, I decided to use my handy yarn winder and turn all the leftover skeins of yarn into neat “cakes” so they’d fit better into the box for storage. They’ll also be easier to use the next time I need to design something with these yarn colors instead of pulling my hair out in the middle of the project trying to untangle them! This is how some of the yarns looked before winding them up for storage:
Messy yarn!
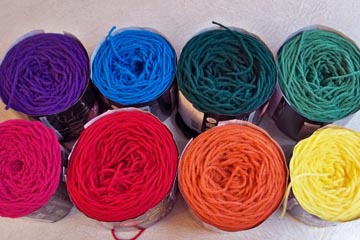
And this is how they looked after winding them up:
Neat cakes of yarn
Don’t they look organized and ready to use again? These 8 yarn colors above, plus black, are the colors I used in the project I just completed, which I recently shipped off to the publisher. I can’t show you the project now, but I can show it to you in July or August, after it’s published.
If you’re looking for a way (or 2) for controlling your yarn, I hope you’ll give yarn sleeves and winding the yarn into cakes a try! And if you’re looking for a new/different crochet technique to try, why not try the Fair Isle Crochet technique? It’s actually quite fun and the results are spectacular!
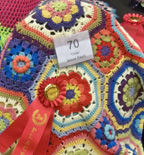
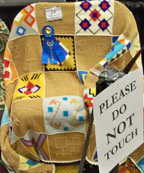
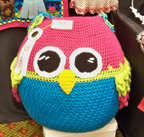
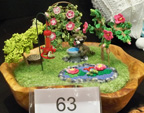
Last month, at the CGOA Chain Link Conference in Charlotte, NC, there was a design contest, open to all CGOA members. We have the design contest each year and I always enjoy seeing the fabulous designs that are entered. This year was no exception! There were some fantastic entries and the winning entries were spectacular!!! Here are some photos from the design contest:
2nd Prize Afghan by Jessie Rayot1st Prize Afghan by Julia Bryant3rd Prize Artistic Expression by Deborah Bagley
1st Prize Artistic Expression by Sachiko Adams
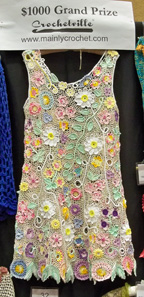
Grand Prize Winner by Dot DrakeWinner’s Circle
To see a full list of the winners in the design contest, please visit the CGOA blog here.
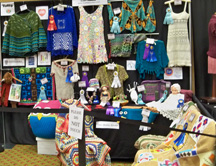
We also had a fashion show at the conference. Some of the garments in the fashion show were in the design contest and others weren’t. The fashion show has lots of “eye candy” and is part of the dinner at the conference! It’s a lot of fun! If you’d like to see lots of photos from the fashion show and the design contest, visit the CGOA Flicker page here.
I entered 3 designs in the Design Contest this year. I didn’t win a prize, but that’s okay. At least I tried my best! I LOVE the designs that won, so that’s what counts! Here are the 3 designs I entered:
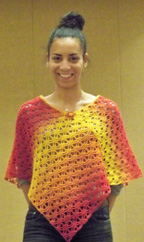
Brandyce modeling my Kauni Poncho
This is Brandyce from Lion Brand Yarn Company modeling my Kauni Poncho in the fashion show. I love the looks of this poncho because the yarn does all the work (well, most of the work!). If you’d like to make a Kauni Poncho of your own, the pattern is available for purchase here on my website, as well as on Ravelry, Craftsy and Etsy. It takes 140 grams (612 yards) of Kauni Effektgarn yarn to make this poncho. This yarn is 100% wool fingering weight and I LOVE the colors it comes in. To see all of the colors of this yarn, please visit the Kauni website here.
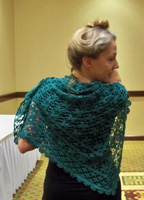
Vashti modeling my Alexandria Shawl
This is my Alexandria Shawl, modeled by Vashti Braha. This shawl is made with 100% cotton yarn. The large triangular section of motifs and the inset of motifs are made in the Continuous Crochet Motifs method, with less ends to weave in because the motifs are made continuously, not separately. If all goes well, I’ll have this pattern available for purchase on my website within the next year.
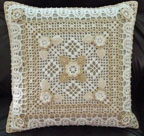
Triple Delight Pillow
This is my Triple Delight Pillow. It’s made with 3 shades of size 10 DMC Cebelia. I made it in 3 techniques: Irish Crochet motifs (the flowers and leaves), Filet Crochet (in the large center section) and Bruges Lace around the edges (hence the word “triple” in the name!). I also added small beads in the center of many of the flowers. I’m not sure what I’m going to do with this design, yet.
If you’re a CGOA member, you’ve tried your hand at designing crochet projects and you haven’t entered them in the CGOA Design Contest, you should consider entering your designs next year. Who knows! You might win! And you don’t have to write the patterns to enter your designs (of course, if they’re going to be published, you’ll need to write the patterns eventually!). The prizes are $100 for 3rd place, $200 for 2nd place and $300 for first place in each of the 6 divisions, plus $1,000 for the grand prize winner! That’s nothing to sneeze at!!! And the designs remain yours to do with as you please after the contest.
Keep watching the CGOA website for more information on the design contest as the 2014 conference gets closer. Next year’s CGOA conference will be July 23-27, 2014 in Manchester, NH. It’ll be the 20th Anniversary of CGOA next year! Yahoo!!! There will be lots of celebrating going on, I’m sure!
Good luck! I hope to see your designs in next year’s CGOA Design Contest.
Okay, this is really part of my CGOA Conference information, but I think it’s important enough to deserve a separate blog post. If you know me well, you know that I don’t consider myself to be a knitter. You may be wondering why I say that. Well, let me tell you why. When I was a girl, my mom taught me to knit, but I wasn’t very good at it. I remember asking my mom which row I was on as I was knitting some slippers: the knit row or the purl row. So, apparently, I couldn’t tell the stitches apart at that time.
When I was a teenager, my best friend taught me to crochet. I later married her brother, making us sisters-in-law! I quickly took to the crochet hook like you wouldn’t believe! It was so much easier to use one hook than 2 needles (I used to stick one needle between my legs to knit, which looks pretty silly in my opinion)!
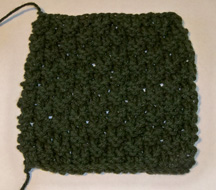
So fast forward almost 40 years to the week before the CGOA Conference last month. I saw the video listings on the Leisure Arts website for the Knook and decided to watch them. If you’re not familiar with the Knook, it’s a wooden crochet hook with a hole at the opposite end from the hook. You can watch the Knook videos here. To use the Knook, you insert a cable (which I think can be just a scrap piece of yarn) into the hole and you can knit with a crochet hook! So I decided to try it, but my local craft store was out of the Knook. I asked my friend, Jane Rimmer, about the Knook and she thought I could do the same thing with a double-ended crochet hook. So I tried it and I was able to knit with a crochet hook! Yahoo! I think using the Knook would be a little easier than using the double-ended crochet hook, but it works for now. I was as happy as a clam with my new knitting skill, since I didn’t have to try to hold 2 knitting needles anymore!!! And the knit stitches are identical, whether they’re made with the Knook (or double-ended crochet hook) or with 2 knitting needles. Can you tell the difference? All of these green swatches were knit with my double-ended crochet hook, not knitting needles. I haven’t blocked them or woven in the ends, so they don’t look too good, but you get the idea!
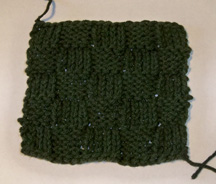
Knit Check Pattern made with a crochet hookKnit Basketweave Pattern made with a crochet hook
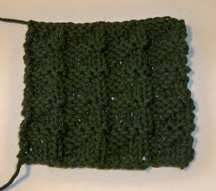
Knit Pennants Pattern made with a crochet hook
But my story doesn’t end there. On the way to the CGOA Conference last month, my good friend, Kathy White (she’s known as Kathryn White for her published crochet designs in books and magazines, as well as on her website), tried to teach me to knit with 2 knitting needles (the long style of needles, which are awkward for me to use). I was still having trouble with the 2 long needles and the slippery yarn. So fast forward 5 days to the last day of the conference, on the way home. Nancy Nehring, another crochet designer in CGOA, was flying home on the same plane as Kathy and me (she was continuing on to San Jose, I believe, while Kathy and I got off in Phoenix). I got to sit between Kathy and Nancy on the plane. They’re both left-handed and I’m right-handed, but they were very patient with me. Kathy bought a set of 5 short, wooden knitting needles at the conference and gave me 2 of them to use. So I kept trying to knit, with their wonderful guidance, until I was successful! I didn’t get a picture of myself knitting on the plane, but here I am in the airport before boarding the plane, thrilled with my new skill (and the shorter needles, which are much easier for me to use):
Here I am in the airport, excited about learning to knit!
I was having trouble with my stitches being twisted, so Nancy explained about inserting the needle in the other direction to keep the stitches from twisting (unless I was supposed to twist them, as patterns sometimes want them to be).
For the last 2 1/2 weeks, I’ve been practicing my knitting. I plan to keep improving and learning more all the time. Here are the first 2 projects I’ve knitted since returning home from the conference and learning to knit again:
Knit Child’s ScarfKnit Doll Blanket
I love the stitch pattern in this scarf, which is my adaptation of a child’s vest pattern from the latest issue of Knit 1-2-3 magazine. And I wanted to try my hand at a lacy knit stitch pattern, so I made a small blanket for a doll. The instructions for this knit stitch pattern are also in the latest issue of Knit 1-2-3 magazine, but it’s a full-size afghan in the magazine.
I’m having a blast with my knitting! I’m currently designing a knitted man’s scarf and I’d like to become a knitting tech editor when I know more about knitting (and can read the patterns comfortably, too). I love the look of knitting and now I can truly call myself “bi-stitchual” or “bi-textural” (that’s someone who can crochet and knit!).
I love knowing how to knit with 2 needles now. I know that it will open up a lot of extra possibilities for me in what I can create. I can add knitted ribbing to my crochet garments or a crocheted edging to my knitting projects! I look forward to the knitting journey ahead and all of the fun of learning something new!!!
If you know how to crochet and knit, in what ways do you enjoy using knitting and crocheting together?
I’ve been getting ready for the CGOA Conference (aka: The Knit and Crochet Show or the Chain Link Conference) for weeks and I’m almost ready to go (except for packing on Monday)! I’m teaching 6 crochet classes at the conference next week in Indianapolis, Indiana, which is a lot to prepare for. It’s going to be a blast…it always is!!! For more information about the conference, check out this website. The things I love about the CGOA conference are (in no particular order):
1. The friendly crocheters (and knitters) that I meet there.
2. The wonderful classes I get to take (when I’m not teaching) and the new things I learn about crochet (I love to learn more to expand my crochet knowledge and ability).
3. The market (show floor) with lots of gorgeous yarn, crochet hooks and patterns!!!
4. Professional Development Day where we learn more about earning an income through designing, technical editing, teaching, contract crocheting, etc.
5. Seeing and spending time with crochet friends that I’ve made over the years.
6. The Fashion Show dinner.
7. The design contest.
I’ve been a CGOA (Crochet Guild of America) member for over 10 years and I’m hooked (pun intended)! There are so many wonderful, friendly, helpful crocheters in CGOA who are happy to share what they know with each other (mostly about crochet, but sometimes about life in general, too). I’ve made so many really good friends by attending the CGOA Conference each year. I am truly blessed to know so many crocheters from every walk of like, whether they’re professionals, associate professionals or CGOA members at large (these are the nicest people)! I love to encourage new crochet professionals and share my crochet knowledge with others through my classes. I certainly don’t know all there is to know about crochet, but I’m learning more all the time (and that’s what CGOA is all about…learning about crochet).
I’ve been working on a shawl for this year’s CGOA Design Contest for several weeks. I can’t show you a picture of it because one of the judges might see it before the contest and the entries are supposed to be kept secret. But I can share with you the struggles and trials I’ve had designing this shawl (it’s confession time!). First, I made countless mistakes in this shawl and had to rip out a lot of stitches several times to correct the mistakes (I really should have been paying closer attention to what I was doing!). Oh well. Live and learn! Second, I ran out of yarn before the end of the shawl, so I had to frog (rip out) hours and hours of work on it so I can redesign it a little differently to use just the amount of yarn that I purchased last year at the conference (about 950 yards from the Newton’s booth).
One of the “challenges” with this design (besides all of my mistakes and ripping out so many stitches) was the stitches that I worked into the chain spaces sliding around and not staying evenly spaced. The yarn I’m using is a rather slick mercerized cotton (not all mercerized cotton is slick like this one). I do enjoy the sheen this yarn has and the lighter weight of the yarn, so I’m willing to overlook the sliding stitches “challenge”!
I’d like to share a hint to help your stitches stay in place and not slide around, like mine were doing. I normally work my stitches in a chain space into the space and not into the chains. But with some slippery yarns (like the one I’m using), the stitches can slide around and not be evenly dispersed across the chain space. So I decided (after ripping out a huge chunk of my work) that I’d work into the chains themselves instead of into the chain spaces. Here are a couple of photos showing the difference between working into the chains themselves and working into the chain spaces:
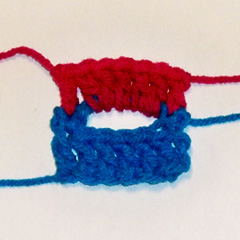
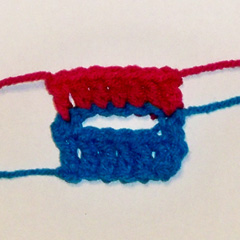
Working in Chain SpaceWorking in Chains
Can you see the difference? The photo on the left shows the center 5 red double crochet stitches worked in the blue chain-5 space below. The photo on the right shows the center 5 red double crochet stitches worked in the chains of the blue chain-5 space below (one double crochet is worked in each of the 5 chains). Can you notice how the red stitches are more evenly spaced in the right-hand photo? And they don’t move around anymore. Of course, working into the chains themselves works best when you have the same number of stitches to work into the same number of chains (like 5 chains and 5 stitches).
Well, I’d better get back to preparing for the conference. I hope you all enjoy the rest of this month and are able to enjoy many relaxing hours of crochet!