I’m pleased to announce the winner of Kathryn White’s book, “The Go-To Book for Irish Crochet Motifs”. Congratulations to Kathylovescrochet! You’re the big winner. I’ll e-mail you today to arrange to send your autographed copy of the book this week.
Thank you all for your comments/entries and please stay tuned for another crochet giveaway soon.
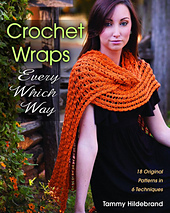
I’m honored to review the first crochet book done by my good friend, Tammy Hildebrand today. Tammy’s name and crochet designs have been gracing the pages of crochet magazines and books for many years, but this is Tammy’s first book with ALL of the projects designed by Tammy herself. You’ve probably seen some of Tammy’s designs in Crochet!, Interweave Crochet, Crochet 1-2-3 and Crochet World magazines. Many times, Tammy’s designs have graced the cover of these magazines, too! To see Tammy’s published designs, visit her Ravelry page. Tammy is a wonderful crochet garment designer who I’ve admired for years! She is also the Vice President on the CGOA Board of Directors and has served on the Professional Development Committee of CGOA for many years.
Crochet Wraps Every Which Way front cover
Anyway, back to Tammy’s new book, “Crochet Wraps Every Which Way”. This is a great book with 18 patterns for wraps, ponchos, shawls and stoles in 6 techniques: hairpin lace, broomstick lace, Tunisian crochet, double-ended crochet, motifs and traditional crochet. There are 3 designs/projects for each of these 6 techniques: 1 design for each of these skill levels: easy, intermediate and experienced. So you can pick a project based on your skill level, making the book relevant to almost all crocheters! And there is even a “how-to” section in the back of the book with step-by-step instructions and photos to help you learn the new techniques that appeal to you!
Tammy has pushed the envelope with many of these cutting-edge designs. She even works some of these techniques in the round that are traditionally worked in rows! How cool is that? I’m in awe of Tammy’s creativeness! Here are some of my favorite projects in the book:
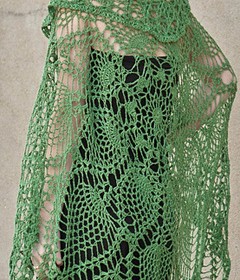
Perfect Pineapples
The “Perfect Pineapples” shawl is essentially a big, round doily with the pineapple pattern throughout, made with yarn. I love the way you can fold it over wherever you want to make it the length you like (and the folded portion forms a collar!).
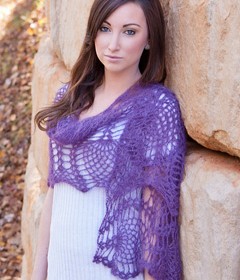
Purple Passion
The “Purple Passion” wrap is also made with pineapples. This wrap is made with Lion Brand Silk Mohair yarn, which is one of my new favorite yarns! It’s a dream to work with and it’s light-as-a-feather!
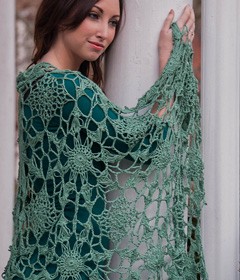
Chica Mala
The “Chica Mala” shawl looks like it’s made with regular motifs, but it’s made with broomstick lace motifs, worked in the round! I had to do a double-take on this shawl! I have to give this a try soon when I have some spare time.
I love the colors that Tammy has chosen for these wraps. Of course, you can choose different colors for the wraps you make from these patterns to coordinate with your wardrobe or the recipient’s wardrobe, if the project will be a gift for someone else!
I know how to do all of these crochet techniques, but I’m not very proficient with some of them! I’d like to learn more about them and practice my skills with them (like hairpin lace and broomstick lace). I took a hairpin lace class at last year’s CGOA Conference in Charlotte, NC from Jennifer Hansen, who is a genius with hairpin lace, broomstick lace and Tunisian! That was a lot of fun! I’ve enjoyed Tunisian crochet for many years and I love crocheted motifs! What are your favorite techniques out of the 6 techniques in this book? Which ones would you like to learn?
If you’d like to purchase this fabulous book and learn some new crochet techniques or expand on the ones you already know, the book is available at Amazon.com here. It is also available at many local craft stores and book stores nationwide. Tammy’s book has 104 pages and retails for $19.95 in the US ($22.95 in Canada). That’s just over $1 per pattern!
I hope you’ll take a look at Tammy’s new book and learn a new crochet technique in 2014!
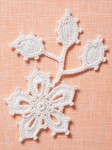
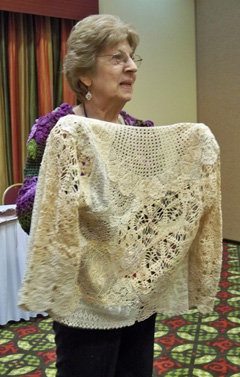
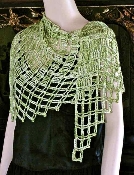
I am thrilled to be taking part in Kathryn White’s blog tour for her new book, “The Go-To Book for Irish Crochet Motifs”! Kathryn (Kathy) is a good friend of mine and an extremely talented designer. She is an expert with a steel crochet hook and cotton crochet thread! I’ve loved her designs for years and met her at the CGOA Conference in Sept. 2011 in Greensboro, NC. I think it was Kathy’s first CGOA conference, but I’d been to many CGOA Conferences before that one. I didn’t get a good photo of Kathy at that conference, but I did get a photo of the Irish crochet motifs that she made and appliqued to the sweater she was wearing when we met. Here it is for you to see:
Kathy’s Irish motif appliques
These are beautiful Irish crochet pieces and they show up so nicely on that sweater (or perhaps it was a sweatshirt).
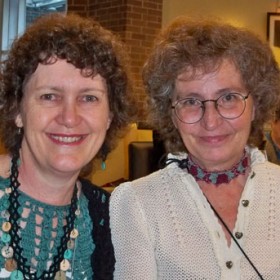
Here is a photo of Kathy and me from another CGOA Conference last year:
Susan & Kathy at CGOA Conference in 2013
You can find Kathy on Facebook, as well as on her website here. And you can follow the rest of the stops on her Irish Crochet blog tour on her blog here.
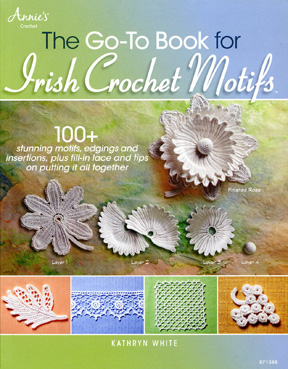
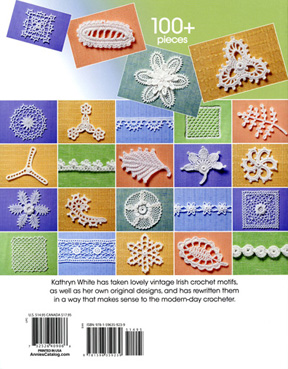
Now on to her fabulous Irish Crochet book! Here’s the front and back covers of the book:
front cover of Irish Crochet bookback cover of Irish Crochet book
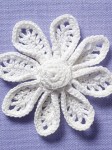
As the front cover says, there are over 100 motifs, edgings and insertions in this book, along with fill-in lace and tips on putting it all together. The motifs include various types of flowers, leaves and fill-in motifs. There are also dangles and overlays in this book. There are many motifs to choose from and combine into your very own Irish crochet masterpiece!!!
If you’re not familiar with Irish crochet, it’s a fabulous technique of making motifs (typically with crochet thread), many with something called a “padding cord” or a “padded ring” to give more dimension to the pieces (Kathy explains the padding cord and padded rings in this book, along with giving hints to make them easier). The motifs are then joined together with “fill-in lace” to make a large piece or project. Many of the old Irish crochet patterns are difficult to understand, but Kathy has made them easy to understand with modern crochet terms and updated Irish crochet patterns in her new book. There are motifs for every skill level in this book, as well. And if you don’t want to use a padding cord or padded ring, Kathy gives updated patterns for making the same motifs without them.
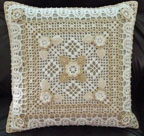
Here are photos of some of the pieces in the book:
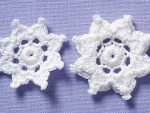
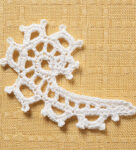
As a thread crochet lover, I absolutely LOVE this book! As one of Kathy’s friends, I actually saw part of the book before it was published. And I got to try out a part of the book last year, too. Here’s my fill-in lace sampler from last year:
My Irish crochet sampler
I learned a lot while making this sampler piece, which is in Kathy’s book. I learned how to use padding cord (successfully) and how to work the fill-in lace between the motifs (successfully, too!). Kathy is a patient teacher and she’s very thorough, too! I love that in a crochet designer/teacher.
You can see more of Kathy’s Irish Crochet book and purchase it as a printed book or in digital format on the Annie’s website here. The book has 96 pages and retails for $14.95 in the US ($17.95 in Canada). It’s a fabulous book and I can’t wait to make more of the motifs in it. I also want to try joining more motifs with more of the fill-in lace methods in this book. Now if I just had more time or some clones to do my work so I could sit and crochet more, which is what many of us would love to do!!!
To celebrate Kathy’s new Irish Crochet book, I’m giving away an autographed copy to one very lucky winner. To enter the giveaway, just leave a comment on this blog post about Irish crochet or crochet in general (or tell me what crochet technique is your favorite). You must live in the US to qualify, since shipping the book to another country is very expensive. I’ll pick the lucky winner on Jan. 21, so you’ll have plenty of time to enter! Good luck everyone!
I recently got 2 new crochet/knitting books from Annie’s. I love getting new patterns for crochet and knitting projects! There’s nothing like a new project! If you called me a “pattern junkie”, I think you’d hit the nail right on the head!!!
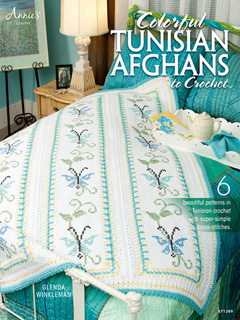
Colorful Tunisian Afghans to Crochet book
The first book is “Colorful Tunisian Afghans to Crochet” by Glenda Winkleman. This book includes 6 patterns for Tunisian crochet afghans with cross-stitches worked on the surface to create the designs. These are really nice afghans! I love the construction of them. Five out of the six afghans are done in either strips or squares of Tunisian crochet. Each strip or square is edged before joining them together. The sixth afghan is done in a large center section that appears to be 2 separate sections, but it’s one big piece with bobbles separating the solid center from the edges where the cross-stitches are worked. Here’s that afghan:
Hope Rose Afghan
Isn’t it pretty? And here are a few of the other afghans in this book:
Summer Blues AfghanPennsylvania Dutch Afghan
The patterns in this book are rated as an “easy” skill level, but they may be closer to “intermediate”, in my opinion! Some of the special stitches used in various afghans in the book are: bobbles, popcorns, crossed sc and picots). Each pattern comes with written instructions and charts for the cross-stitch placement. If you’ve never done cross-stitch on Tunisan crochet before, it’s really easy! The Tunisian crochet makes a “grid” of squares that serve as the background for the cross-stitches. The book even includes a diagram in each pattern showing how to work cross-stitches.
Each of the afghan squares or panels is crocheted with one color of yarn, making the pieces work up quickly. Then you cross-stitch the design onto the squares or panels per the charts. If you’ve ever done stamped or counted cross-stitch on fabric, you already know how to do the cross-stitch portion of these afghans. And if you’ve done Tunisian crochet before, you already know how to do the background of the afghans! If you don’t know how to do Tunisian crochet and you want to learn, Annie’s has a lot of books, videos and materials for doing Tunisian crochet. You can see their assortment of Tunisian items here. Kim Guzman has designed a lot of projects in Tunisian crochet. She has several online classes with Annie’s, too. To read about her class called “Learn to Tunisian Crochet”, click here.
You can see all of the afghans in this book at the Annie’s website here. The book retails for $9.95 in the US and $11.95 in Canada. So with 6 patterns in this book, that comes out to be $1.67 for each pattern in the US ($2.00 each in Canada)!
If you enjoy doing Tunisian crochet (or want to learn), why not add this book to your crochet library?
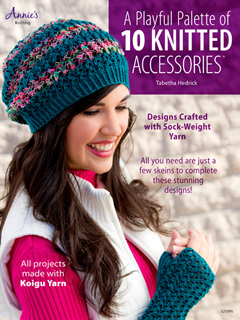
A Playful Palette of 10 Knitted Accessories book
The second book I got is “A Playful Palette of 10 Knitted Accessories” by Tabetha Hedrick. As the name implies, this is a knitting book. For those of you who are bi-stitchual (you can crochet AND knit), this is a great book. There are 10 projects, ranging from small, quick projects to larger, longer projects. There’s a headband, bracelet, scarf, cowl, hat (in 2 versions), fingerless mitts, scarflette, cape and socks in 2 lengths in this book. All of the projects are made with 1-4 skeins of Koigu Yarn: either Koigu Premium Merino (KPM) or Koigu Painter’s Palette Premium Merino (KPPPM). These are both fingering/sock-weight yarns in 100% merino wool. I’ve never tried this yarn, but it looks really pretty in the book, so I’ll have to give it a try sometime very soon!
Here are a few photos from this book:
Kodiak CowlGarden City Hat & Mitts
Nantucket Socks
You can see all of the projects in this knitting book here.
The skill levels for the projects in this book range from beginner to intermediate. I like having this range of skill levels, since I’m a fairly new knitter with lots to learn! I really like the looks of the lacy socks in this book. I never thought I’d knit or crochet socks before, but I might have to take the plunge sometime soon!!!
This knitting book has 48 pages and retails for $14.95 in the US ($17.95 in Canada). With 10 patterns in the book, each pattern costs just $1.50 in the US ($1.80 each in Canada)!
If you enjoy knitting accessories, you may want to add this book to your knitting library!
Many years ago, I crocheted some snowflakes for my Christmas tree. But, true to my procrastinating nature (aka: other things were more important to do, so this got pushed to the bottom of the list), I waited until last week to stiffen these crochet snowflakes. Now don’t get me wrong, I don’t always procrastinate. But I find myself doing the crocheting of projects quite easily, while the finishing of many projects takes me a lot longer to warm up to doing! Are you the same way? Also, I don’t relish the idea of getting the stiffening solution all over my hands! I suppose I could always wear rubber gloves, but where’s the fun in that?
Last week, I was inspired to stiffen these snowflakes because of a crochet design that I just finished for a major crochet magazine (the design is still a secret, but you’ll find out in about 6 months what it is when the magazine comes out).
I’d guess that not too many people have stiffened crochet snowflakes or know how to do it, so I decided to write a tutorial on how to stiffen them. You can find it right here on my “Tutorials” page. So if you’d like to learn how to stiffen snowflakes, then please take a look at the tutorial.
Update (11/25/20): I have a YouTube video for learning to stiffen crochet snowflakes. You can find that video here.
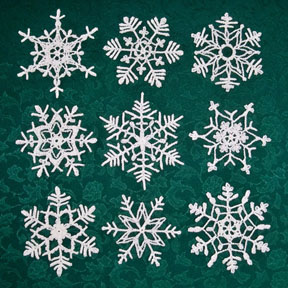
Anyway, here’s a photo of the 9 snowflakes I stiffened to use on next year’s Christmas tree (I already had this year’s tree decorated, so I didn’t want to change it!):
9 Stiffened Snowflakes
Aren’t they pretty? I crocheted them from the Leisure Arts book called “White Christmas in Thread Crochet” by Kathryn A. Clark, a very talented crochet designer. This book includes 54 projects from snowflakes to icicles to tree toppers to tree skirts and garland. It’s a great book! Here’s a photo of the front cover of this book:
White Christmas in Thread Crochet book
I’ve had this book for many years (it was published in 2001). My copy isn’t that pretty anymore because I’ve taken it with me to many places, including little league baseball games when my sons were much younger. Since I love thread crochet, these snowflakes were a natural project for me to make!
If you enjoy working with crochet thread, why not give some crocheted snowflakes a try! You’ll be glad you did and your Christmas tree will look fabulous!!! Or if you’re looking for a unique gift, these snowflakes make fabulous gifts!
Are you a CGOA (Crochet Guild of America) member? If so, fantastic! If not, why not? If you love crochet and you’d like to be part of a national organization that is dedicated to crochet, then CGOA is for you! We have local chapters that hold monthly meetings for members to share with each other and learn from each other, yearly crochet conferences with lots of classes and fun activities, free crochet patterns “for members only” and many more benefits of CGOA membership! Check out all the member benefits on the CGOA website here. To find a local chapter near you, please visit this webpage.
Do you know about the CGOA website? You can find CGOA at www.crochet.org. The CGOA website has a new look and added features this year. We have some crochet lessons and fabulous new crochet videos (done by Kim Guzman) on the new CGOA website, as well! And there will be more additions to the website in the near future, too.
Many of you already know that I am the current secretary on the CGOA Board of Directors. I’m also one of the co-chairs on the CGOA Masters Committee and I’ve taught classes at many of the CGOA Conferences in the last 5 years. As a Board member, I was honored to design and crochet the website banner for the CGOA website this year. If you’re a CGOA member, you can read all about the banner and download the free website banner motif pattern (for members only) here. This is the motif for the CGOA website banner:
CGOA Website Banner Motif
It’s made with popcorns and post stitches, as well as many regular crochet stitches. Here’s a photo of part of the CGOA website banner with many joined motifs:
CGOA Website Banner
I made this banner with 12 colors of Cascade 220 Superwash yarn. This yarn was a dream to work with! You can see the huge range of Cascade 220 Superwash colors here. There are 220 yards of worsted weight 100% wool yarn in each ball. I know the CGOA banner will last for a long time, since this yarn is completely washable!
Happy crocheting everyone! And remember the CGOA motto:
“When you think CROCHET, think CGOA”!!!
Susan
P.S. I hope you have a very Merry Christmas and a Happy New Year filled with lots of time to crochet! And I hope you learn a new crochet technique in 2014, too!
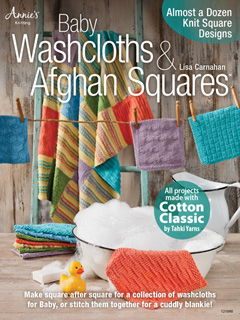
Last month, I got the book, “Baby Washcloths & Afghan Squares” by Lisa Carnahan, published by Annie’s. This is a knitting book, not a crochet book. But since I now know how to knit, as well as crochet, I wanted to give some knit washcloths a try. Here is a photo of the front cover of this book:
Baby Washcloths & Afghan Squares book (front cover)
This is a very nice book with some nice washcloth patterns. I especially like it because I’m a relatively new knitter and my knitting skills are still a work-in-progress (I’m not ready for the TKGA Masters program by any means, yet!).
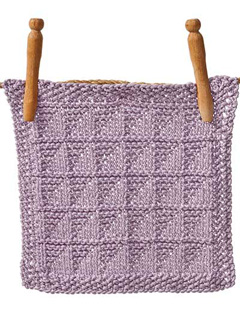
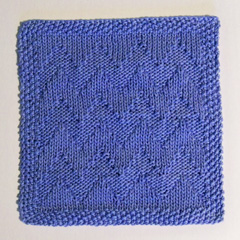
It was hard to pick which washcloth designs I wanted to make from this book because I like them all! But I finally chose the Zigzags and the Triangles washcloths to make. Here are photos of these 2 washcloths in the book:
Zigzags Washcloth from bookTriangles Washcloth from book
The washcloths in this book were made with Tahki Yarns Cotton Classic, which is a DK weight yarn. Since I didn’t have any of that yarn, I used some Omega Sinfonia that I had left over from the “Wiggly Crochet Dishcloths” book I did for Annie’s. I LOVE this yarn! It’s a sport weight 100% cotton yarn that comes in many gorgeous colors. It is 3.52oz (100g) and has 218 yards (200m) for $4-5, so the value is good (and you can buy it for even less than this with a coupon!). I started knitting a pretty pink sweater this month from 5 balls of Sinfonia that I bought on sale for $3 each to learn more about knitting and shaping sweaters! It should be really nice!
But back to the baby washcloths! These washcloths don’t use that much yarn, so using left overs is perfect for these projects. In my opinion, these washcloth patterns aren’t just for babies. Since pretty much all of them are geometric designs, they can be used for much more than babies. At 8” (20cm) square, I think they’re a great size for facial washcloths and smaller dishcloths, too. I LOVE the drape of them and the stitch pattern keeps my interest instead of knitting rows of all knit or all purl! I also LOVE how quick they are to make. I can make a washcloth in just 1 or 2 evenings while watching TV (I’m not that fast of a knitter, yet, either!). Okay, here are photos of my washcloths for you to see:
My Zigzags WashclothMy Triangles Washcloth
What do you think? I think I did pretty well for being a new knitter (since July of this year).
There are 10 solid washcloths and 1 striped washcloth (done with slipped stitches) in this book. There’s even an afghan made with all 10 of the solid squares and 10 of the striped squares in the book (the afghan can be seen on the cover of the book and there is a full-size photo of the afghan inside the book). Here’s the striped washcloth for you to see:
Slip-Stitch Washcloth from book
You can see larger photos of all the washcloth blocks in this book and purchase it online on the Annie’s website here. If you love to knit washcloths and dishcloths, you’ll really enjoy this book!
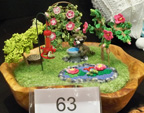
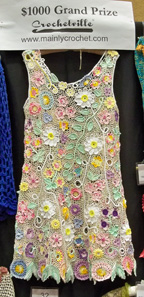
Last month, at the CGOA Chain Link Conference in Charlotte, NC, there was a design contest, open to all CGOA members. We have the design contest each year and I always enjoy seeing the fabulous designs that are entered. This year was no exception! There were some fantastic entries and the winning entries were spectacular!!! Here are some photos from the design contest:
2nd Prize Afghan by Jessie Rayot1st Prize Afghan by Julia Bryant3rd Prize Artistic Expression by Deborah Bagley
1st Prize Artistic Expression by Sachiko Adams
Grand Prize Winner by Dot DrakeWinner’s Circle
To see a full list of the winners in the design contest, please visit the CGOA blog here.
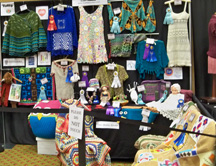
We also had a fashion show at the conference. Some of the garments in the fashion show were in the design contest and others weren’t. The fashion show has lots of “eye candy” and is part of the dinner at the conference! It’s a lot of fun! If you’d like to see lots of photos from the fashion show and the design contest, visit the CGOA Flicker page here.
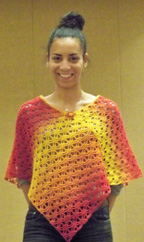
I entered 3 designs in the Design Contest this year. I didn’t win a prize, but that’s okay. At least I tried my best! I LOVE the designs that won, so that’s what counts! Here are the 3 designs I entered:
Brandyce modeling my Kauni Poncho
This is Brandyce from Lion Brand Yarn Company modeling my Kauni Poncho in the fashion show. I love the looks of this poncho because the yarn does all the work (well, most of the work!). If you’d like to make a Kauni Poncho of your own, the pattern is available for purchase here on my website, as well as on Ravelry, Craftsy and Etsy. It takes 140 grams (612 yards) of Kauni Effektgarn yarn to make this poncho. This yarn is 100% wool fingering weight and I LOVE the colors it comes in. To see all of the colors of this yarn, please visit the Kauni website here.
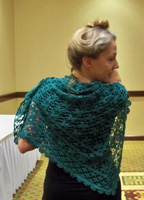
Vashti modeling my Alexandria Shawl
This is my Alexandria Shawl, modeled by Vashti Braha. This shawl is made with 100% cotton yarn. The large triangular section of motifs and the inset of motifs are made in the Continuous Crochet Motifs method, with less ends to weave in because the motifs are made continuously, not separately. If all goes well, I’ll have this pattern available for purchase on my website within the next year.
Triple Delight Pillow
This is my Triple Delight Pillow. It’s made with 3 shades of size 10 DMC Cebelia. I made it in 3 techniques: Irish Crochet motifs (the flowers and leaves), Filet Crochet (in the large center section) and Bruges Lace around the edges (hence the word “triple” in the name!). I also added small beads in the center of many of the flowers. I’m not sure what I’m going to do with this design, yet.
If you’re a CGOA member, you’ve tried your hand at designing crochet projects and you haven’t entered them in the CGOA Design Contest, you should consider entering your designs next year. Who knows! You might win! And you don’t have to write the patterns to enter your designs (of course, if they’re going to be published, you’ll need to write the patterns eventually!). The prizes are $100 for 3rd place, $200 for 2nd place and $300 for first place in each of the 6 divisions, plus $1,000 for the grand prize winner! That’s nothing to sneeze at!!! And the designs remain yours to do with as you please after the contest.
Keep watching the CGOA website for more information on the design contest as the 2014 conference gets closer. Next year’s CGOA conference will be July 23-27, 2014 in Manchester, NH. It’ll be the 20th Anniversary of CGOA next year! Yahoo!!! There will be lots of celebrating going on, I’m sure!
Good luck! I hope to see your designs in next year’s CGOA Design Contest.
It’s been almost a month since my last blog post! Wow! Where does the time go? It’s been a busy month.
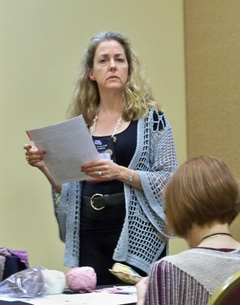
Earlier this month, I attended the CGOA Chain Link Conference at the Embassy Suites Hotel in Charlotte/Concord, NC (from Oct. 2-6). It was fabulous, as always! There’s too much to tell you about in one blog post, so I’ll tell you about the classes I took in this post and save the other information for another blog post or two later. I love teaching at the conference, but I also enjoy being a student and stretching my crochet knowledge and skills, too.
I took 7 crochet classes at the conference. The teachers whose classes I took are Margaret Hubert, Jennifer Hansen, Vashti Braha and Dora Ohrenstein (I took 3 classes from Vashti and 2 classes from Jennifer). All of the classes were fantastic! And there were many more classes with other great teachers, too.
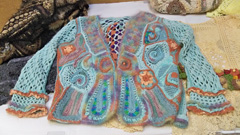
Margaret’s class was Freeform Knit and Crochet. Since I can now knit, as well as crochet, I thought this class would be a good fit for me. However, I’m not sure I’m cut out to be a freeform person (I might be too analytical and black/white). But I truly love the freeform look and would like to be able to do it someday (perhaps in Irish crochet with crochet thread instead of with yarn). Maybe with a little practice (or some wine to help me relax!), I might learn to do freeform well. But I enjoyed the class and drooled over Margaret’s gorgeous freeform pieces. Here’s one of them:
Margaret Hubert’s freeform jacket
Isn’t this gorgeous? Margaret is a wonderful teacher and designer. Here she is in the class showing us a jacket that she made from purchased doilies to inspire us:
Margaret Hubert’s doily jacket
I was truly inspired (the photo doesn’t do it justice)! All of Margaret’s freeform pieces are inspirational! You can read more about Margaret and see her fabulous creations on her website here.
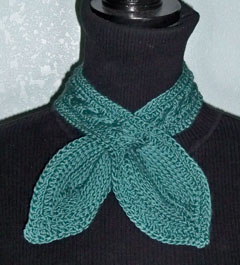
The 2 classes I took from Jennifer Hansen were on Hairpin Lace and Tunisian Crochet. Jennifer is a “Master” at both of these crochet techniques. She has boundless energy, too! In the Tunisian class, we learned to do cables and make a keyhole for her wonderful Tunisian Keyhole Cravat pattern (see pattern on her website here). Here’s a photo of this fantastic design:
Jennifer Hansen’s Tunisian Keyhole Cravat from Stitch Diva Studios
I crocheted my cravat from some extra Naturally Caron Spa yarn that I had. I haven’t blocked it, yet, so I hope it turns out as nice as the one in the Stitch Diva photo. Here’s a photo of that for you to see:
My cravat
In the hairpin lace class, we learned how to make many different types of hairpin lace strips and many different ways to join them together. It was great! Here’s Jennifer in the hairpin lace class:
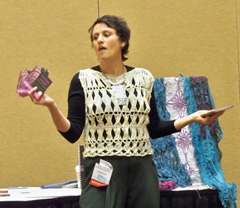
Jennifer Hansen (aka: Stitch Diva Studios)
I learned a TON in both classes! Thanks so much, Jennifer.
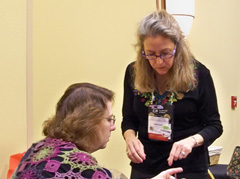
The 3 classes I took from Vashti were on Love Knots, Tunisian Filet and Slip Stitches. Vashti is a wonderful teacher with lots of patience. She’s a very laid back teacher and puts a lot of thought into her classes and her designs. Here she is in the love knots class explaining something to Shari White:
Vashti Braha (on right) and Shari White (on left)
If you’ve never seen love knots before, here’s a photo of some:
Love knots
And here’s Vashti in the Tunisian Filet class deep in thought:
Vashti Braha
The Tunisian Filet class was based on her Aero Wrap. Here’s a photo of that wrap:
Aero Wrap by Vashti Braha of “Designing Vashti”
You can see the pattern and read about it on her website here.
I wasn’t able to attend all of the Slip Stitch class because the Board meeting ran late (I’m the secretary on the CGOA Board and we have our annual “face-to-face” Board meeting on Saturday morning at the conference). But I enjoyed what I got out of the class and would like to learn more about it in the future.
Dora’s class was on grading garments (something I don’t like to do and I still need to learn more about it). Dora was very informative, but her class was on the last day of the conference and I was battling “conference brain”! Here’s Dora explaining something about garments:
Dora Ohrenstein of “Crochet Insider”
I took good notes during the class. I think that between my notes and the handout, I’ll learn more when I get a chance to read through it all again. Dora has written several crochet books and they’re all fabulous! To read more about Dora, check out her website here.
I hope you’ve enjoyed this look at the 7 crochet classes I took at the CGOA Conference. If you’ve never attended a CGOA Chain Link Conference before and you’re curious about it, check out the CGOA website here, or the CGOA blog here or the CGOA Facebook page here.
Ahoy, matey! Shiver me timbers! Happy “International Talk Like a Pirate Day” to everyone! What will they think of next?
But seriously, I wanted to share a few newly published crochet patterns that I designed with you. And best of all, one of them is FREE!!!
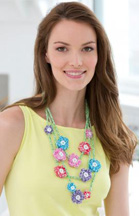
Here’s my Mod Flower Necklace, published by Red Heart/Coats & Clark and available on their website here.
Mod Flower Necklace
This necklace is made with a new crochet thread by Coats called Aunt Lydia’s Baker’s Cotton. This is a size 3 cotton thread that comes in 150 yard balls. It’s currently available in 6 colors, which are all plied with white. It’s very soft and has a great drape to it. You can watch a video about this new crochet thread on the Red Heart website, featuring the editor of Crochet Today magazine, Theresa Gonzalez, who is wearing my flower necklace in the video here. I designed this necklace with double-sided flowers, so whichever side of the flowers is facing will be the right side (no backs of flowers for me on this one!). I also added white buttons in the center of each flower, while sewing the flowers onto the necklace chain. And best of all, this pattern is FREE!!!
I just had 2 more patterns published, both in the October 2013 issue of Crochet World magazine. You can see the projects in this issue of Crochet World here.
First is my Reversible Popcorn Ripple Afghan.
Reversible Popcorn Ripple Afghan in Crochet World magazine Oct. 2013
This afghan is made with 5 shades of Plymouth Encore yarn, which is a worsted weight yarn. I designed this afghan with a one-row repeat, changing colors in every other row. Because of the one-row repeat, the popcorn stitches stick out on the front and on the back of the afghan, making it truly reversible! Be creative and use any colors you desire to make this afghan for yourself or as a wonderful Christmas gift for a friend or family member.
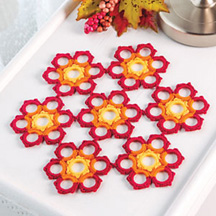
Second is my Autumn Blaze Table Mat.
Autumn Blaze Table Mat in Crochet World magazine Oct. 2013
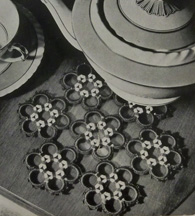
This design is special because it’s the first design I’ve done for the new column in Crochet World called “What’s Old is New Again”. Basically, I’m taking a vintage pattern from the past and turning it into a modern treasure. This design started with the inspiration from this vintage pattern:
Vintage Bone Ring Table Mat pattern
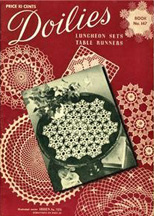
This is the vintage book where I found this pattern:
Vintage Doilies book from 1940
This book was published in 1940 by Spool Cotton Co. It’s book #147 and sold for only 10 cents back then. What a deal!
Anyway, back to my updated version of this table mat. I used 3/4″ bone rings and Aunt Lydia’s Classic, size 10 cotton crochet thread. In the inspiration design, they didn’t cover all of the rings, but left some white showing at the center of the rings where they joined them together by simply wrapping crochet thread around the adjacent rings. I covered all of the 49 bone rings with crochet stitches and added points around the rings that create 6-pointed stars in the empty space between the groups of 7 rings. And I decided to use 3 colors of thread instead of one in each of the 7 groups of 7 rings: the center ring is covered in yellow, while the 6 rings surrounding the center ring are covered in orange and red. I like the way these 3 colors create more visual interest in the table mat. Of course, you can use 3 different colors for your table mat, if you prefer. Color selection is a very personal choice and anyone can change the colors they use in a crochet pattern to suit their own needs, décor or personal preferences.
I hope you’ve enjoyed this look at 3 new crochet patterns. There are new crochet patterns coming out all the time by many very talented crochet designers. I’m sure you have your favorite crochet designers, just like I do!