Do you enjoy crocheting for the holidays? I definitely do! During the past 15 years, I’ve designed quite a few heart-shaped crochet patterns! So in honor of Valentine’s Day, I’ve compiled a list of my published Valentine’s Day and/or heart-shaped crochet patterns for you (and a few are FREE, too!). If you’re like me, you’re looking for a new heart-shaped crochet pattern to make for this Valentine’s Day (before it’s here and gone!). Why not crochet something for your sweetheart this Valentine’s Day?
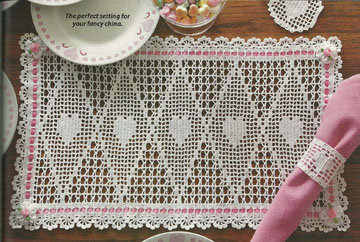
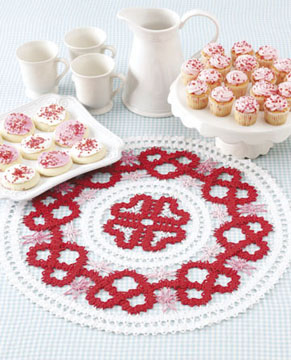
Valentine Placemat Set
1. Valentine Placemat Set (published in the Feb. 2010 issue of Crochet World magazine). This filet placemat set was made with size 20 cotton crochet thread.
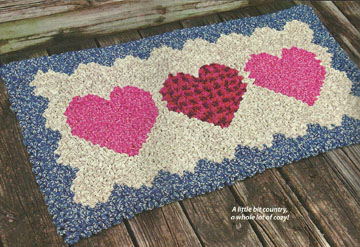
Wiggly Hearts Rug
2. Wiggly Hearts Rug (published in the Feb. 2010 issue of Crochet World magazine). This rug was made with Red Heart Super Saver and LusterSheen yarns.
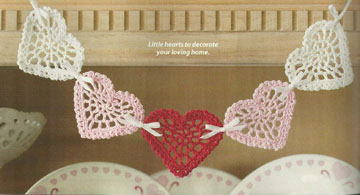
Heart Swag
3. Heart Swag (published in the Feb. 2010 issue of Crochet World magazine). This swag was made with size 10 cotton crochet thread.
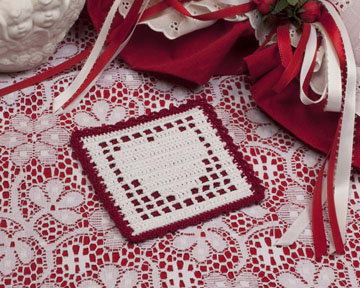
Filet Heart Coaster
4. Filet Heart Coaster (available for purchase on my website here). This coaster is made with size 10 cotton crochet thread.
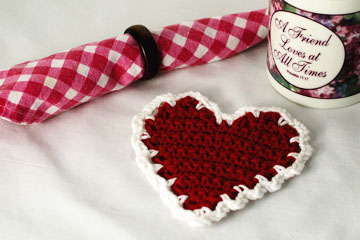
Heart Coaster
5. Heart Coaster (FREE pattern download on my website here). This coaster is made with worsted weight cotton yarn.
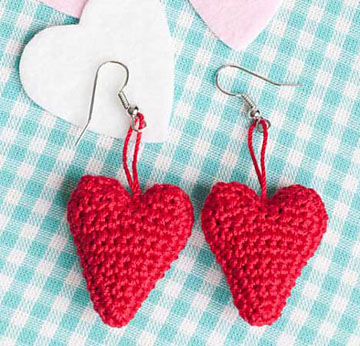
Valentine Earrings
6. Valentine Earrings (published in the Jan/Feb 2011 issue of Crochet Today! magazine). These earrings were made with size 10 cotton crochet thread.
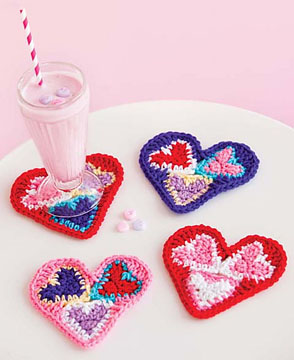
Justify my Love Coasters
7. Justify my Love Coasters (published in the Jan/Feb 2013 issue of Crochet Today! magazine). These coasters were made with Red Heart Super Saver yarn).
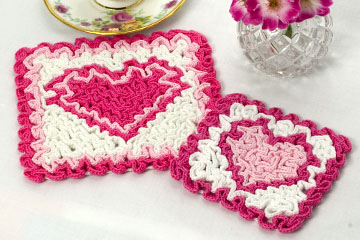
Wiggly Valentine Hot Pad & Coaster Set
8. Wiggly Valentine Hot Pad & Coaster Set (available for purchase on my website here). This set is made with size 10 cotton crochet thread.
Bruges Lace Heart Centerpiece
9. Bruges Lace Heart Centerpiece (published in “Crochet Beyond the Basics” book in 2014 by Rita Weiss and Susan Lowman, published by Leisure Arts). This centerpiece is made with size 10 cotton crochet thread.
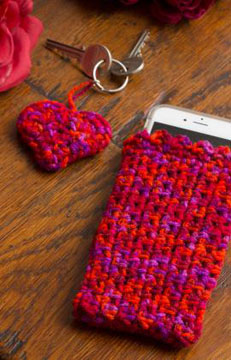
Easy Cell Phone Cosy & Heart-Shaped Key Fob
10. Easy Cell Phone Cosy & Heart-Shaped Key Fob (FREE pattern on the Red Heart UK website here). This set uses Red Heart Detroit Color yarn, which is a 100% acrylic, light weight yarn (#3) that is available in the UK. If you live in the US, you could easily substitute Red Heart Anne Geddes Baby yarn or Red Heart Baby TLC yarn instead.
I hope you’ve enjoyed this look at my Valentine’s Day and heart-shaped crochet patterns. There are TONS of other published Valentine’s Day and heart crochet patterns out there by many talented crochet designers. Why not find the perfect pattern and start your Valentine’s Day crochet project(s) now (before it’s too late!). And if you’d like to learn a new crochet technique (such as wiggly crochet, filet crochet or Bruges Lace crochet) at the same time, what are you waiting for? Start learning something new right now!
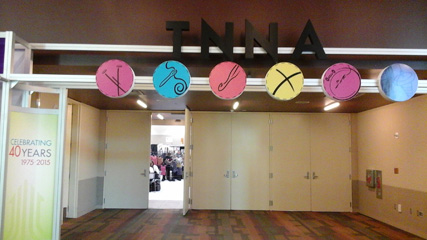
A few weeks ago (on January 10 and 11), I attended the TNNA Trade Show in Phoenix, AZ. If you’ve never heard of TNNA, it stands for “The National Needlearts Association”. You can read all about TNNA here.
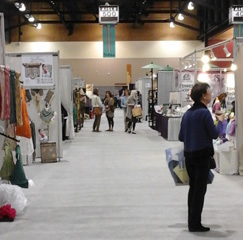
It was a great show! There were hundreds of booths filled with yarn, crochet hooks, knitting needles, books and lots of knit and crochet garments to drool over! It was “eye candy” for creative people! There were also needlepoint companies there. I used to do some needlepoint and counted cross stitch in the 80’s and 90’s, but I don’t do it anymore. I’m having too much fun with crocheting and knitting now!
A typical aisle of booths at the TNNA trade show
The TNNA Trade Show is for people who are professionals in the needle arts industry to show their products to other companies looking to purchase their products. There were lots of yarn shop owners there, as well as magazine editors and designers. I attended the trade show to see the different yarns up close and to speak with the yarn company owners/reps in person. I submitted a book proposal to a publisher a few months ago and I wanted to see some of the yarns that I might be able to use for the book. I also wanted to meet the people from the yarn companies face to face.
I saw many other knit and/or crochet designers there: Brenda Bourg, Linda Dean, Karen Whooley, April Garwood, Andee Graves, Melissa Leapman and Michelle Hunter. And I also saw Marcy Smith, the editor for Interweave Crochet in one of the yarn booths. I had lunch with Kj Hay, a fellow knit and crochet designer and a good friend of mine one day, too. Unfortunately, I didn’t take any photos with any of my friends (I guess I was too preoccupied with the gorgeous yarn to remember to take photos!).
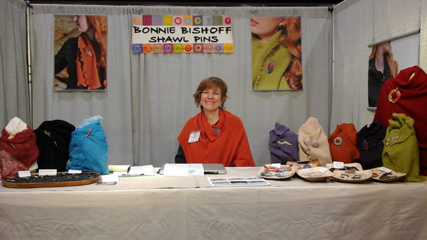
In one of the booths, I met a lady named Bonnie Bishoff. Bonnie is an artist who creates beautiful shawl pins from polymer clay. Here are a few pictures of Bonnie in her booth, along with her shawl pins:
Bonnie Bishoff in her TNNA booth
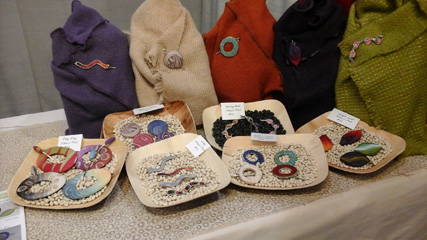
Bonnie Bishoff’s shawl pins
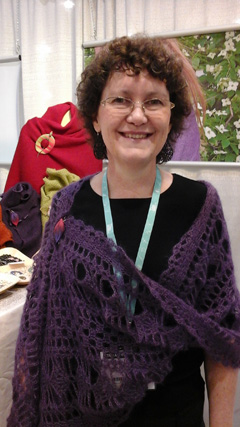
And here’s me wearing the beautiful leaf shawl pin that I bought from Bonnie at TNNA on Sunday:
This shawl pin is so pretty and will coordinate with a lot of the knit and crochet shawls that I’ve made over the years!
Of course, the shawl pins are even prettier in person than in these photos! You can see more of Bonnie’s designs on her website here. Bonnie’s shawl pins are available at many yarn shops around the US. To see if your local yarn shop carries Bonnie’s shawl pins, check out this page.
I met some new people at the trade show, too. One of them was Erin Slonaker. About 9 years ago, I worked with Erin when I was tech editing crochet patterns for Crochet Today magazine. Erin was the assistant editor, along with Brett Bara, who was the editor of the magazine. Now Erin is the editor in chief of Yarn Market News, a magazine for people in the yarn industry. I didn’t get a photo of Erin, either. Darn!
Another new person who I met there was Trisha Malcolm. Trisha is the editorial director of Vogue Knitting magazine. I just had my first knitting design published in the Winter 2014/2015 issue of VK, so I was excited to meet Trisha! Here we are in the Vogue Knitting booth on Sunday afternoon:
Trisha Malcolm and me
Unfortunately, the shawl I chose to wear that day grew on me while I was wearing it. It ended up getting stretched out and hanging pretty low by that afternoon! I think I’ll be more careful how I wear this shawl in the future!!!
All in all, I had a great time at the TNNA trade show! It was great to see old friends and to make new ones, too! And it was wonderful that the show was so close to home!
Speaking of close to home, the Knit & Crochet Show (aka: CGOA Conference) is going to be held in San Diego, CA this July! I hope to see many of you there and to meet some more new friends! To find out more about CGOA and the annual CGOA conference, go to their website here.
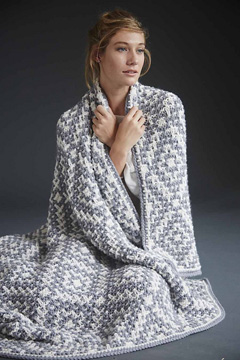
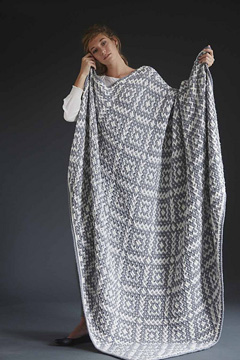
This is the story of my first published knitting design. It’s the beginning of September when I’m writing this blog post. But I’m posting it now because the pattern has just been published in the Winter 2014/2015 issue of Vogue Knitting magazine. My design is #9 Mosaic Blanket on pages 48 and 49 in the magazine. Here it is for you to see:
Mosaic Blanket (knit) from Vogue Knitting magazine Winter 2014/2015 issueMosaic Blanket (knit) from Vogue Knitting magazine Winter 2014/2015 issue
Now here’s my story about this blanket…
Back on August 15th, 2014, I got a phone call and an e-mail from an editor at Vogue Knitting. She explained that they were doing a special interview with Barbara Walker, a “guru” in the knitting field, especially in mosaic knitting. Since I learned to knit in July, 2013, I’ve been devouring knitting books and continually learning new knitting techniques. I’ve always loved mosaic crochet, so mosaic knitting was one of the first techniques I learned, along with lace knitting, which I also love! I checked out one of Barbara Walker’s Mosaic Knitting books from my local library in the Fall of 2013 and quickly learned this fascinating knitting technique. So I said “yes” to taking on this mosaic blanket project and waited somewhat “impatiently” for the yarn to arrive. It took a whole week to get here, which was a lot longer than I had hoped it would!
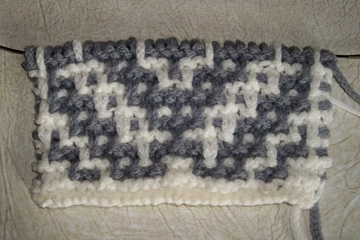
I began this challenging blanket right away when the yarn arrived on August 25th. The yarn came in hanks, so I quickly wound a few hanks into cakes with my trusty umbrella swift and ball winder. Then I sat down and knit a gauge swatch so I could calculate how many stitches and rows would make the targeted 50” x 60” blanket.
Mosaic blanket gauge swatch
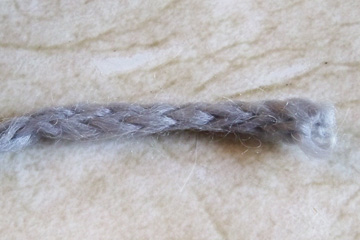
I calculated that I’d need to knit approx. 340 rows to make the blanket 60″ high. Since the deadline to get the finished blanket needed to be at the publisher’s office no later than Sept. 19th, that meant I should aim for finishing it by Sept. 12th, to allow time for shipping it from Arizona to New York. I wanted to aim for a few days earlier than that to finish it, so I decided I should knit between 20 and 24 rows per day. At first, my knitting speed was 6 rows per hour, but later on, it slowed down to 4-5 rows per hour (I’m not sure why, but it did!). I calculated it would take me approx. 17 days to knit this blanket at 20 rows per day, which was within the deadline of Sept. 12th. Each hank of yarn had 70 yards in it and was enough to knit 10 rows in the blanket. So that meant 2 hanks of yarn would yield 20 rows total, which was one day’s work. The yarn (Debbie Bliss Paloma) was a real pleasure to knit with, being 60% alpaca and 40% wool. It is a chainette yarn, which means that it’s like a knitted I-cord already. This yarn is as light as a feather and knits up to make a fabulous blanket that isn’t too heavy, but has lots of “bounce” to it. Here’s a few photos of the yarn:
Debbie Bliss Paloma yarnDebbie Bliss Paloma yarn close up
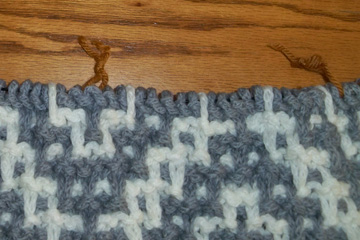
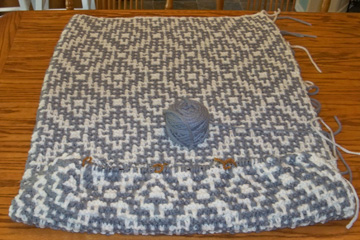
I learned some things while knitting this blanket. The first thing I learned is the necessity to use stitch markers between pattern repeats, especially in mosaic knitting with lots of pattern repeats across the rows. Without those markers, I would have messed up royally across the rows. The markers helped me see the different “sections” of the row and keep my stitches worked properly, which is essential in mosaic knitting. As you can see in this photo, I used scraps of yarn for makeshift markers, since my largest markers were not quite big enough to go on these large needles (I used size 15 circular needles for this blanket). The yarn markers worked great and didn’t cost a thing, either! So the next time you need some stitch markers, why not make your own out of contrasting scraps of yarn?
Homemade stitch markers
I also learned that once the blanket got big (like around halfway through when it was around 30” long), putting it on a clean table and knitting it there was easier than having the weight and thickness of the blanket on my lap (especially in the hot summer months!). I folded the blanket in half widthwise and sat on one side of the table to knit the first half of the rows. Then I simply moved to the other side of the table and folded the blanket in half lengthwise (so the top of the blanket was on the other side of the table, as well) to knit the second half of the rows.
Mosaic blanket being knit on table
In mosaic knitting, you have to pay attention to what you’re doing all the time. It doesn’t help when your mind wanders and you knit more stitches than you need in that particular part of the row! How do I know this? Because I’ve done it myself, of course! And you have to pay attention to whether you’re working a right side or wrong side row because you slip your stitches with the yarn held in back on RS rows and with the yarn held in front on WS rows. While I was working on the blanket, I noticed a slipped stitch I had worked with the yarn held on the right side instead of on the wrong side while I was working the next row. So I fixed that mistake by simply moving the yarn to the wrong side on the next row before slipping that stitch again. If you don’t notice the mistake on the following row, though, it’s another matter!
Most mosaic patterns are written with charts, which I love, since I’m a visual person. I use a magnetic board with magnetic strips so I can place one of the strips ABOVE the row I’m currently working. This allows me to see what stitches are supposed to be BELOW the stitches I’m currently working. This also helps to find and fix any mistakes quickly before they’re too far back to fix!
Every now and then, I laid out the blanket to check for any mistakes so I could quickly fix them. In mosaic knitting, most mistakes are VERY OBVIOUS!!! While I was working the WS rows, I would check the RS to make sure I didn’t have the yarn held on the back (the RS) instead of on the front (the WS), like it should be.
Sometimes it’s hard to concentrate on a mosaic knitting project. It was much easier to work on this blanket with music playing than while watching a TV show because I could concentrate easier with the music.
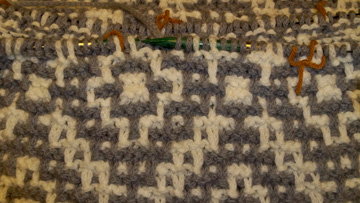
Here are a few photos of a mistake I made and that section after fixing the mistake. I’ve added an arrow to where the mistake is located to help you see it better. Basically the gray horizontal line should have been a white vertical line! So I had to ladder down and fix that mistake before continuing. If I had looked at the blanket sooner, I wouldn’t have had to ladder down as many rows (approx. 18-20 rows)! It’s sure better to be able to fix a mistake by laddering down rather than having to rip out several hours of work, especially when you’re on a deadline to get it finished!
Mistake in blanket before fixing itAfter fixing mistake
Okay, so can you answer a question for me? Am I a “glutton for punishment” for knitting a project this big or am I simply a knitter in search of a “challenge”? What do you think?
I hope you’ll give mosaic knitting a try. If you’ve never done mosaic knitting before, it might be best not to attempt a project this big for your first mosaic knitting project. Make something smaller, like a mosaic coaster or dishcloth first, to help you learn this technique. Then you’ll be ready to attempt something larger! And if you’d like to see a preview of all the fabulous projects in the Winter 2014/2015 issue of Vogue Knitting, check out this link.