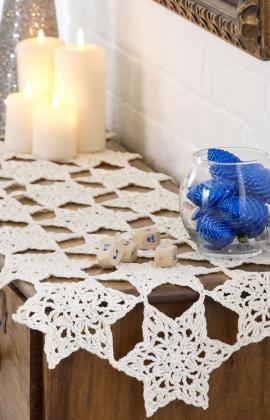
Here’s today’s FREE crochet pattern. It’s a table runner that I designed for Red Heart in 2012. It’s called Star Table Runner and is made with size 3 Aunt Lydia’s Fashion Crochet Thread, along with a size D (3.25 mm) crochet hook.
Star Table Runner
You can download this FREE pattern here. I think it would be great for Easter, as well as for Christmas, or all year long! I love crocheting motifs and I love thread crochet, too! These motifs are joined together at the points as you work them. The pattern includes an assembly diagram, as well as symbol crochet charts.
I hope you enjoy this FREE crochet pattern. You can even crochet one star and use it as a Christmas tree decoration, if you’d like!
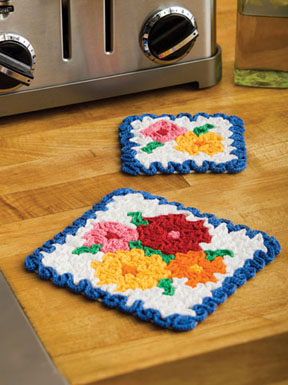
If you’ve never tried Wiggly Crochet and you’d like to give it a try with a FREE Wiggly Crochet pattern, today is your day! Here is my May Flowers Hot Pad & Coaster Set from the Red Heart website. It’s today’s FREE crochet pattern of the day, in honor of National Crochet Month!
May Flowers Hot Pad & Coaster
You can get this FREE pattern here. This set is made with Aunt Lydia’s Classic Crochet thread in size 10, along with sizes 7 (1.65 mm) and 10 (1.30 mm) steel crochet hooks. If you’ve never done Wiggly Crochet before, check out my tutorial on this page.
I hope you enjoy Wiggly Crochet as much as I do! Check back again tomorrow for another FREE crochet pattern.
Today’s FREE crochet pattern is the Sorrel River Sweater/Tunic. I designed this sweater/tunic in 2011 for Caron Yarns. Here it is…
Sorrel River Sweater
I used Naturally Caron Spa yarn (now discontinued) and a size G (4 mm) crochet hook for my sweater/tunic (you may use a different size of crochet hook, depending on the size of the sweater/tunic you’re making, though). You can use any DK weight yarn that you want for this sweater/tunic, as long as you’re able to achieve the listed gauge.
This sweater/tunic is made with motifs, which are joined together while crocheting the last round of each motif, so there’s no seaming required. The square motifs are set on point and are joined at the corners, as well as at the middle of each side. The corner joins create what looks like a mini motif between the larger motifs, but that’s just the 4 corners being joined! I used full motifs, half motifs and quarter motifs in this sweater/tunic. An edging is added around the neck, at the bottom of the sleeves and at the bottom of the sweater/tunic. The pattern includes crochet symbol diagrams and assembly diagrams. If you’re uncertain about how to join the motifs, you can see some additional photos and chart that I added to the Ravelry pattern page here.
I hope you’ll give this sweater/tunic a try. You can find the FREE pattern here.
Today’s FREE crochet pattern is the Keepsake Lace Shawl, a lacy shawl that I designed for the May/June 2010 issue of Crochet Today magazine. This shawl includes a center section of filet crochet with crocheted pineapples on both long edges of the filet center. It’s made with size 3 Aunt Lydia’s Bamboo crochet thread and a size E (3.5 mm) crochet hook. The shawl measures 60″ x 19″. The pattern even includes a symbol crochet chart for those of you (me included) who love working from symbol crochet charts! Without further ado, here is this shawl…
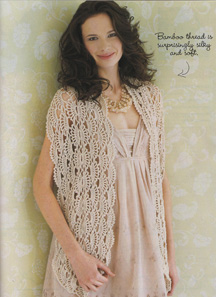
Today’s FREE crochet pattern is another one that I designed many years ago. It was published in the May/June 2009 issue of Crochet Today magazine. I really enjoyed designing this one! It’s called “Romantic Wrap”. Here it is…
Romantic Wrap
This particular wrap was made with Aunt Lydia’s Bamboo Crochet Thread, size 10 and a size 0 (3.25 mm) steel crochet hook, which is the same size as an aluminum size D (3.25 mm) crochet hook. It measures 60″ long x 11.5″ wide. You can find the FREE pattern here.
I LOVE designing and wearing lacy items! I hope you enjoy this FREE crochet wrap pattern.
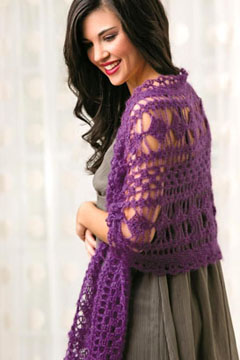
Here is today’s FREE crochet pattern. It’s my Purple Haze Wrap that is available for FREE from Crochet World magazine. The pattern may not be free forever, but it is currently. So if you like it, I’d suggest downloading and saving it for later use!
Purple Haze WrapPurple Haze Wrap
This pattern was originally published in the December, 2013 issue of Crochet World magazine. It is made with Lion Brand LB Collection Silk Mohair yarn, which is light as a feather, but surprisingly warm! You can see the colors that this yarn comes in on the Lion Brand website here. I couldn’t believe how small and lightweight the box of yarn was when it arrived in the mail a few years ago to make this wrap! I LOVED working with this yarn! It’s fabulous! Of course, like any mohair yarn, you have to be careful when you’re crocheting with it because it’s not that easy to rip out stitches when you make a mistake. If you’re not comfortable working with mohair yarn, you could always use a different yarn that isn’t mohair to make your wrap.
Here’s the link to this FREE crochet pattern. I hope you enjoy it and will share a photo of your completed Purple Haze Wrap with me!
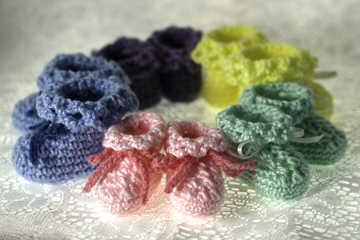
For those of you who are new to The Crochet Architect website, I’d like to share my FREE Baby Booties pattern with you today.
Baby Booties
These booties are on the small side at 3” long, perfect for preemies and newborns. They’re made with sport weight yarn and a size G (4 mm) crochet hook. Or use worsted weight yarn and a larger hook to make them bigger. It’s your choice. The added drawstring, which can be made from a length of ribbon or crocheted with a coordinating color of yarn, helps keep the booties on little baby’s feet. The chain loops at the top of the booties give them a little flair! You can find the FREE pattern here.
I hope you enjoy this FREE baby booties pattern and visit The Crochet Architect website often! And I hope you’re enjoying National Crochet Month, too!
Because of internet problems today, this post is a little late! But if the internet stays up while I’m typing this post (fingers crossed), you’ll be able to see the 5th of the FREE crochet patterns I have for you this month, in honor of National Crochet Month.
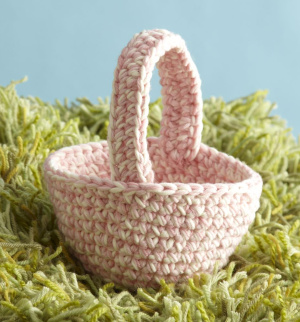
Easter Basket
Here’s another Easter pattern; this time for the basket to put the eggs in that you’ll be crocheting from yesterday’s free pattern! This pattern is from Lion Brand Yarn. You can download the FREE crochet pattern here. This basket is made holding 3 strands of yarn together and using an N-13 (9 mm) crochet hook. I think these baskets would be great for children’s or grandchildren’s Easter Egg Hunts! And since they’re made with a larger hook, they shouldn’t take long to make at all!
I hope you enjoy this pattern and all the FREE crochet patterns I’m sharing with you this month.
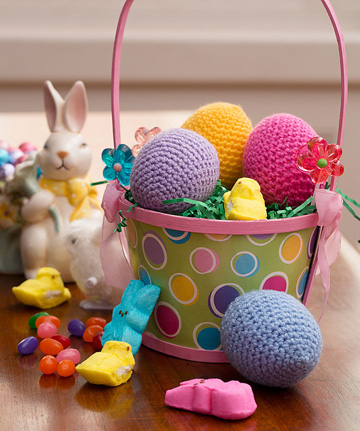
Easter is right around the corner (1 month from tomorrow on April 5). To help celebrate Easter, why not crochet some Easters eggs during March? Here’s a great FREE pattern for basic crocheted Easter eggs from Red Heart yarns:
Easter Eggs
The FREE pattern can be found here. Since this pattern is from the Red Heart UK website, they’ve used a yarn that is available in the UK. But basically any DK weight 100% acrylic yarn, such as Anne Geddes Baby or Red Heart Baby TLC, could be substituted (or use a worsted weight yarn for larger Easter eggs). You could decorate these eggs however you like, with embroidery or stripes (or even puff paint!). You could even use a color-changing or multi-colored yarn for more visual appeal! Use pastel colors or bright colors, it’s your choice! The sky’s the limit when it comes to decorating Easter eggs!
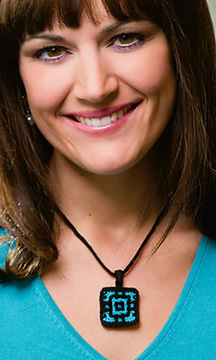
If you’re like me and love to crochet jewelry, here is a FREE crochet pattern, compliments of Annie’s and the “Knit and Crochet Now!” TV show. I designed this necklace a few years ago in the “Intermeshing Crochet” technique, in which 2 layers of crochet mesh are crocheted/woven together to make one layer of “intermeshed/interlocked” fabric! To do this technique, you crochet one row at a time, switching back and forth between the rows to make them intermeshed together. It’s a great technique and this necklace is a nice, small project to give the technique a try. You can find the download for this FREE crochet pattern here.
Double Take Pendant Necklace
The pattern includes instructions for the pendant, the chain and the hanging loop. You supply 2 colors of size 10 crochet thread, a size 7 (1.65 mm) steel crochet hook, a needle, stitch markers and a jewelry clasp.
You can read more about this technique, see photos of both sides of the pendant (they are not the same!) and read the corrections to the pattern that I posted in this blog post. Note: If you’re going to make this necklace, please don’t forget to read and/or print out the corrections in this linked blog post. When the pattern was tech edited, the turning chains were moved incorrectly to the wrong rows. Most of the black turning chains should be “ch 4” and most of the blue turning chains should be “ch 2”.
I hope you enjoy this quick project and will share photos of your finished “Double Take Pendant Necklace” with me.