Have you ever seen a crochet pattern that instructs you to work in the back “bump” (or back “bar” or back “hump”) of the foundation chain? Do you know what part of the foundation chain this is? If you’ve never worked in the back bump of the foundation chain, you’re in for a treat! This is the best thing since sliced bread (well, almost)!
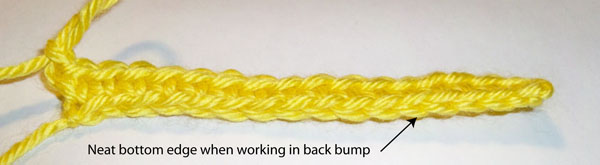
So why would someone want to work into a different loop of the foundation chain than they always work into? In this instance, it is because working in the back bump gives you a nice bottom edge of your project that mimics the top edge of the project. This is what I’m talking about:
Can you see the chain edge at the bottom? Doesn’t that look nice? I LOVE working into the back bump of the foundation chain. Not only does it look nice, it gives a stronger bottom edge, as well.
I’ve made a tutorial for you explaining how to work into the back bump of the foundation chain. You can find it on my “tutorials” page here. I hope you’ll check it out and give it a try. You’ll be glad you did!
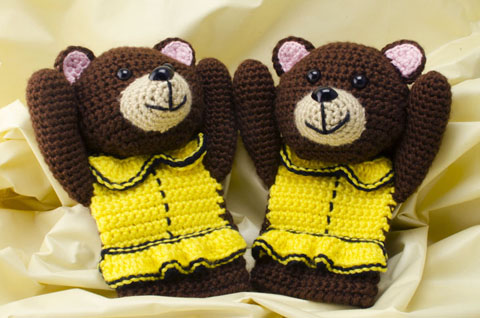
I’ve been busy working on more crochet patterns for you. Introducing my newest crochet pattern, “Bear Mitts”. Right now, this pattern is only sized for teens through adults (it’s not available in a child’s size yet, but I’ll work on that as time allows). What teenager or young adult (or “young-at-heart” adult, for that matter) wouldn’t love some adorable bear mitts in their stocking this Christmas? Without further delay, here is my bear mitts pattern for your crocheting pleasure:
Bear Mitts
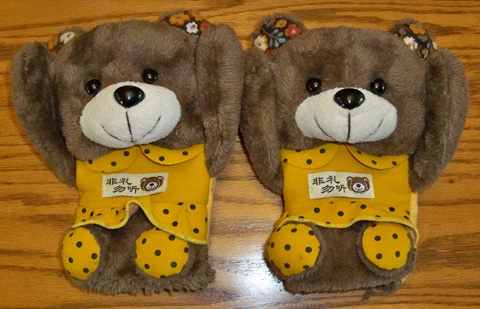
I’d like to tell you a little about this crochet pattern. I got the inspiration earlier this year when my middle son and his wife were here visiting from China. My daughter-in-law brought some adorable bear mitts with her from China and once I saw them, I fell in love with them! Here’s a photo of the original bear mitts from China:
Chinese Bear Mitts design inspiration
Aren’t they adorable? I think they’re so cute! Anyway, I decided within a few minutes of seeing them that I’d design some crocheted bear mitts similar to them. And I’m glad I did.
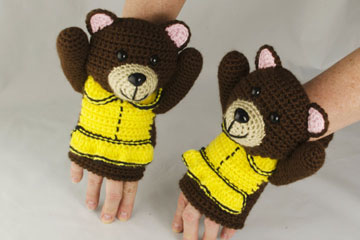
These bear mitts are a lot of fun to make! The head, muzzle and arms are made just like amigurumi pieces and are stuffed to keep their shape. The mitt body piece is made from the top to the bottom with the yellow dress on the front worked at the same time as the brown body. The skirt ruffle and collar are worked separately, then sewn onto the body afterward. The head and ears are separate pieces, too. Because the original Chinese bear mitts had the top of the arms sewn to the side of the face, I decided I’d do this, too, so they don’t flop around while being worn. I didn’t like the way the feet were coming out in crochet, so I decided my crocheted bear mitts didn’t need feet (besides, the fingers sticking out at the bottom can be the bear’s “legs”!). I chose to use safety eyes and noses because I like the look of them, but you could embroider the faces on your bear mitts, if you choose. This is how they look worn:
Bear Mitts worn
They’re really fun to wear! If you don’t care for the yellow dress, you can simply make your bear mitts with a different color of dress (it’s absolutely your choice on that part of the pattern)! And if you’d like to embellish your bear mitts with buttons or bows, I think they’d look great with those, as well (I think a bow at the top of the head or off to one side would be adorable!).
The 16-page written pattern for these Bear Mitts includes many photos of the individual pieces for ease of identification and construction.
As always, if you have a question about one of my patterns, I provide free pattern support for all of my patterns here at The Crochet Architect. I learn as much from my customers’ questions as they do from my answers (and I always welcome questions). That’s how we all learn, right?
If you’re an intermediate crocheter (or an adventurous beginner), I hope you’ll give these bear mitts a try. They’re great for helping to keep your hands and wrists warm! And they’re very stylish, too! You can find the pattern right here for sale on our pattern page.
We all love scarves for keeping our necks warm during the cold winter months! I know I do! But there’s one thing even better than a scarf because it doesn’t fall off easily or become crooked with wear. That item is a “cowl”! If you’ve never heard of a cowl, it’s basically the same thing as an “infinity scarf”, which is a scarf that is joined together at the ends into one big, long tube. There are no ends to be concerned about being straight or even when wearing it. You just put the cowl over your head and wrap it around your neck once or twice, depending on your preference of length and neck warmth! And presto! You have a beautiful and functional accessory to proudly wear or give as a gift. And it’s one of those gifts that doesn’t have to be a certain size, too!!!
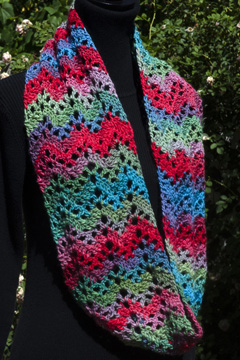
This year, I started designing lots of scarves and cowls, since they’re a lot of fun to crochet and wear (and don’t require sizing!). I recently had my first cowl design published in the Dec. 2014 issue of Crochet World magazine and I have a new cowl pattern for you right here on The Crochet Architect. It’s called the “Unforgettable Ripple Cowl”, named after the Red Heart Boutique “Unforgettable” yarn that I chose for this cowl. This yarn comes in some absolutely “gorgeous” colors! It’s 100% acrylic, so it’s machine washable, which is a big plus for anything you might get dirty (not that I get my cowls dirty, but it could happen and I want to make sure I can get it clean without felting it)! I really enjoy crocheting with this soft, squishy yarn. Anyway, here is my new cowl design:
Unforgettable Ripple Cowl
Aren’t the colors pretty? I chose a ripple stitch pattern for this design because I like the way the changing colors are shown off to their best advantage. It’s also an easy pattern to memorize and crochet, as well as being quick to make! This cowl uses only 1 skein of the Unforgettable yarn, making it an economical project, too. There is only 1 seam to sew to join the bottom and top edges to form the tube-shaped cowl, as well as 2 tails to weave in (that’s not bad considering all the beautiful colors that change on their own!).
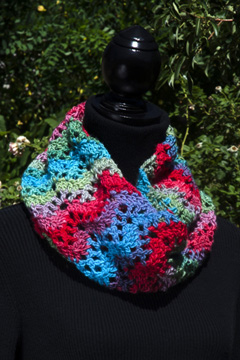
Here’s a photo of the cowl worn doubled:
Unforgettable Ripple Cowl worn doubled
I’m really going to enjoy wearing this cowl during the winter, which isn’t too far off now (we had our first frost on Sunday night, so winter is right around the corner here in the higher elevations of Arizona!).
Have you started any new scarf or cowl patterns lately before winter hits where you live? Do you have someone on your Christmas list who loves scarves and cowls?
To purchase the “Unforgettable Ripple Cowl” pattern, just check out our “patterns” page!