It’s that time of year again! Time for Christmas decorating, singing, spending time with loved ones and crocheted gifts/projects!
These patterns have been many years in the making! I designed these Christmas stockings way back in 2011, but never got around to crocheting them until last year. Now I’m finally publishing the patterns for your enjoyment in decorating your home, too!
Introducing my Mosaic Christmas Stocking patterns. They come in 2 different sizes (large and small), along with the option to purchase both stocking patterns together for a special price.
Each stocking is crocheted in one piece from the mosaic cuff down to the toe. The body of each stocking is worked in a textured stitch pattern with increases and decreases, along with short rows to form the heel and toe.
I used bulky weight yarn for these stockings so they work up in no time!
Check out the patterns today and start crocheting some new Christmas stockings tomorrow! You can find each pattern on the Crochet Patterns “Home Decor” pagehere.
Do your finished crochet projects pile up because you crochet faster than you can give, gift or use the finished projects? I know mine do! Especially since I’ve been designing for publication for over 25 years. Sometimes the finished projects are returned to me after the design has been published in a book or magazine. Other times, I’ve crocheted extra pieces for my self-published designs on my website (or in my Etsy or Love Crafts shops). Either way, they’ve been piling up and it’s time they went to their new “forever homes”!
I started listing these finished projects/items recently in my Etsy shop. If you’re short on time and can’t finish all the lovely handmade projects you’ll be gifting this holiday season, check them out here. I’ll add to these listings for finished items that are hand crocheted or knitted, (mostly by me, although a few were commissioned from contract crocheters) as often as I can.
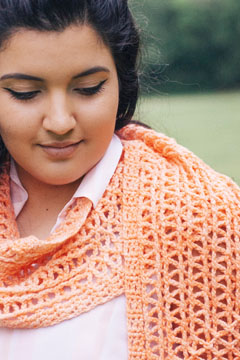
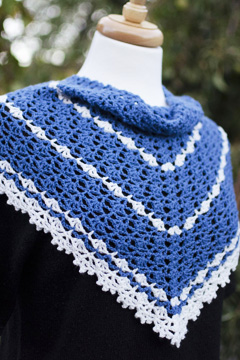
Here are a few samples of what you can find in my Etsy shop for finished items to purchase:
So far, I have some afghans, rugs, shawls, cowls and scarves for sale. There is only one of each item for sale. Once they’re gone, they’re gone! So if you’re interested in one or more of them, don’t delay!
I wish each of you a blessed holiday season full of family, friends and lots of love!
Who doesn’t love a new baby blanket? I certainly do!
These baby blankets have been finished for many years (8-9 years to be exact), but I never got around to publishing them (what can I say except life has been busy)! It’s about time that they’re available for you to make!
The first is my Snuggly Chevron Baby Blanket. This blanket is super soft and squishy using boucle yarns. I used 2 strands of a light worsted weight yarn for the center and 1 strand of a bulky weight yarn for the edging. If you’ve got both weights of boucle yarns in your stash, this is a great way to use them together! Of course, you don’t have to use boucle yarn. You can use any type of yarn you desire in whatever colors you desire (I personally love soft baby colors).
The second is my Textured Columns Baby Blanket. This blanket is also soft and squishy, but it’s made using sport weight and light worsted weight acrylic yarns. I used a Hobby Lobby yarn for the center and Caron Simply Soft yarn for the edging (I know, it’s not “technically” light worsted weight, but it’s a lot thinner than many other worsted weight yarns, so it worked out just fine).
If you’ve got a baby coming or know someone who has a baby coming, these blankets would make great baby shower gifts! The Snuggly Chevron Baby Blanket is going to my youngest son and DIL for their second child, due next month.
Check out the Snuggly Chevron Baby Blanket here and/or the Textured Columns Baby Blankethere.
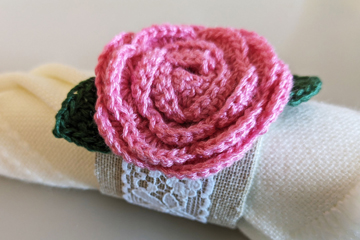
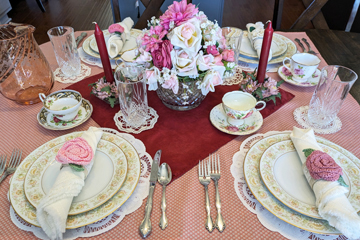
Last Spring, the the local church that my husband and I attend had a ladies tea. Since I have lots of pretty china/porcelain dinnerware, along with tea cups and saucers (thanks to my Mom), I offered to set and host a table of ladies. I had so much fun planning and decorating the table that I thought I’d share something crafty that I made for my decorated table with others.
I had plenty of crocheted flowers and leaves already made (and I love the look of crocheted flowers and leaves), so I decided to make some Floral Napkin Rings for my decorated table. I looked for inspiration/instructions online and I found some to help me decide how I wanted to make my napkin rings.
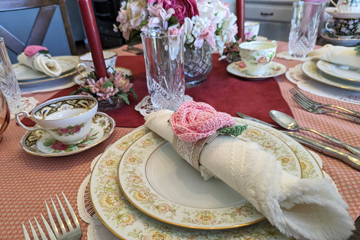
Here’s a close up of one of the floral napkin rings that I made (each one has a different stye flower and/or color):
After I made the napkin rings, I decided to try some things out on my table at home to see how they looked. Here’s my set up table at home after I figured out what worked well together:
I used some lacy crochet coasters that I had made previously under the glasses and some lacy paper placemats under the plates, as well. The pretty flower centerpiece was something I inherited from my mom (she had great taste in just about everything!).
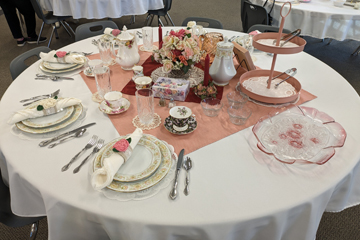
Here’s my set up table at church (we purposely left a few places unset at each table so nobody had their back to the speaker):
Last year, I typed up the instructions for making these napkin rings and I thought I’d finally share them with anyone who would like to make some for themselves or to give as a gift. Since the flower patterns are all copyrighted, I can’t share those with you. However, I’m sure you’ll find plenty of patterns for crocheted flowers in books, magazines and online to use! You can download the pdf instructions for these Floral Napkin Rings here.
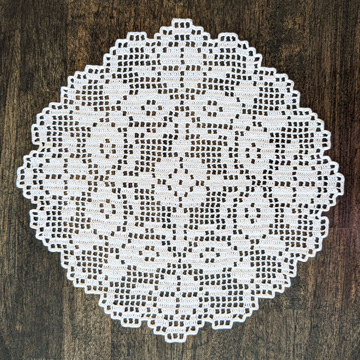
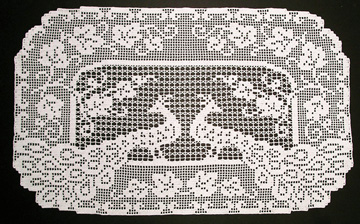
Do you want to learn a new crochet technique? I’m going to be teaching some crochet classes this August at the IOLI Convention in Dallas, TX. There will be all kinds of lace techniques taught (like bobbin lace, tatting, etc), but since my specialty is crochet, I’ll be teaching crochet classes. One of my favorite crochet techniques is Filet Crochet. If you haven’t heard of it, here are a few samples:
Filet Crochet is made mostly from charts, since each row changes so much and written instructions for each row would be very, very long! It’s usually done with crochet threads and steel crochet hooks, but you can also make larger projects with yarn and larger hooks.
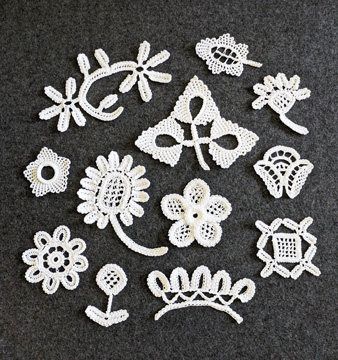
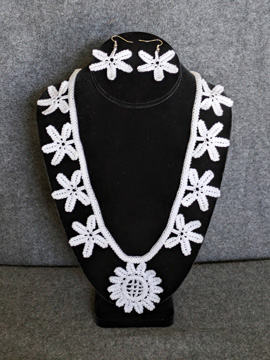
The other class I’ll be teaching is something that’s really new (at least to the US). It’s called Veronese Crochet Lace. I was introduced to this technique by someone at the IOLI Convention in 2022 in Mesa, AZ. She had this book from Italy with some English in it and some step-by-step photos. I looked at the book and decided I’d like to purchase it to learn this technique. So now, 3 years later, I’m ready to teach this fascinating technique to others! Veronese Crochet Lace originated in Verona, Italy! Here are some samples of Veronese Crochet Lace:
I made all the small pieces in the top photo from the book, along with some other really old instructions for Veronese Crochet Lace that I was gifted from one of the authors of the book! I also designed and made the necklace and earrings set in the other photo. This technique is so fascinating because you don’t insert your hook into the same places as in typical crochet patterns. You also use a form of Tunisian Crochet in some of these pieces. I LOVE making (and designing) Veronese Crochet Lace!
The Filet Crochet Lace and Veronese Crochet Lace classes are 12 hours each, so there will be plenty of time to learn these 2 techniques.
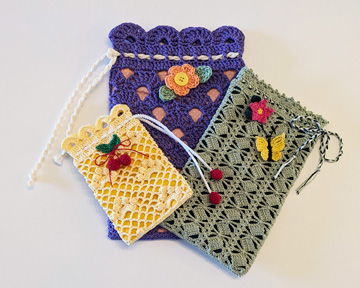
I’m also teaching a 6-hour (1 day) class on making crochet lace bags. Here is a photo of the bags that are available to make in this class:
To learn more about the IOLI Convention and see the full list of wonderful classes being taught, check out this webpage.
I hope you’ll continue learning more crochet techniques and stitches!
After too many months of not blogging, it’s time I got back up on the horse! So here goes.
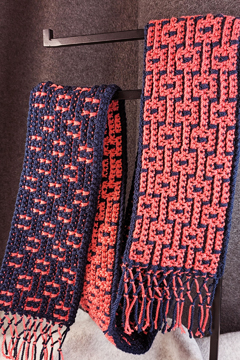
If you’re anything like me, you absolutely ADORE reversible crochet projects, especially scarves! I hate having a wrong (ugly) side on my scarves, so I designed some scarves that are reversible (and a reversible baby blanket, too). Here they are:
Reversible Stripes Baby Blanket
Striped Scarf from Reversible Scarves pattern
Spotted Scarf from Reversible Scarves pattern
Spots and Stripes Scarf from More Reversible Scarves pattern
Bordered Spots Scarf from More Reversible Scarves pattern
All of these projects/patterns use either worsted weight yarn or light weight yarn (I used acrylic yarns). An H/8 (5 mm) hook or a G/6 (4 mm) hook is used, as well.
All of these projects are worked alternating rows of light color, then dark color, back and forth. However, one of the fabulous points about these patterns is you DON’T finish off each row, leaving lots of tails/ends to weave in! I DON’T enjoy weaving in ends, so when I can design something that has a minimum amount of ends to weave in, that’s a HUGE PLUS in my book! At the end of the row, you simply drop the old color and insert a stitch marker in the last loop to secure it. Then you pick up the opposite color yarn, remove the stitch marker from that loop, turn your work and crochet the next row with the new color. If you’d like to see me demonstrate doing this (and the first 3 rows of these reversible patterns/projects), check out my new YouTube video here.
The Reversible Scarves pattern and More Reversible Scarves pattern both contain written instructions, along with symbol crochet charts, for crocheting 2 different, but similar reversible scarves. All of these scarves are made with 2 contrasting colors of yarn. Check out these patterns, as well as my other crochet accessory patterns here.
The Reversible Stripes Baby Blanket pattern is made with either a multi-color and a solid-color yarn or 7 solid colors of yarn. You can find that pattern, as well as my other baby patterns here.
I hope you enjoy crocheting some reversible projects very soon!
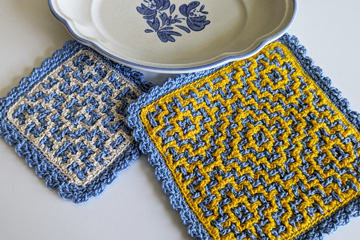
Have you tried Overlay Mosaic Crochet, but can’t quite get it to come out right? Well, there’s a fascinating crochet technique called Woven Crochet. It can look a lot like Overlay Mosaic Crochet, but it’s worked completely differently (and it’s quite fun)! It’s also reversible!!!
I was first introduced to this technique last year when an acquaintance showed me a hot pad/potholder that she had. I was intrigued by it and asked to borrow it. She said “yes” and I proceeded to analyze the hot pad to see how it was made. I found that the woven chains were continuous, not separate for each row, which made for WAY less ends to weave in, which I like!
On and off for the past year, I’ve been playing around with this technique and coming up with new Woven Crochet patterns for your enjoyment. And I decided to make a YouTube video demonstrating how to do Woven Crochet, to go along with the patterns. I’d like to introduce my new Woven Crochet patterns to you.
Persimmon Flower Woven Hot Pad & Coaster
Bullseye Woven Hot Pad & Coaster
Stairstep Woven Hot Pad & Coaster
Squares Woven Hot Pad & Coaster
Check out these new patterns here. If you purchase all 4 patterns, you can receive a $4.00 discount by entering the code “WovenCrochet” at checkout (code is valid indefinitely).
To learn how to do Woven Crochet, watch my free YouTube video.
I hope you enjoy learning this new (to me) crochet technique.
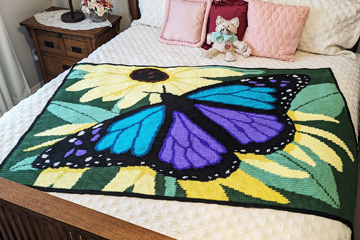
Introducing my Majestic Butterfly Afghan! This afghan was previously published many years ago by Annie’s, but has since been retired. I recently received the copyright back to this beauty, so I wanted to make the pattern available to other crocheters instead of it never being available again!
This beautiful afghan is made in the Intarsia Crochet technique with sc stitches used throughout. Another term that is used for this crochet technique is “graphghan”. In this afghan, the first and last 2 rows are worked in one color (black), but the rest of the rows are worked with color changes throughout. If you’re a fan of kits, the kit is available through Mary Maxim here.
There are at least 2 ways to work the color changes. All ways involve working the last stitch of one color until you have the last 2 loops on the hook like this: “insert hook in next stitch and draw up a loop, drop old color, yarn over with new color and draw through both loops on hook”. The different ways to work the Intarsia technique involve where to drop the old color. One way has the old color dropped to the front of the work, whether you’re working on a right-side row or a wrong-side row. The other way has the old color dropped to the wrong side of the work. That means you’ll be dropping the old color to the back of the work when working a right-side row and to the front of the work when working a wrong-side row.
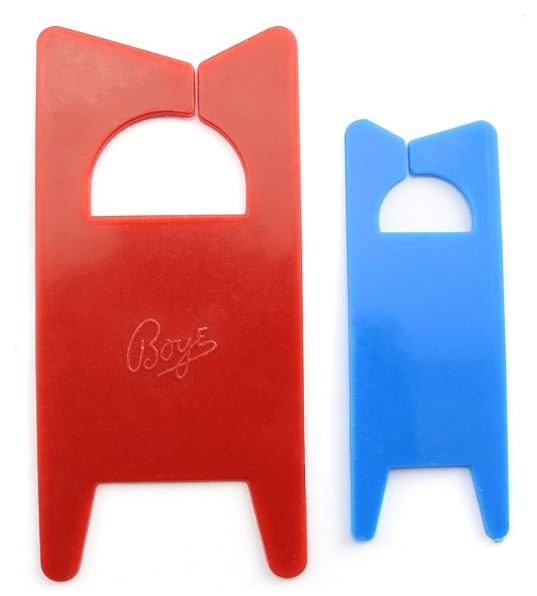
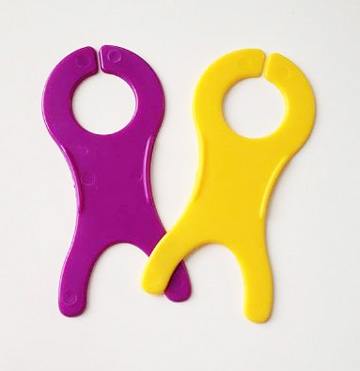
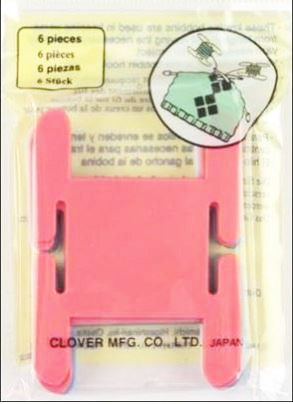
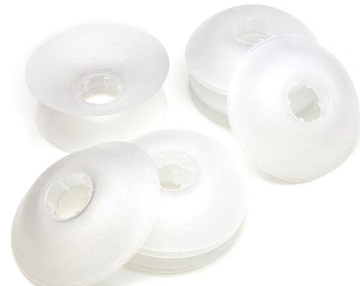
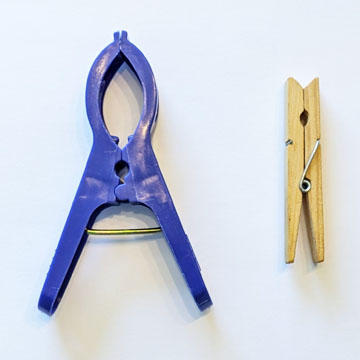
The key to working intarsia crochet (or graphghans) is to use bobbins for each of the separate colors used in the rows. This helps keep the yarns from getting tangled across the rows. The bobbins can be nothing more than a simple DIY type made from cardboard. They can also be made from plastic, coming in many different shapes and sizes. You can also use clothespins of various sizes, made from various materials such as plastic or wood. I found a year or two ago at Dollar Tree. They were $1.25 for 6 of them. They can also be round, encasing the wound yarn inside them. Here are some examples of bobbins used for Intarsia Crochet:
Whichever type(s) of bobbins you use, you’ll need to wind them with the yarn colors you’ll be using. You can wind lots of yarn on each bobbin or figure out the amount of yarn needed for a certain section that will be worked with that color and only wind the amount of yarn you’ll need. The way I figure out the amount of yarn to use is by working a gauge swatch to know the number of sc stitches I get with the hook size I’ll be using. Then I count the number of squares of that color in the section I’ll be working on the chart and divide by the number of stitches I got to come up with the number of yards to wind on that bobbin. I ALWAYS add another 18” – 36” of yarn for wiggle room, as well as leaving a tail at the beginning and end of that section of stitches to weave in and/or work over.
Weaving in the ends can be tedious, but well worth it if done securely. When possible, weave the ends in several directions so they don’t worm their way out when the item is used extensively, like an afghan. ALWAYS weave in the ends in a section of the same color, NEVER in a section of another color!
When working from a chart, each square represents one stitch. If the chart has many rows and many stitches in each row, print out sections of the chart on separate pieces of paper and tape them together. If needed, enlarge the chart to do this. The chart for my Majestic Butterfly Afghan is broken up into 4 “quarter” charts for this purpose (top left, bottom left, top right and bottom right). If the chart was just one chart on the page, the squares would be too small to see accurately. With the chart broken up into 4 charts, the squares are much easier to see, since the squares are larger.
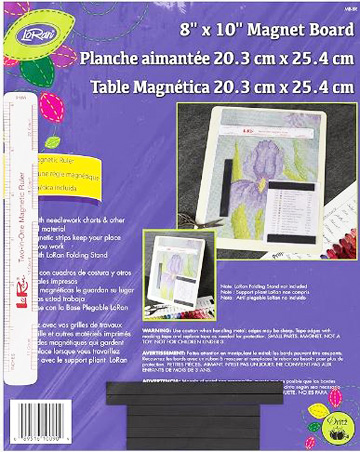
One thing I HIGHLY recommend when following a crochet chart is to use a magnetic board. I’ve used mine for decades now! It’s great to use for all kinds of charted crochet projects and makes it so much easier to keep my place, even on small projects. On large projects like my Majestic Butterfly Afghan, it’s a MUST (in my opinion)! If the chart is too big for the magnetic board, you can mark off the squares/rows that you’ve worked with a sharpie, pen or pencil instead of using the board. I have 2 magnetic boards now and if needed, I could place them side by side to make a larger magnetic board (if working at a table and not in my living room chair, which is where I typically crochet at home). Here are just a few of the styles of magnetic boards available on Amazon:
The Majestic Butterfly Afghan is a large project that can be easier to work at a large table, such as a dining room table or crochet/craft table. It’s easier to work right-side rows while seated at one side of the table and wrong-side rows while seated at the other side of the table, minimizing the need to turn the afghan at the end of each row. Simply move yourself to the other side of the table instead (it’s good to get up and move anyway, so this helps us get some exercise during the project). It also eliminates the need to keep moving the multiple bobbins of yarn and straightening them out across the row! Another option would be to work the afghan at the table on top of a towel. When you finish a row, simply rotate the towel (with the bobbins) so you can work the next row.
Go HERE to purchase the Majestic Butterfly Afghan pattern and get started on your next masterpiece crochet project!
I hope you’ll give Intarsia Crochet a try. Start with a small, easy project and work up to this Majestic Butterfly Afghan or a similar intarsia/graphgan project. You’ll be amazed at what beauty you can create!
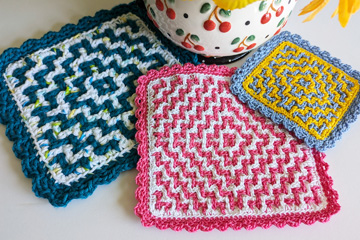
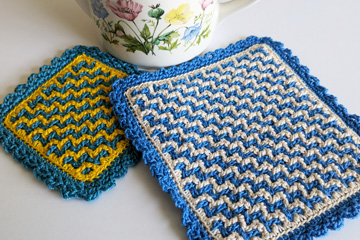
If you love Mosaic Crochet as much as me, you’ll really enjoy learning this new technique!
I was introduced to this technique a few years ago by a lady named Stephanie on Ravelry. She had an afghan that was crocheted by her great grandmother in the 1980’s. She couldn’t figure out how it was made and emailed me photos. I looked at them and figured out how the afghan was made. I thought this technique was so unique and fun, so I decided to share it with all of you through some new patterns and a free YouTube video to go along with the patterns.
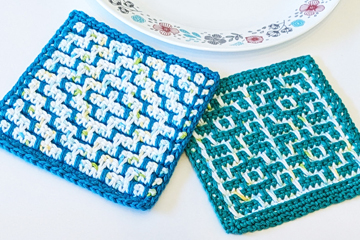
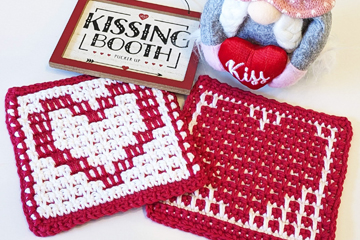
Do you love the look of reversible mosaic crochet projects? I certainly do! I love having projects with two “pretty” sides! And this technique is so much fun! You get a light side and a dark side with this Alternate Spike SC Mosaic Crochet technique.
To learn this new technique, check out my YouTube video.
And if you love this technique as much as I do, check out the patterns I’ve created for this fabulous technique! The 3 patterns I’ve created are my “Chain Links Scarf”, my “Geometric Mosaic Hot Pads” and my “Heart Mosaic Hot Pads”. Each of the hot pads patterns actually contains 2 designs for one low price.
I hope you enjoy learning this new Mosaic Crochet technique!
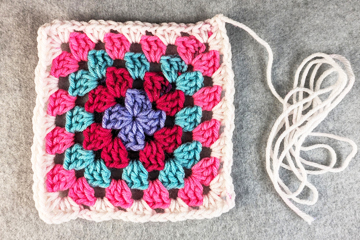
Have you seen the new Red Heart All in One Granny Square yarn? It changes colors at set lengths for each round of a 5-round granny square! I LOVE this idea! I had to buy a skein to try it out for myself! And it works great! Now there are only 2 ends to weave in instead of 10 ends on each 5-round granny square!
I’ve watched quite a few videos on YouTube for using this yarn. I think crocheters either love it or hate it! If you’ve experimented with making taller or shorter stitches, you should do just fine with this yarn. One skein makes 14-15 granny squares (6″ square). That’s enough for 1-2 scarves, depending on the length.
I’ve filmed a YouTube videodemonstrating working with this yarn. I’ve also put together a written, as well as charted, pattern to accompany this yarn. I didn’t like the short length left over after crocheting the granny square per the instructions on the yarn label, so I changed the pattern here and there to create a different granny square. Now I have 3-4 feet of leftover yarn at the end of each square, giving me plenty of yarn to join the squares together! I’m planning to make a scarf with some of these granny squares. And I’ll have more granny squares leftover for another project!
If you’d like a copy of the pattern, it’s available here.